|
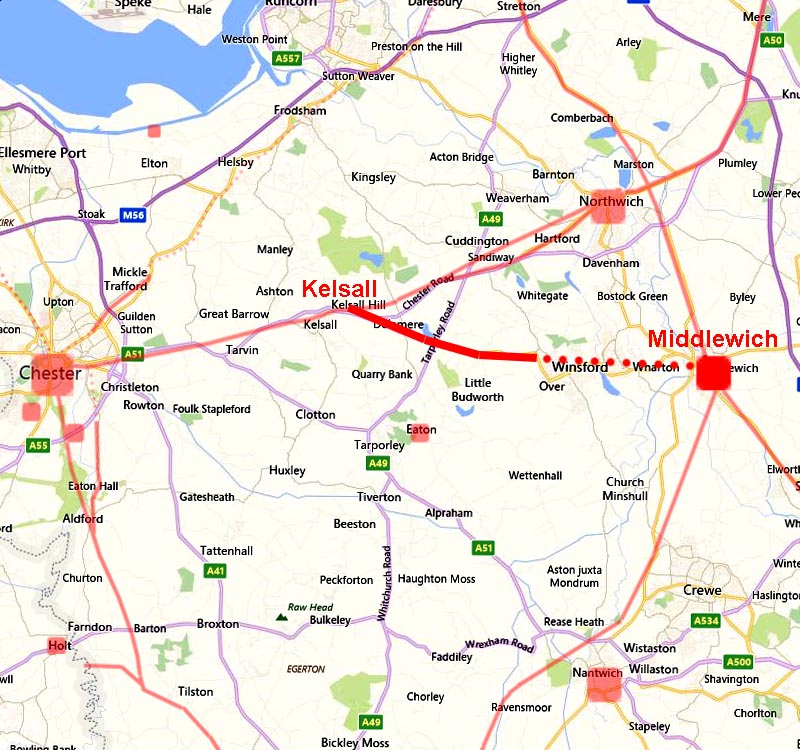
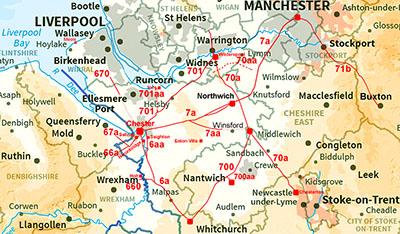
The Roman Road from Kelsall to MiddlewichMargary Number: 7aaDistance: 11 milesThere is no doubt as to the existence of this road but it is definitely a story of two halves. The first half was always obvious but the connection to Middlewich was a puzzle. Kirk was the first to suggest a route but even he was struggling and this was before Winsford's urban sprawl began. The previously known western section featured long straights so we should have been expecting the same for the eastern half. Kirk's route was anything but straight so always a big doubt. Fortunately, due to updated Lidar and field name discoveries by Neil Buckley, we can finally be confident of the route to Middlewich. Both halves were pretty straight! |
Historic Counties: Cheshire Current Counties: Cheshire HER: Cheshire
|
|
|
|
|
|
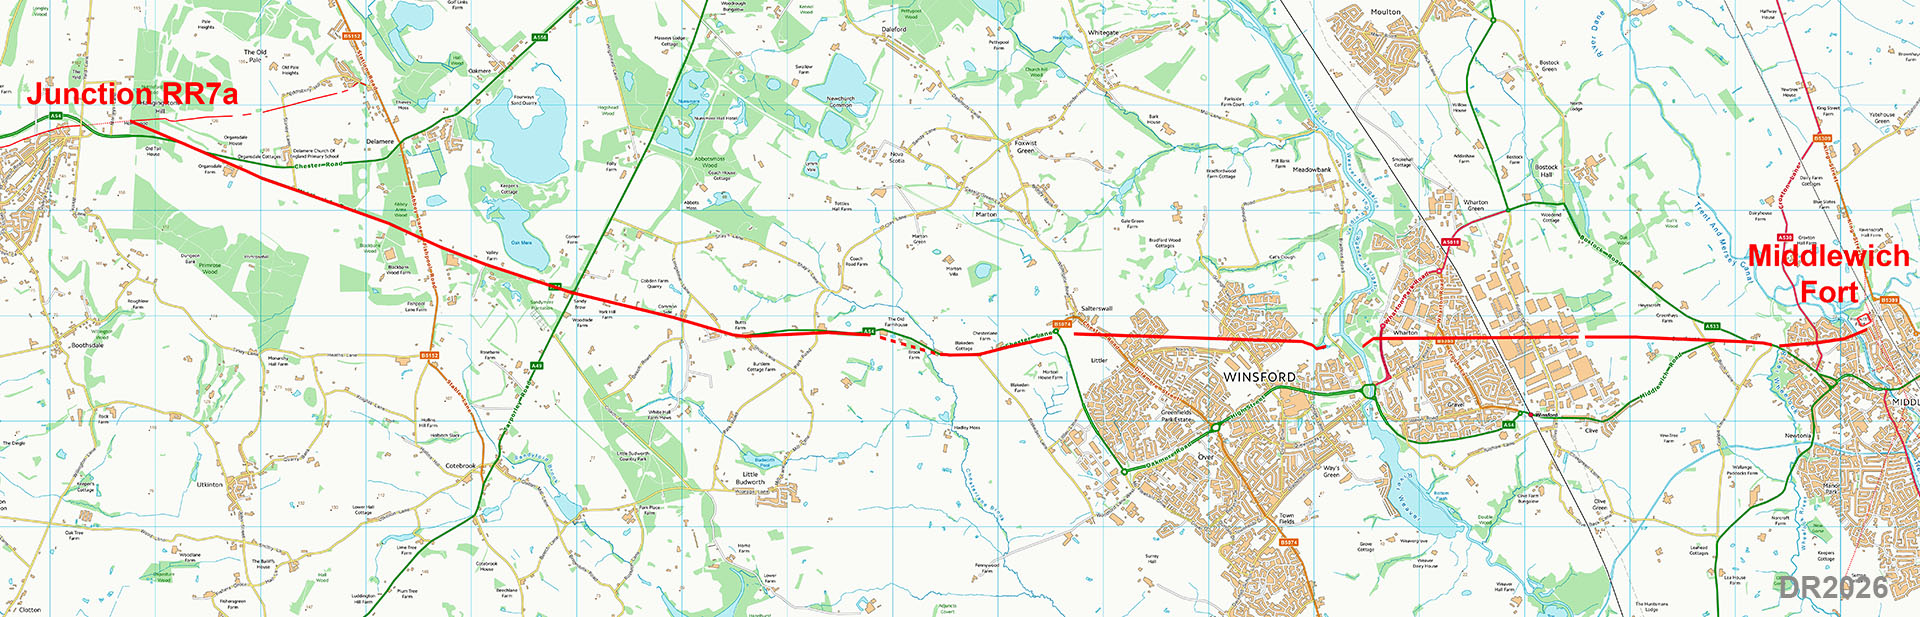
Full Route Map Very logical route. Very direct with, in effect, just two main alignments. |
Click for larger view |
 |
Nettleford Wood - looking towards the Junction This is the Northwich alignment through Nettleford Woods, Kelsall. The road is in a fabulous engineered cutting. Our road branches off just where the leaning tree is located. Image: Neil Buckley |
Click for larger view |
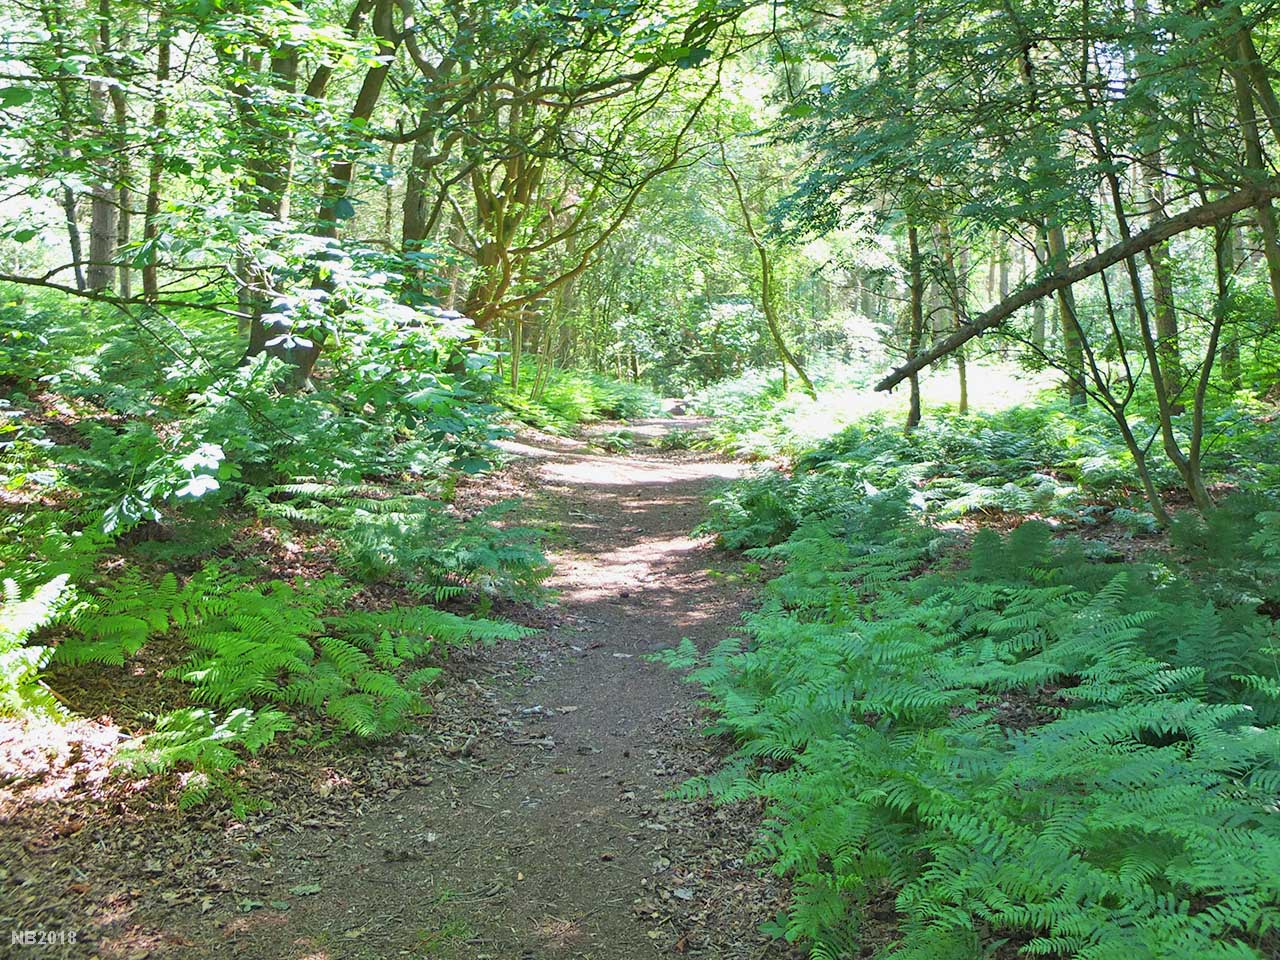 |
Nettleford Wood - Road Junction This is the actual junction and the start of our road to Middlewich. This leg is not used as a public footpath now so is much overgrown. Winter will obviously be best to view this stretch which is also in an excavated cutting. The cuttings are very clear in the 3D lidar image - see below. Image: Neil Buckley
|
Click for larger view
|
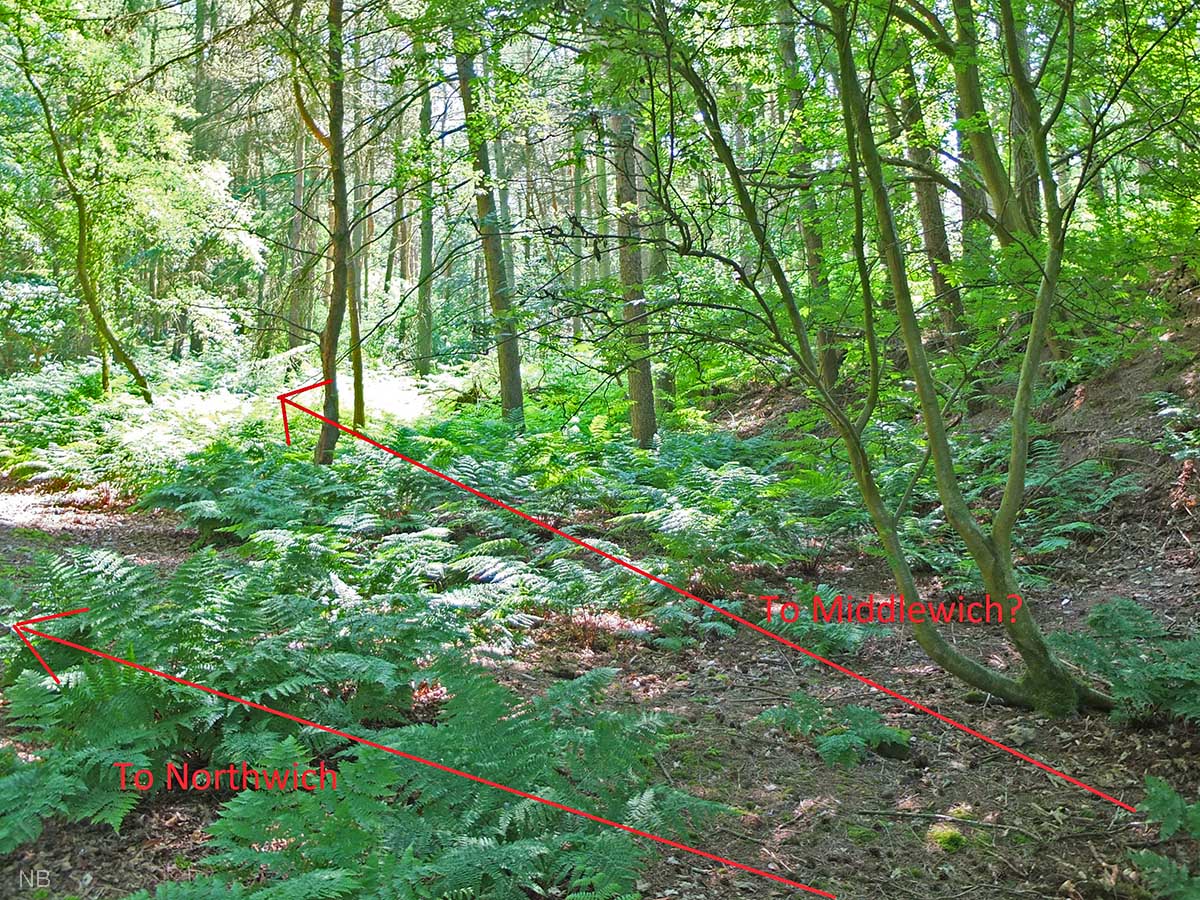 |
Looking Down the Cutting towards the A54 for Middlewich A fallen tree conveniently marks the course of the Roman Road. Even in winter this cutting is nowhere near as obvious as the one for Northwich. Image: Neil Buckley
|
Click for larger view
|
 |
Looking from the cutting towards the A54 At the bottom of the cutting the road heads of the A54 where is straightens before the modern junction - it merges approximately where the large sign is..
Image: Neil Buckley
|
Click for larger view
|
 |
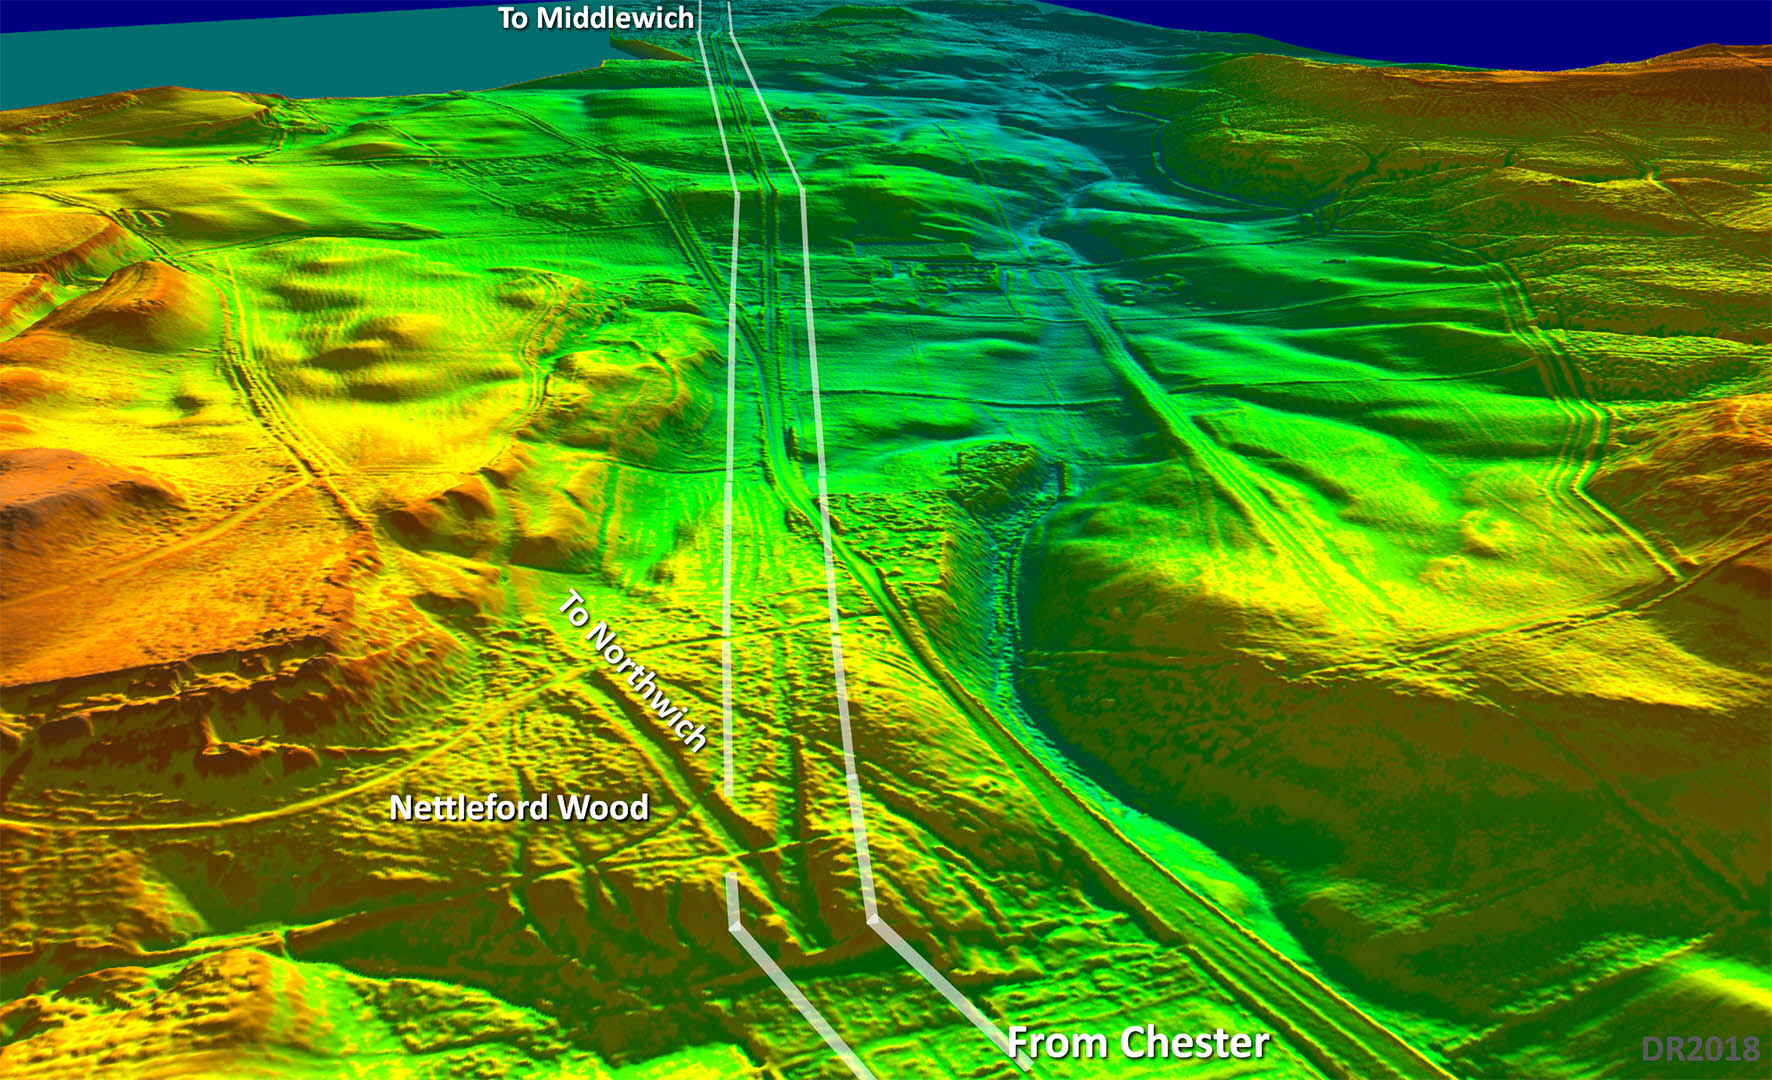
3D Oblique Lidar Image - Nettleford Wood looking towards Middlewich. In this DTM derived image trees, vegetation and buildings are removed making the Roman constructed cuttings very clear. These must be some of the most impressive in the north-west.
|
Click for larger view |
 |
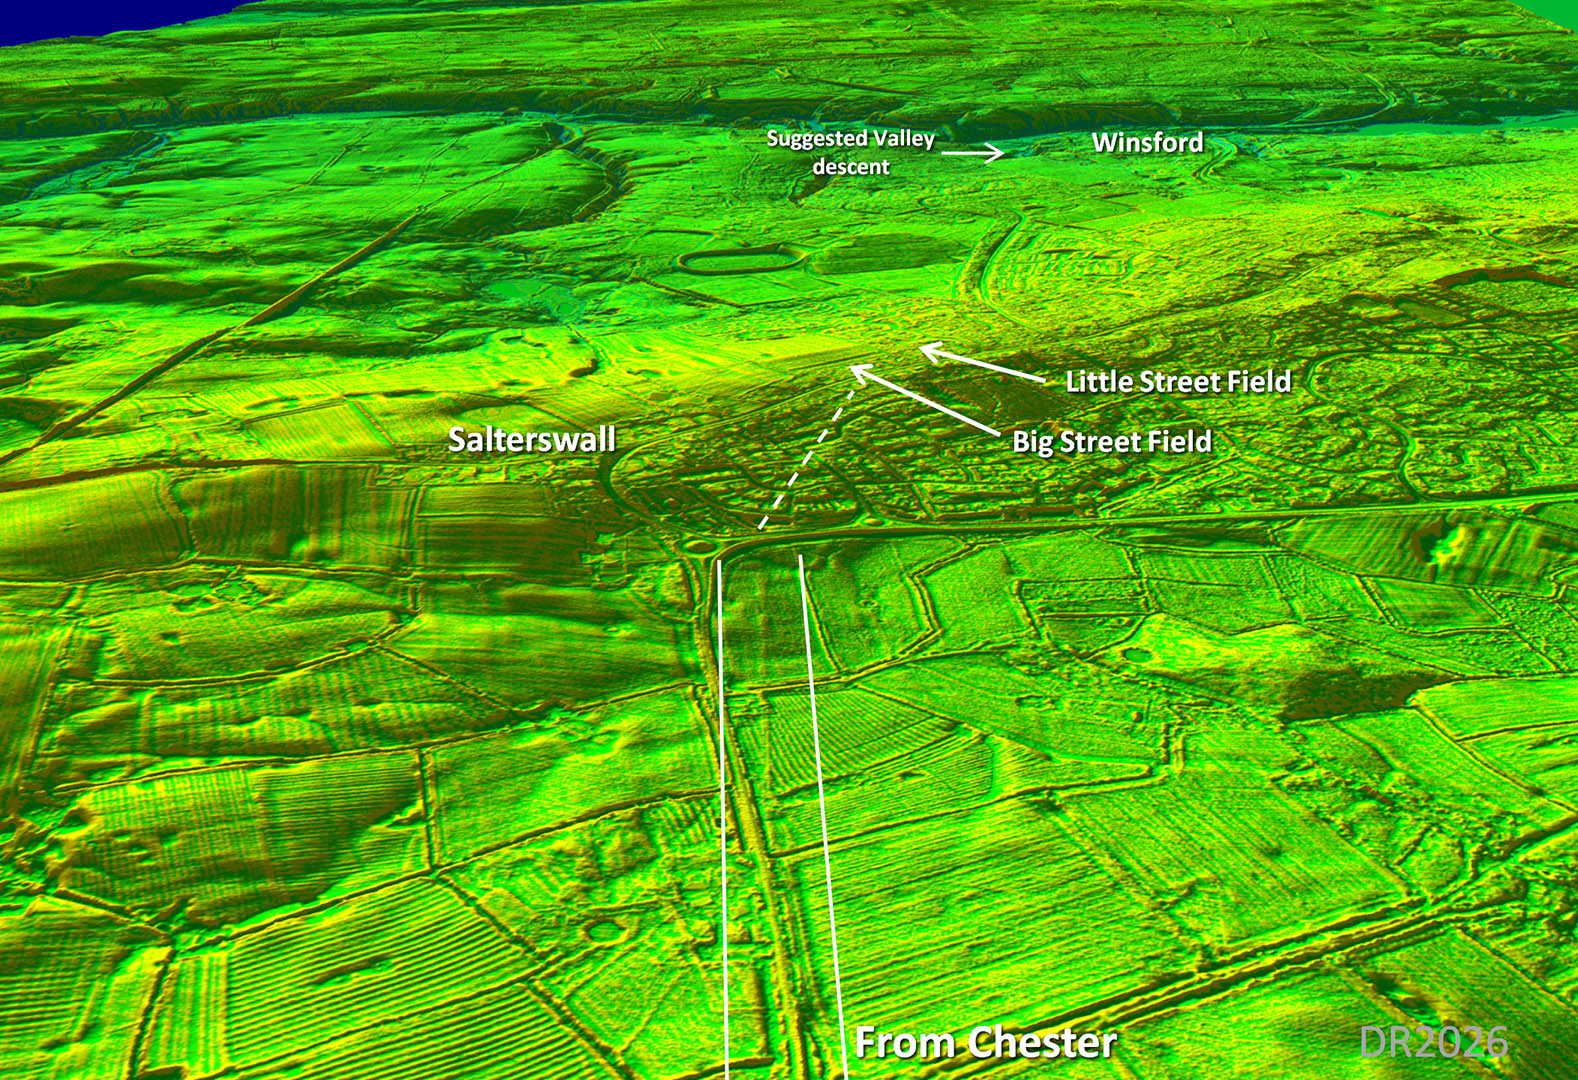
3D Oblique Lidar Image - Salterswall Clear Lidar evidence showing the Roman road agger heading towards Salterswall. To pass through the "street" fields identified by Neil Buckley then there would have been a turn here - dashed line. This line would match the probable road feature approaching the Weaver valley - see later - so high confidence.
|
Click for larger view |
 |
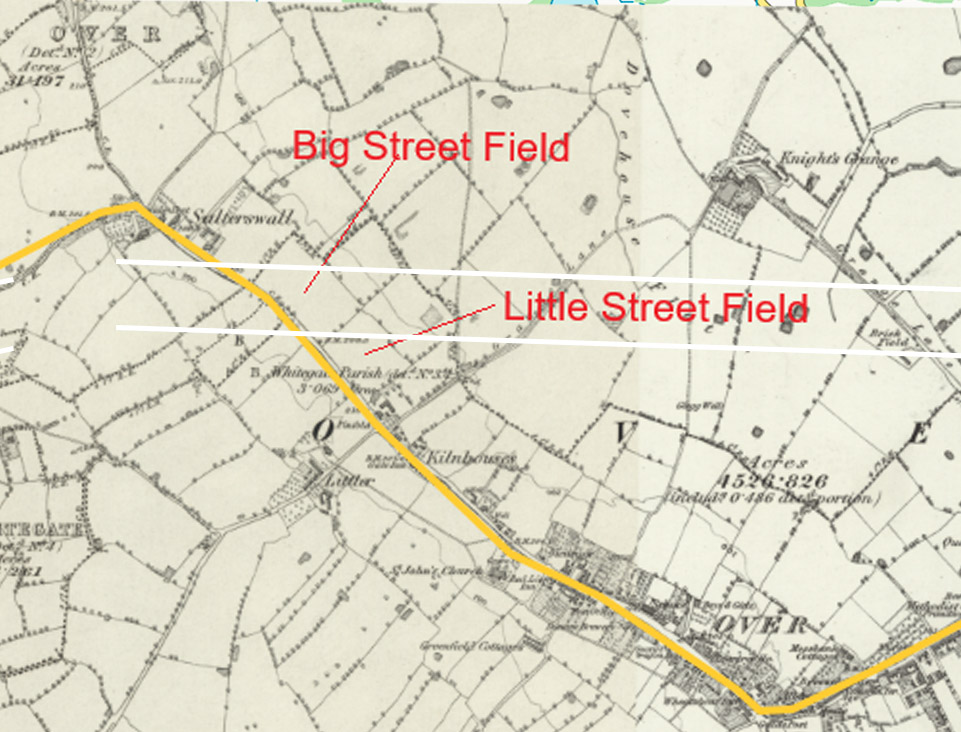
Ordnance Survey First Edition Map - Location of "Street" fields Neil Buckley located these three field names from Cheshire Tithe maps. These are an obvious reference to the Roman road, which must therefore pass through, along the edge or the corner of these fields. There is just one line of the Roman road which satisfies this requirement. It passes through Big Street Field and through the corner of the other 2. Route fixed! |
Click for larger view |
 |
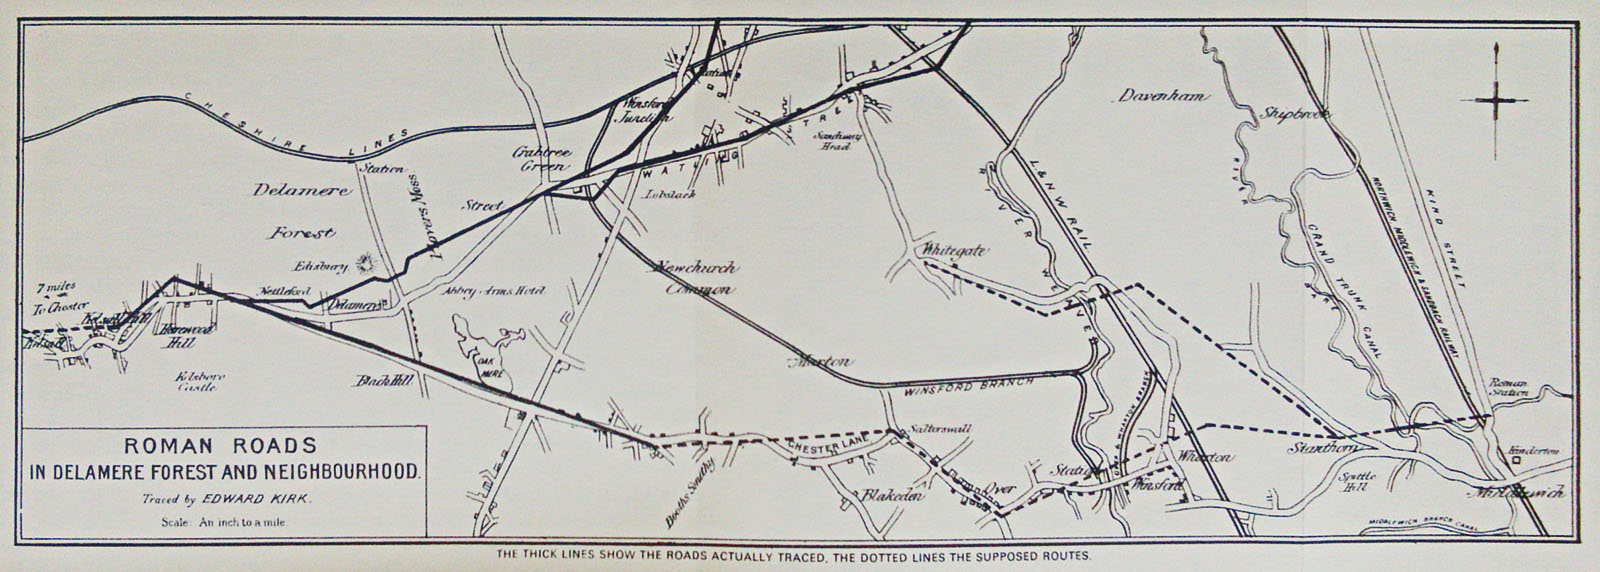
Kirk's Route Plan Kirk showed the eastern half of the road dotted so he was unsure. His route is very indirect which always made it doubtful. The rest of the road from Kelsall is so direct..It had to be straighter to Middlewich and so it proved. Note: Kirk's plans appear to have been inaccurately drawn by Watkin's book engraver. The Northwich route is particularly misplaced.
|
Click for larger image |
 |
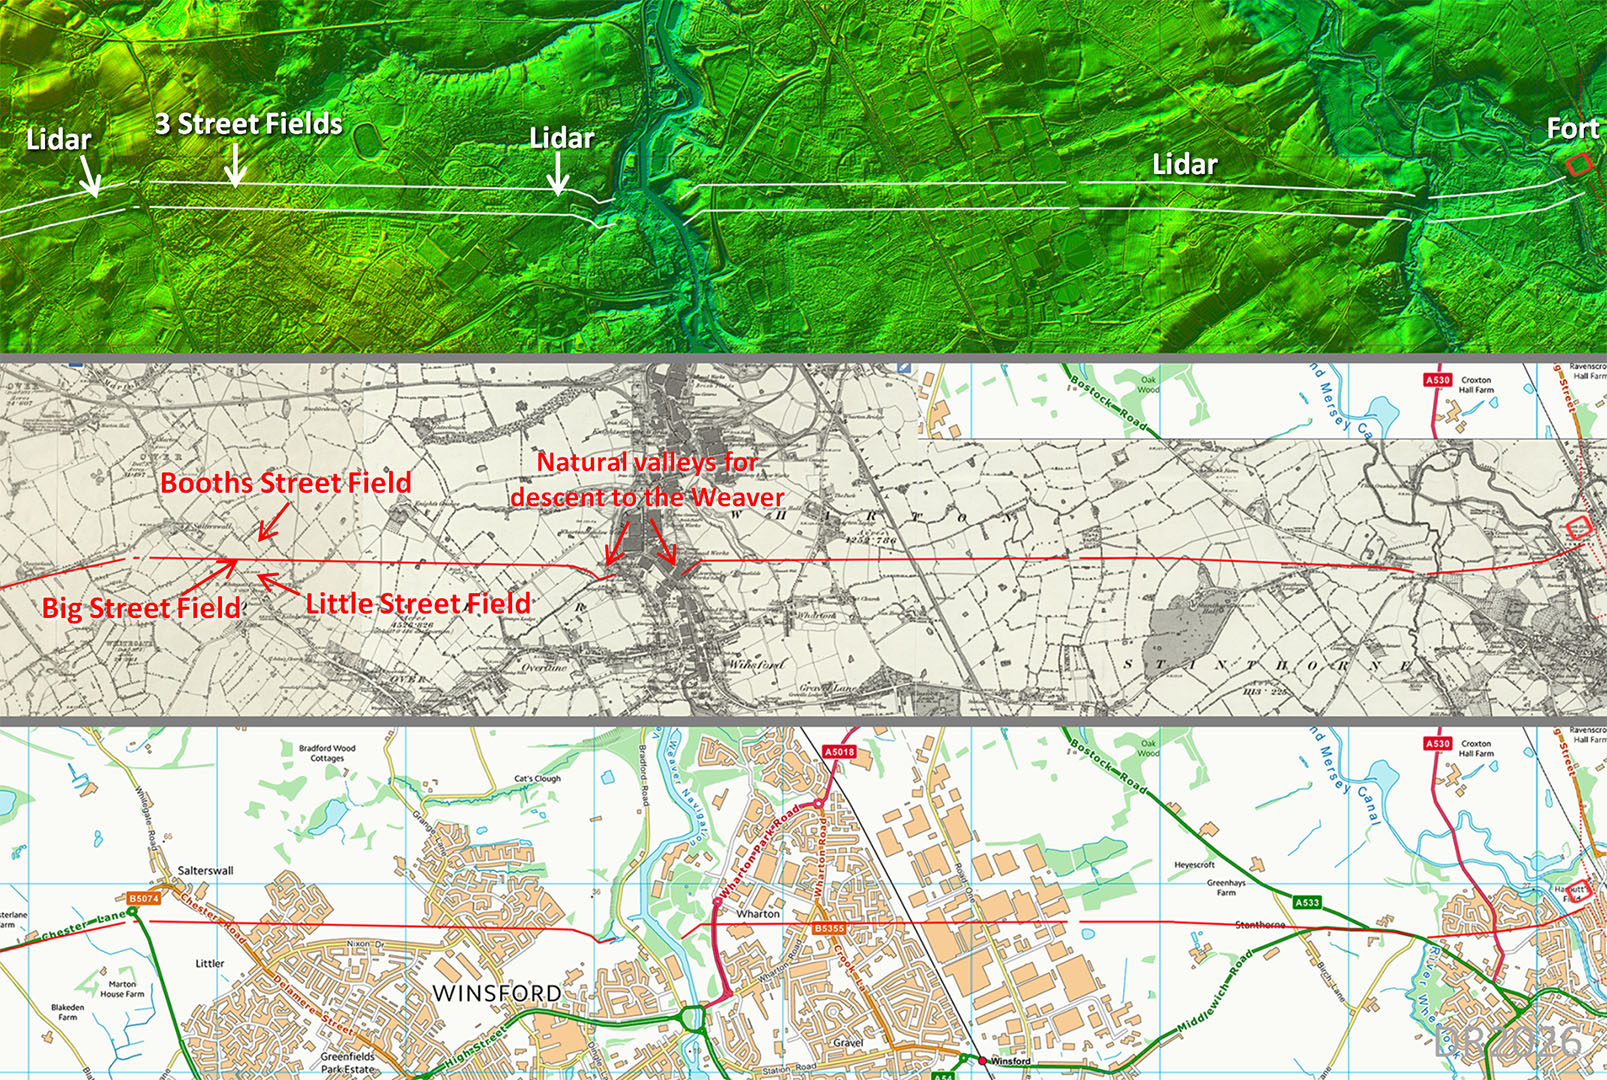
Salterswall to Middlewich - missing section located This was the final piece of the jigsaw. Unlike Kirk's route it is basically one alignment. All the clues fit together remarkably well - see below..
|
Click for larger image |
 |
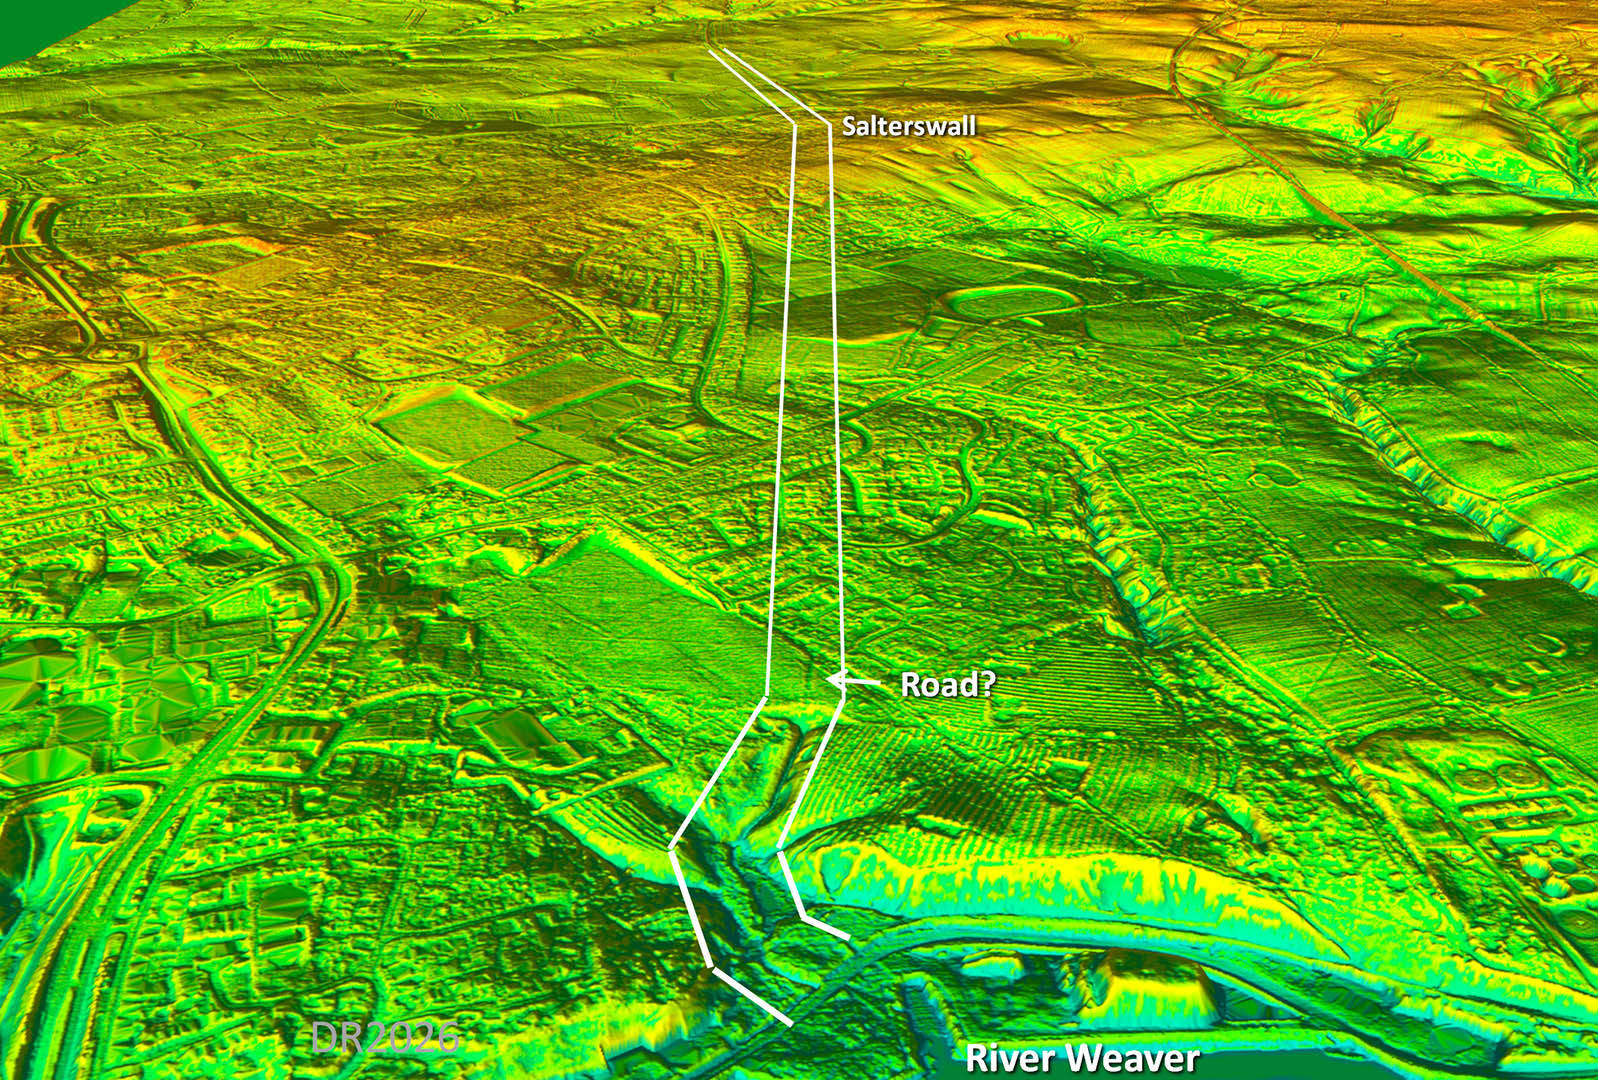
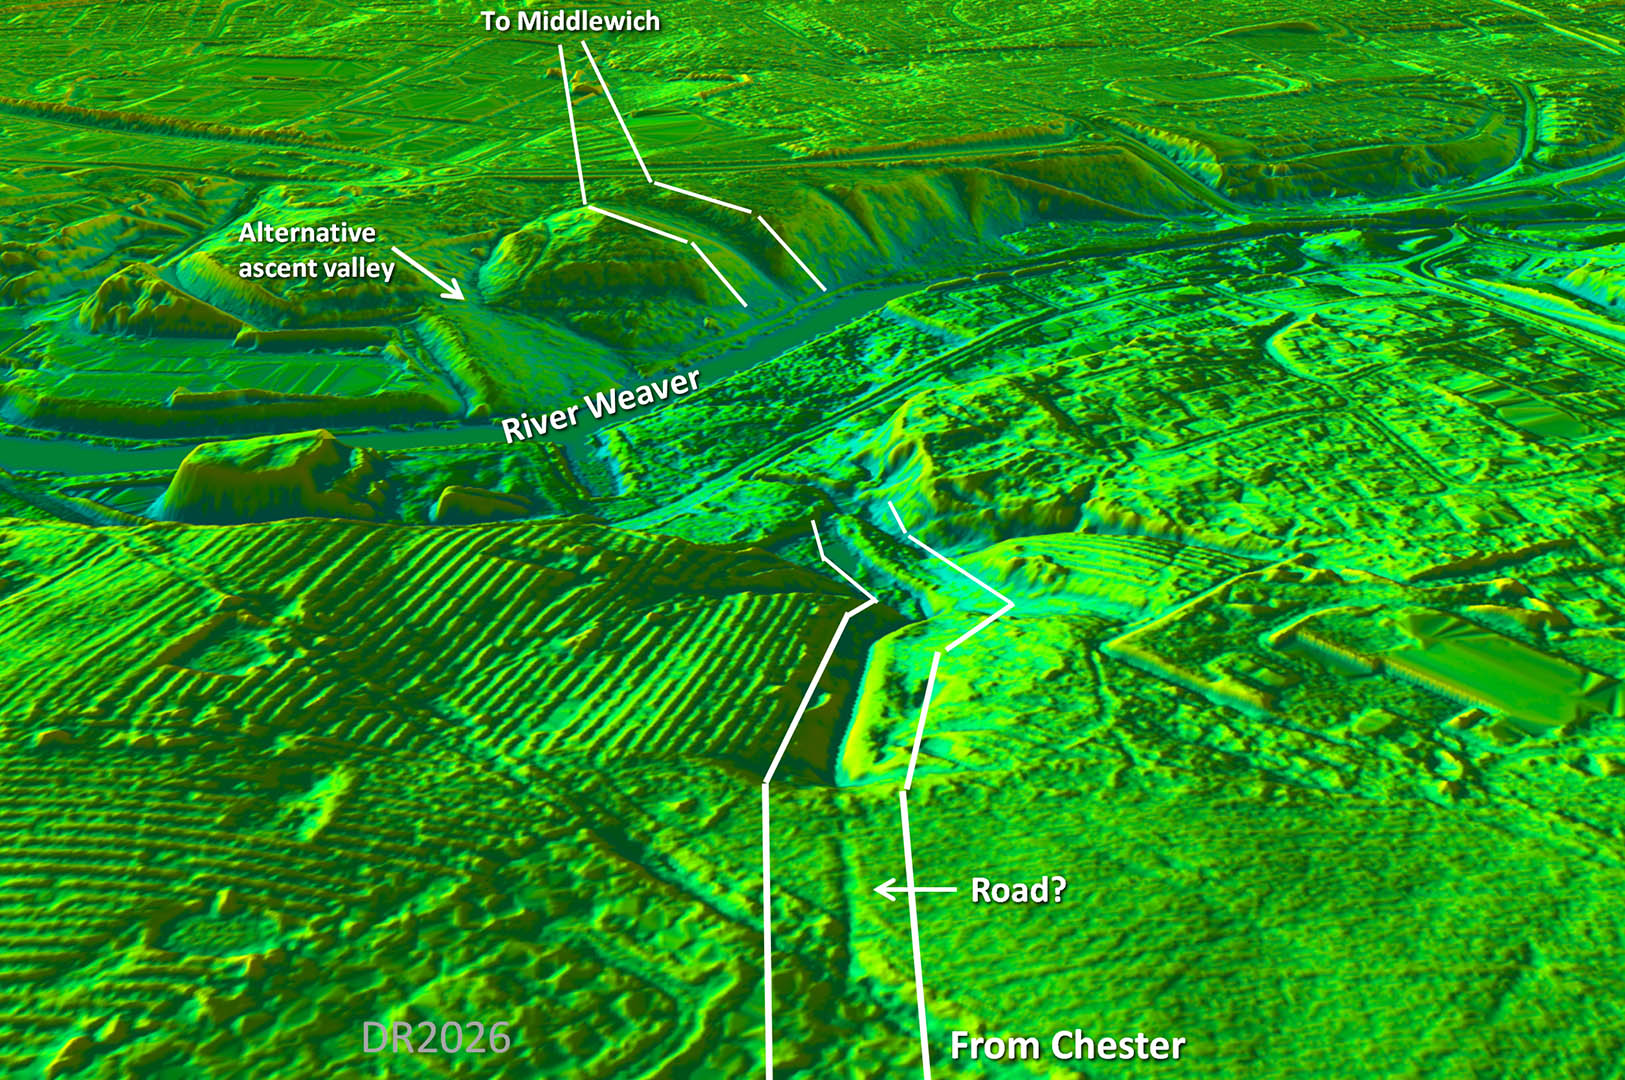
3D Oblique Lidar Image - Salterswall to the River Weaver We are looking back from the River Weaver to Saltlerswall. On the west bank of the Weaver valley there is only really one option for getting down to the river level for a crossing. There does appear to be a short length of Roman road there lending support. It does all align giving confidence that this was the route. It also satisfies passing through or bordering the "street" fields. In reality it could be a few metres either side of the line shown but this has to be the general course from Salterswall.
|
Click for larger view |
 |
3D Oblique Lidar Image - River Weaver Crossing We are looking eastwards here across the Weaver Valley. Whilst there was only one real option on the west bank for descending down to the river that is not the case on the east bank - there are a few options. The one shown perhaps fits best but the other one could easily have been used.
|
Click for larger view |
 |
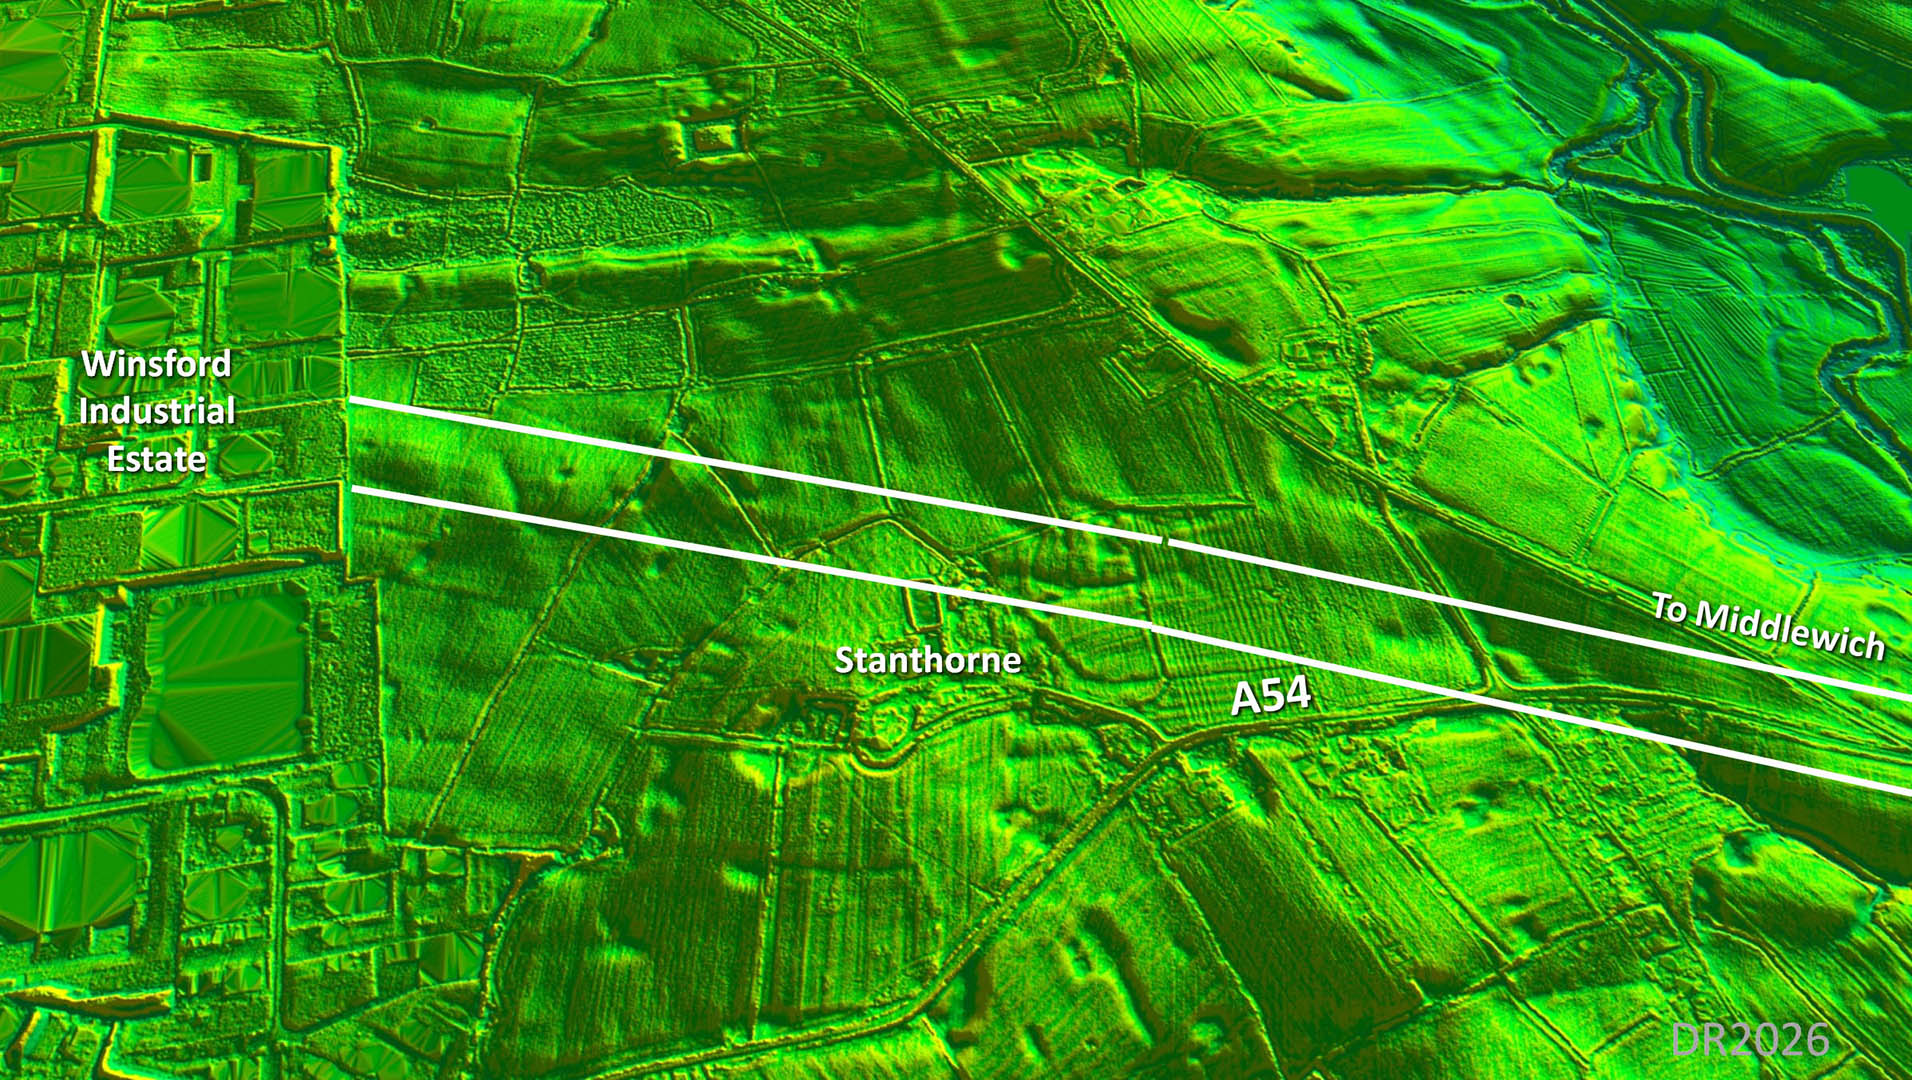
Lidar Images - Stanthorne East of Winsford Industrial Estate are these traces of the road. Yes they are faint and intermittent but they do align with the Weaver crossing. They also merge in well with the A54 (at the right) for a crossing of the River Wheelock with an onward connection to Middlewich fort - see below. Note in the bottom left corner is what looks like the alignment continuing on to an old bridge approach/abutment. This would perfectly suit the direct route to the fort.
|
Click for larger view |
 |
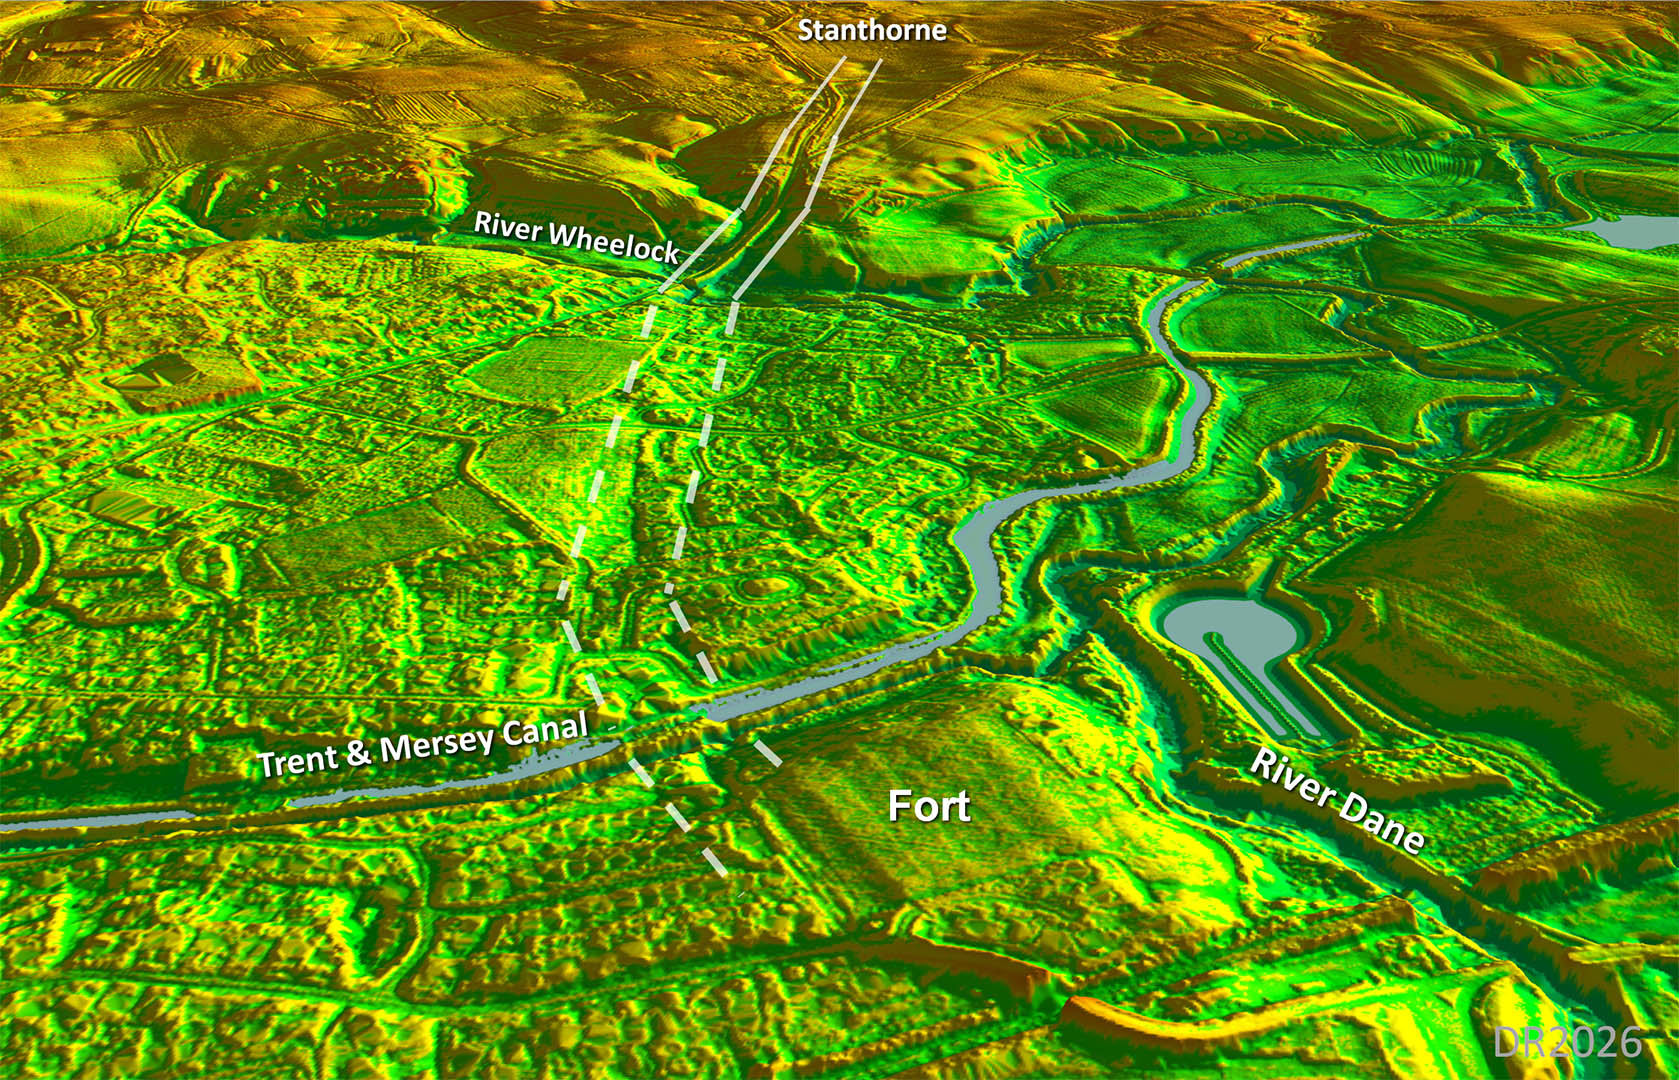
Oblique 3D Lidar view looking back from over Middlewich Fort Easy level route from the Wheelock across to the valley that now contains the canal. This is supported by old maps showing this as hedgelines before the modern development encroached. There even looks to be a cutting up to the fort's south side.
Below is a RAF 1946 aerial photo showing the hedgelines mentioned above. This aerial has west at the top, north to the right. The fort is in the middle of the photo. Thanks to Neil Buckley for bringing this to my attention. Note you can click on the photo to enlarge and move around. Copyright Historic England. |
Click for larger view |
 |
|
|
||
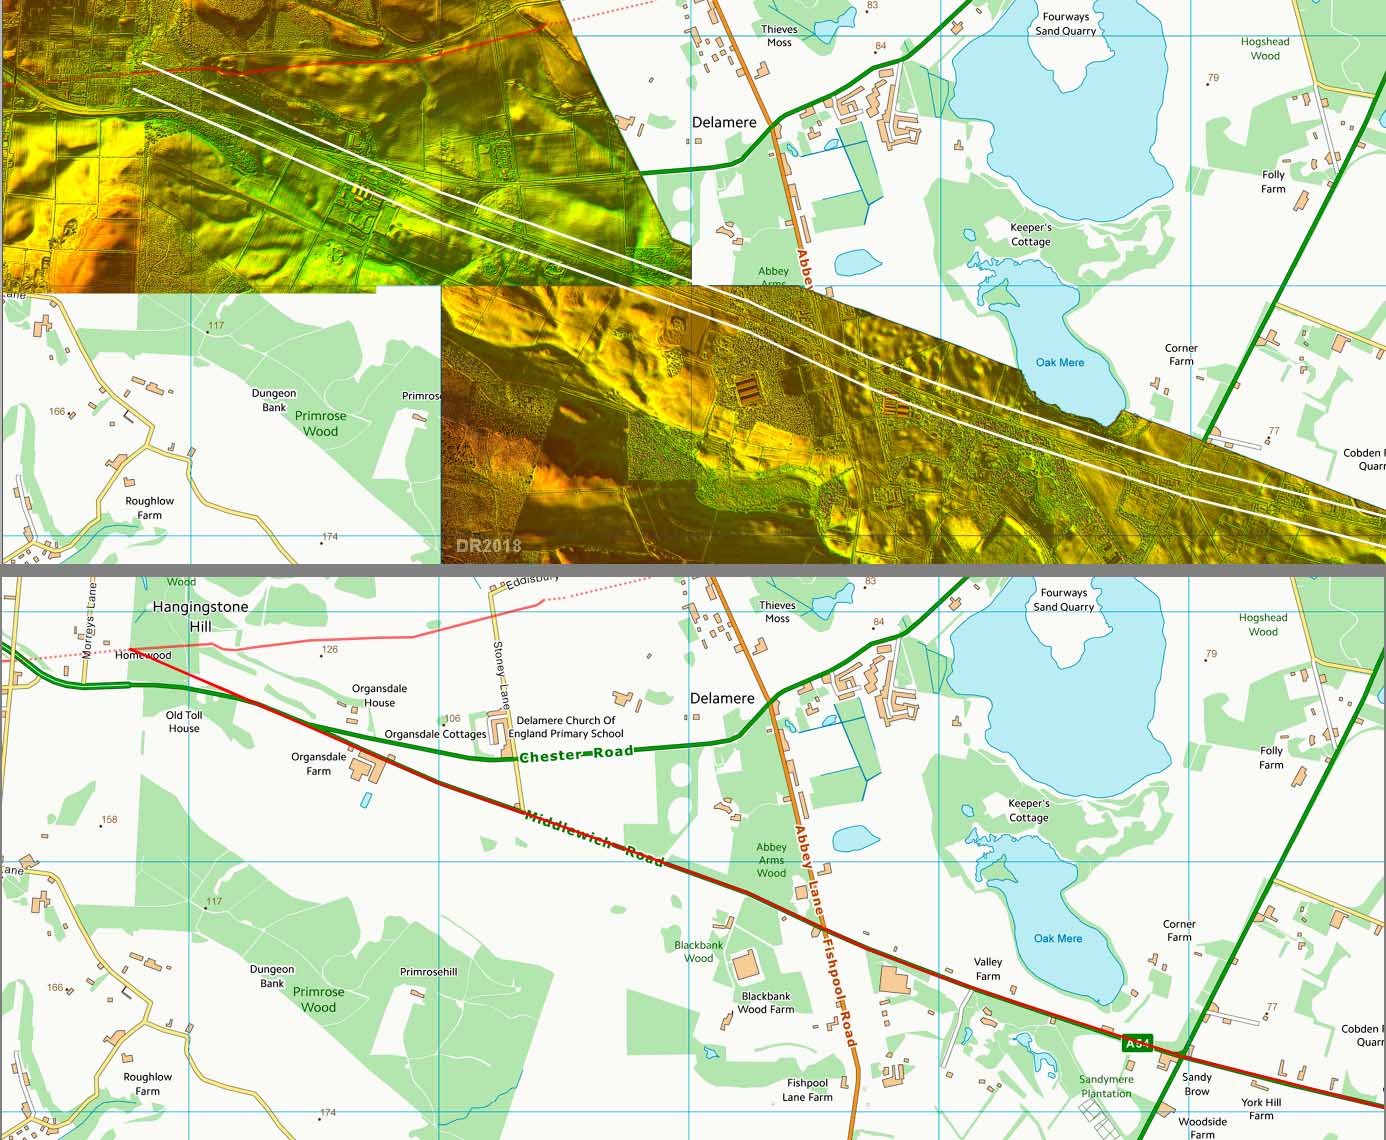
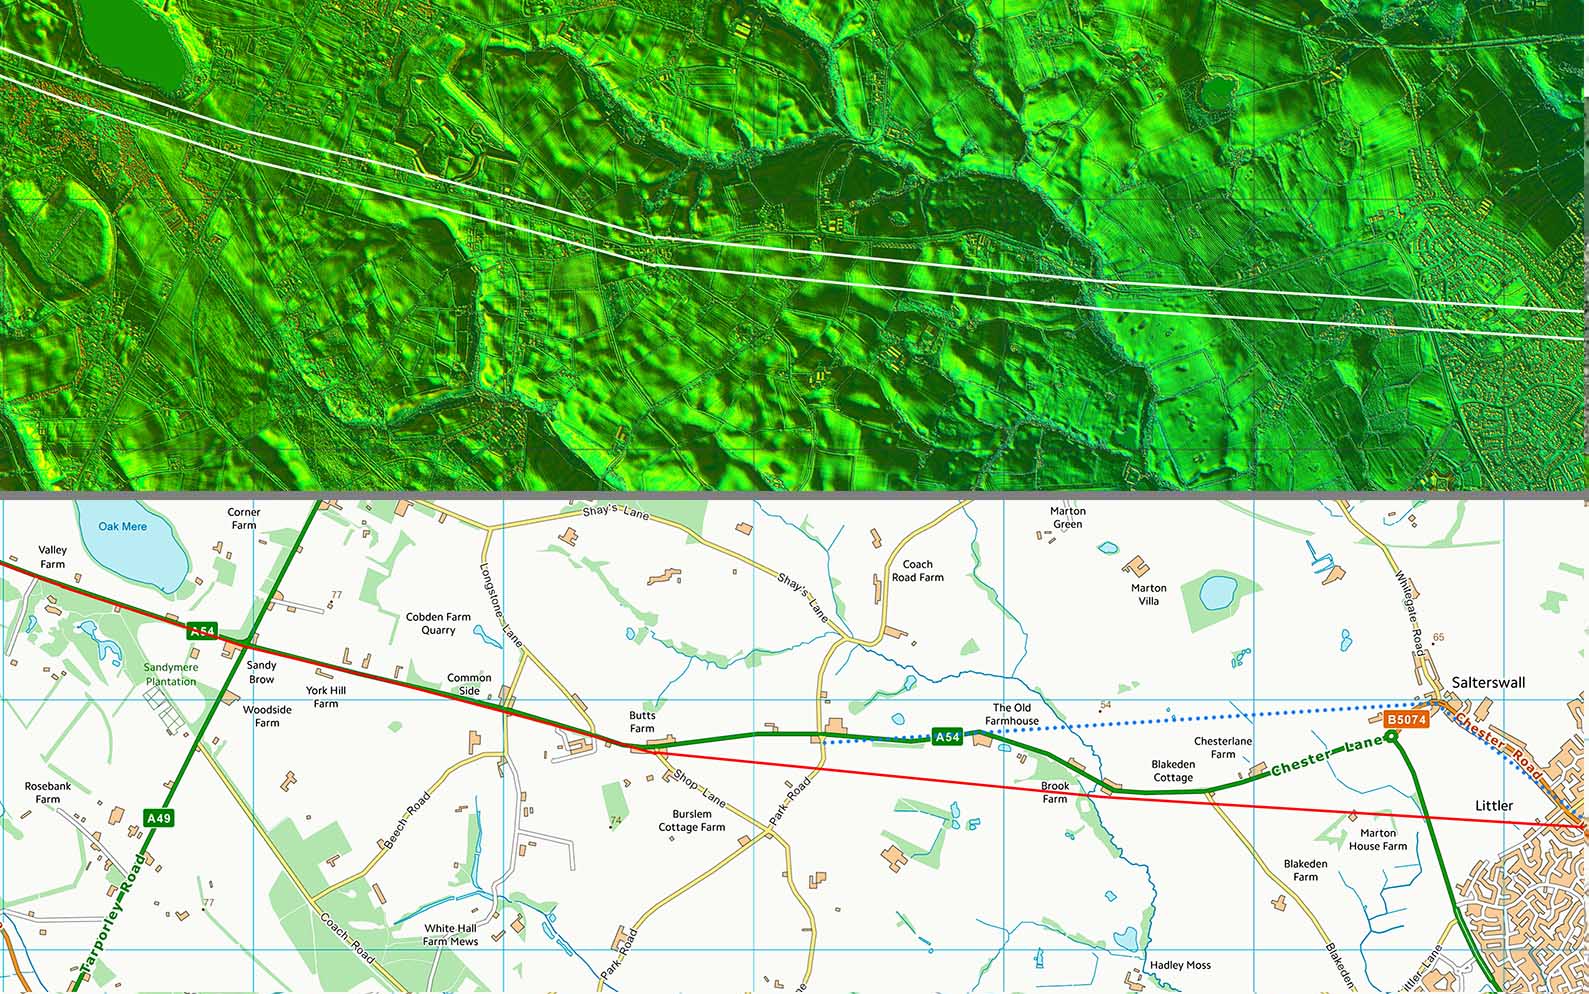
Lidar Image & Map - Route Map 1 The junction and its alignment and merger into the A54 are clear. There have been suggestions that the Roman line was slightly to the north of the A54 on this stretch but lidar does not support this. We can be reasonably certain therefore that the A54 represents the Roman line here. |
Click for larger view |
 |
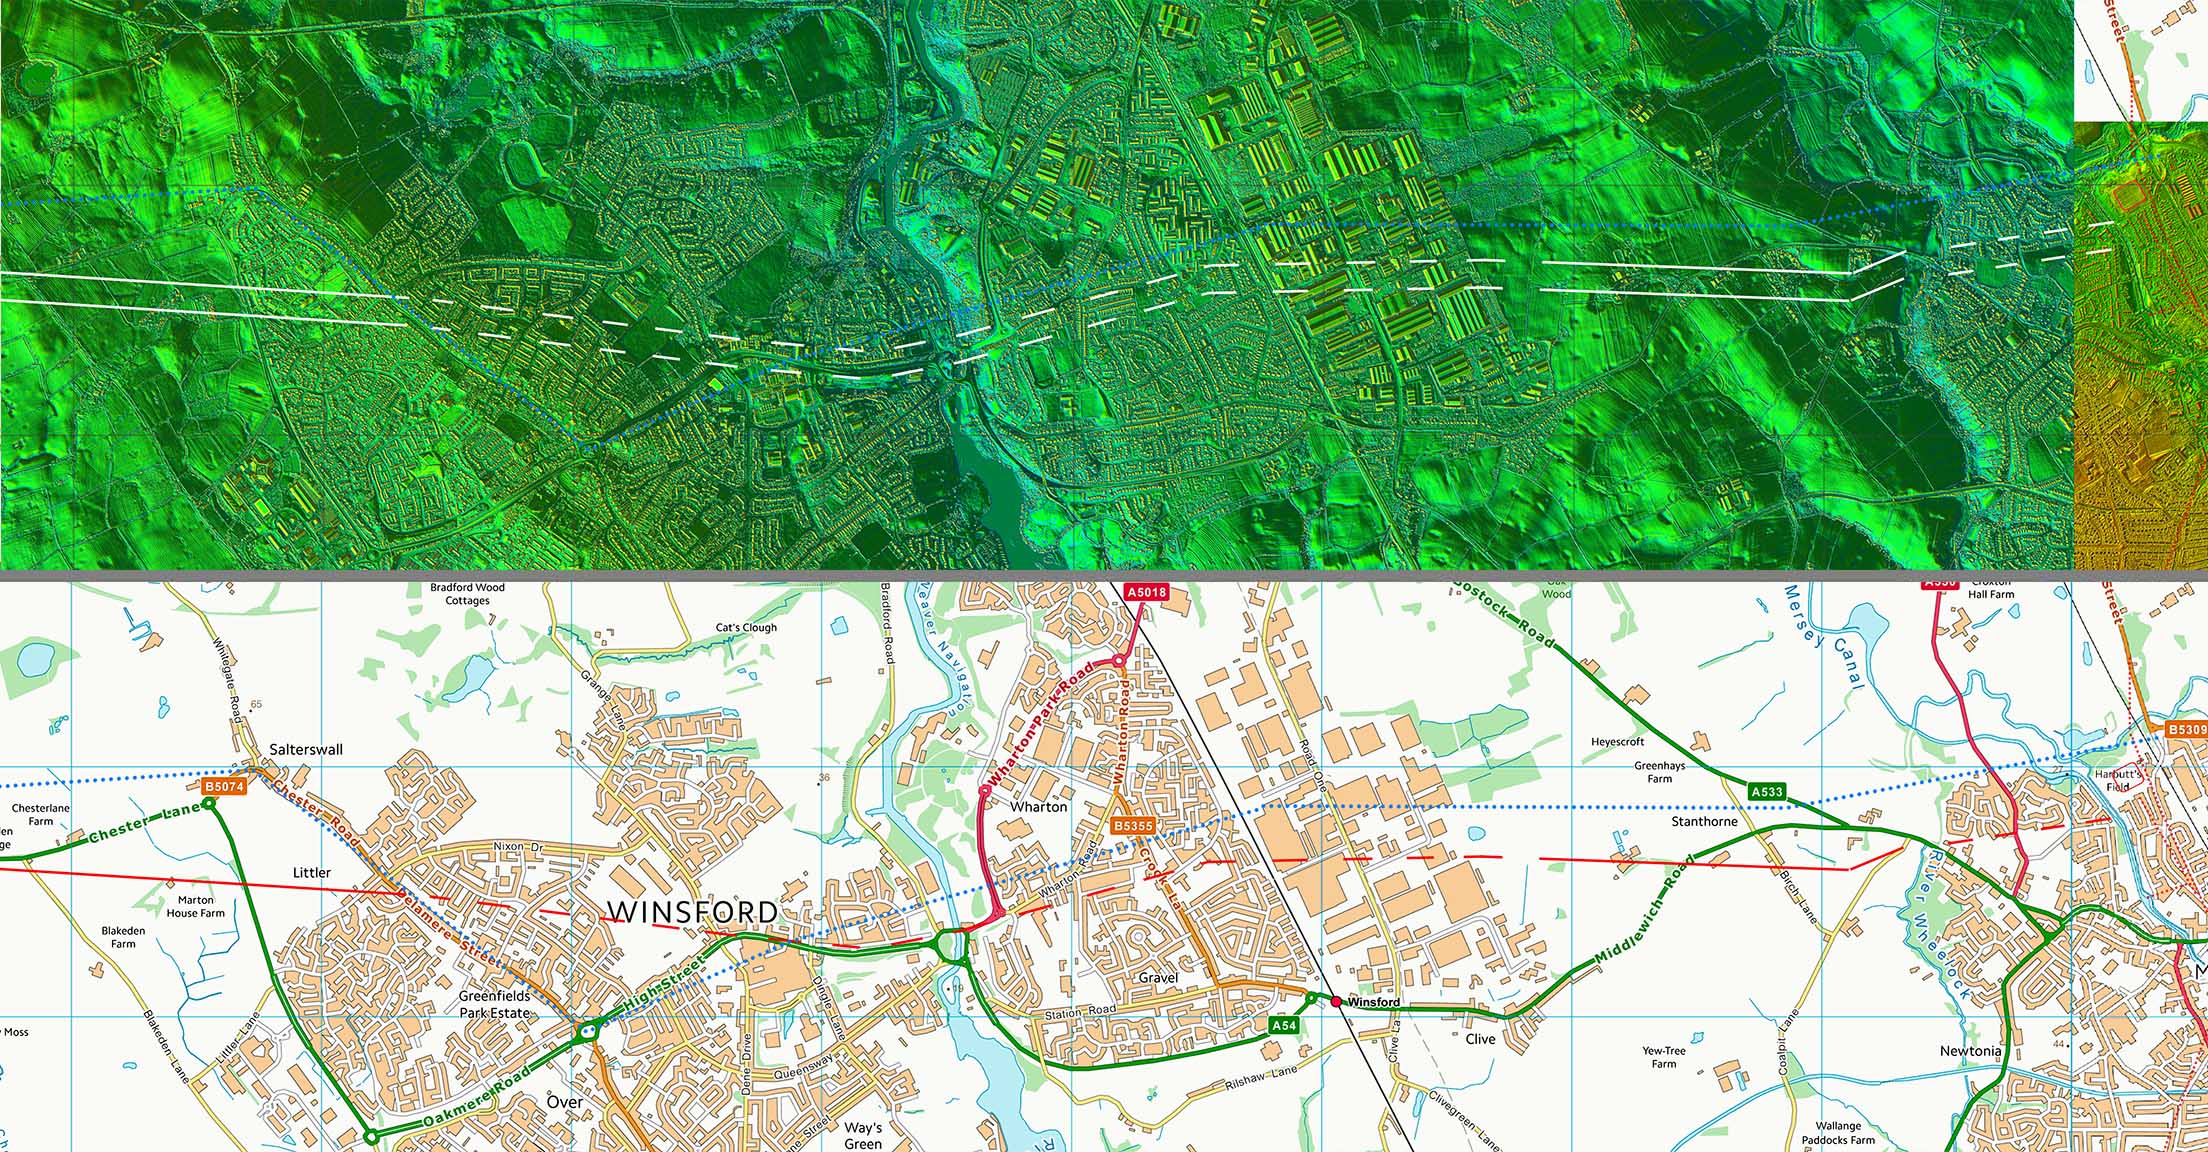
Lidar Image & Map - Route Map 2 Just a short section where the route is uncertain - shown dashed. |
Click for larger view |
 |
Lidar Image & Route Map 3 At last we have the route across Winsford to Middlewich.
|
Click for larger view |
 |
|
|
|
Last update: April 2026 |
© David Ratledge |