
|
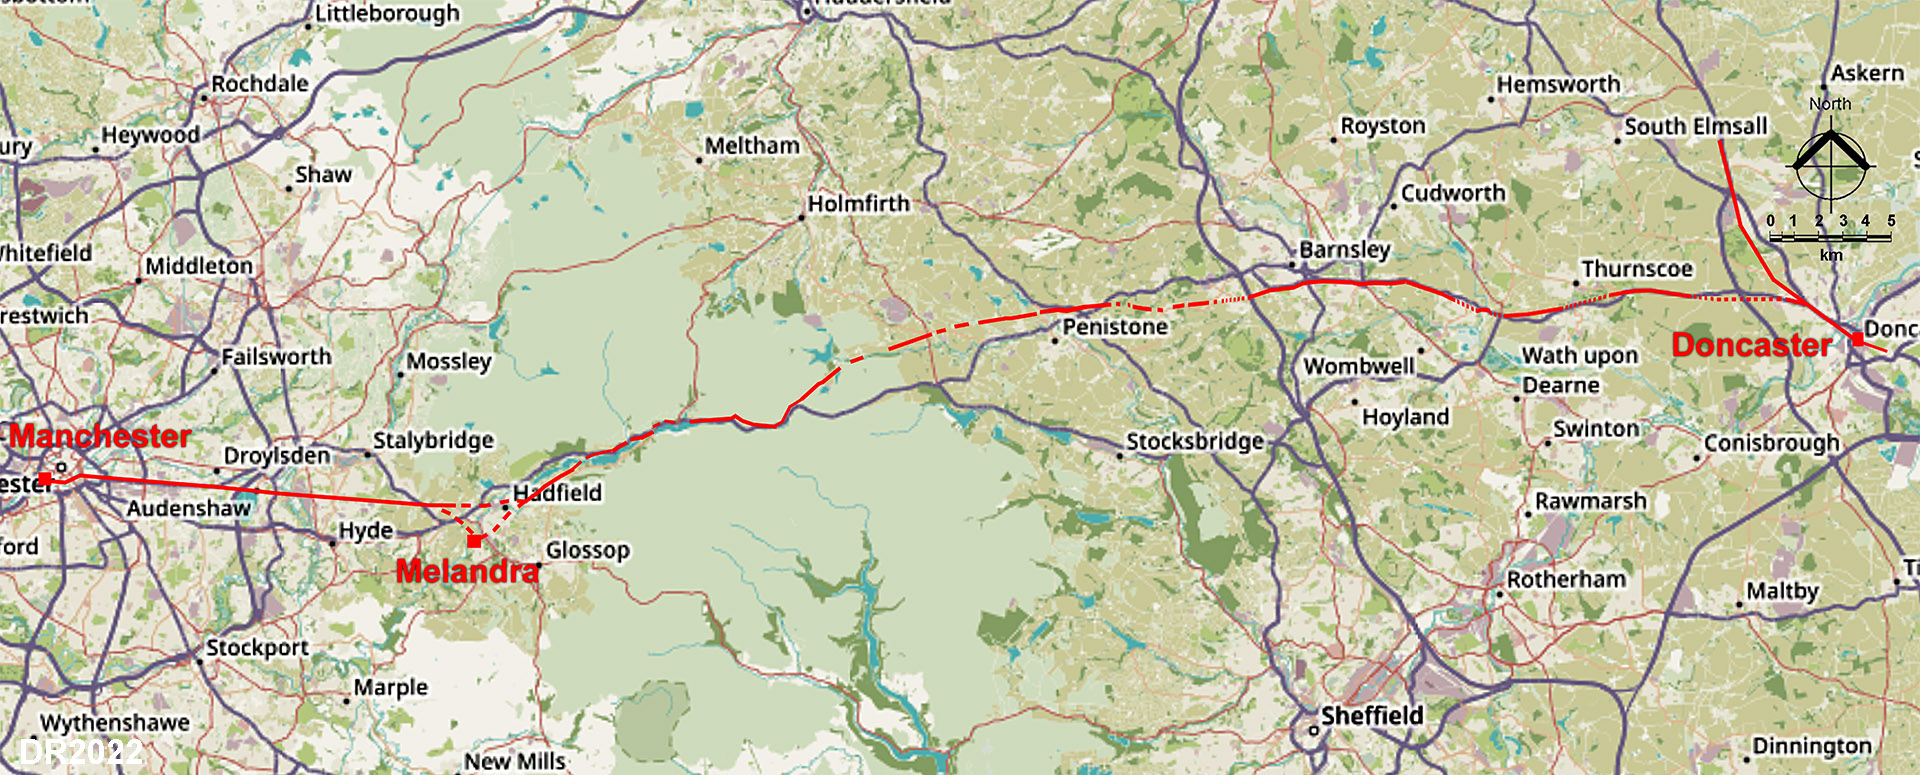
The Roman Road from Manchester to Doncaster(?)Margary Number: 715xDistance: 50 miles (approximately) In 2020, following the spotting of a length of agger east of Manchester at Matley by my colleague Neil Buckley, we were able to determine, at long last, the route of the Roman road from Manchester to Melandra Castle. However, this may have solved one puzzle but created a new one. The alignment of the road was clearly not on Melandra Castle fort but targeted something much further east through the Longdendale valley. The road could be traced for a short distance into the valley before the LiDAR data ran out. With the release of a new block of LiDAR data the route can now be extended through the Longdendale valley and well into Yorkshire. The indications are that the Roman fort and town at Doncaster was probably the destination. Note; This road has now been issued with the number RR715x by the Roman Roads Research Association. The Manchester to Melandra Roman road was previously recorded at RR711 - the latter should now be only used for the Melandra to Brough road. New - video flyover from Melandra to Hoylandswaine
|
Historic Counties: Lancashire, Derbyshire & Yorkshire Current Counties: Greater Manchester, Derbyshire & South Yorkshire HER: Greater Manchester, Derbyshire & South Yorkshire
|
Full Route Map - Manchester to Doncaster |
 |
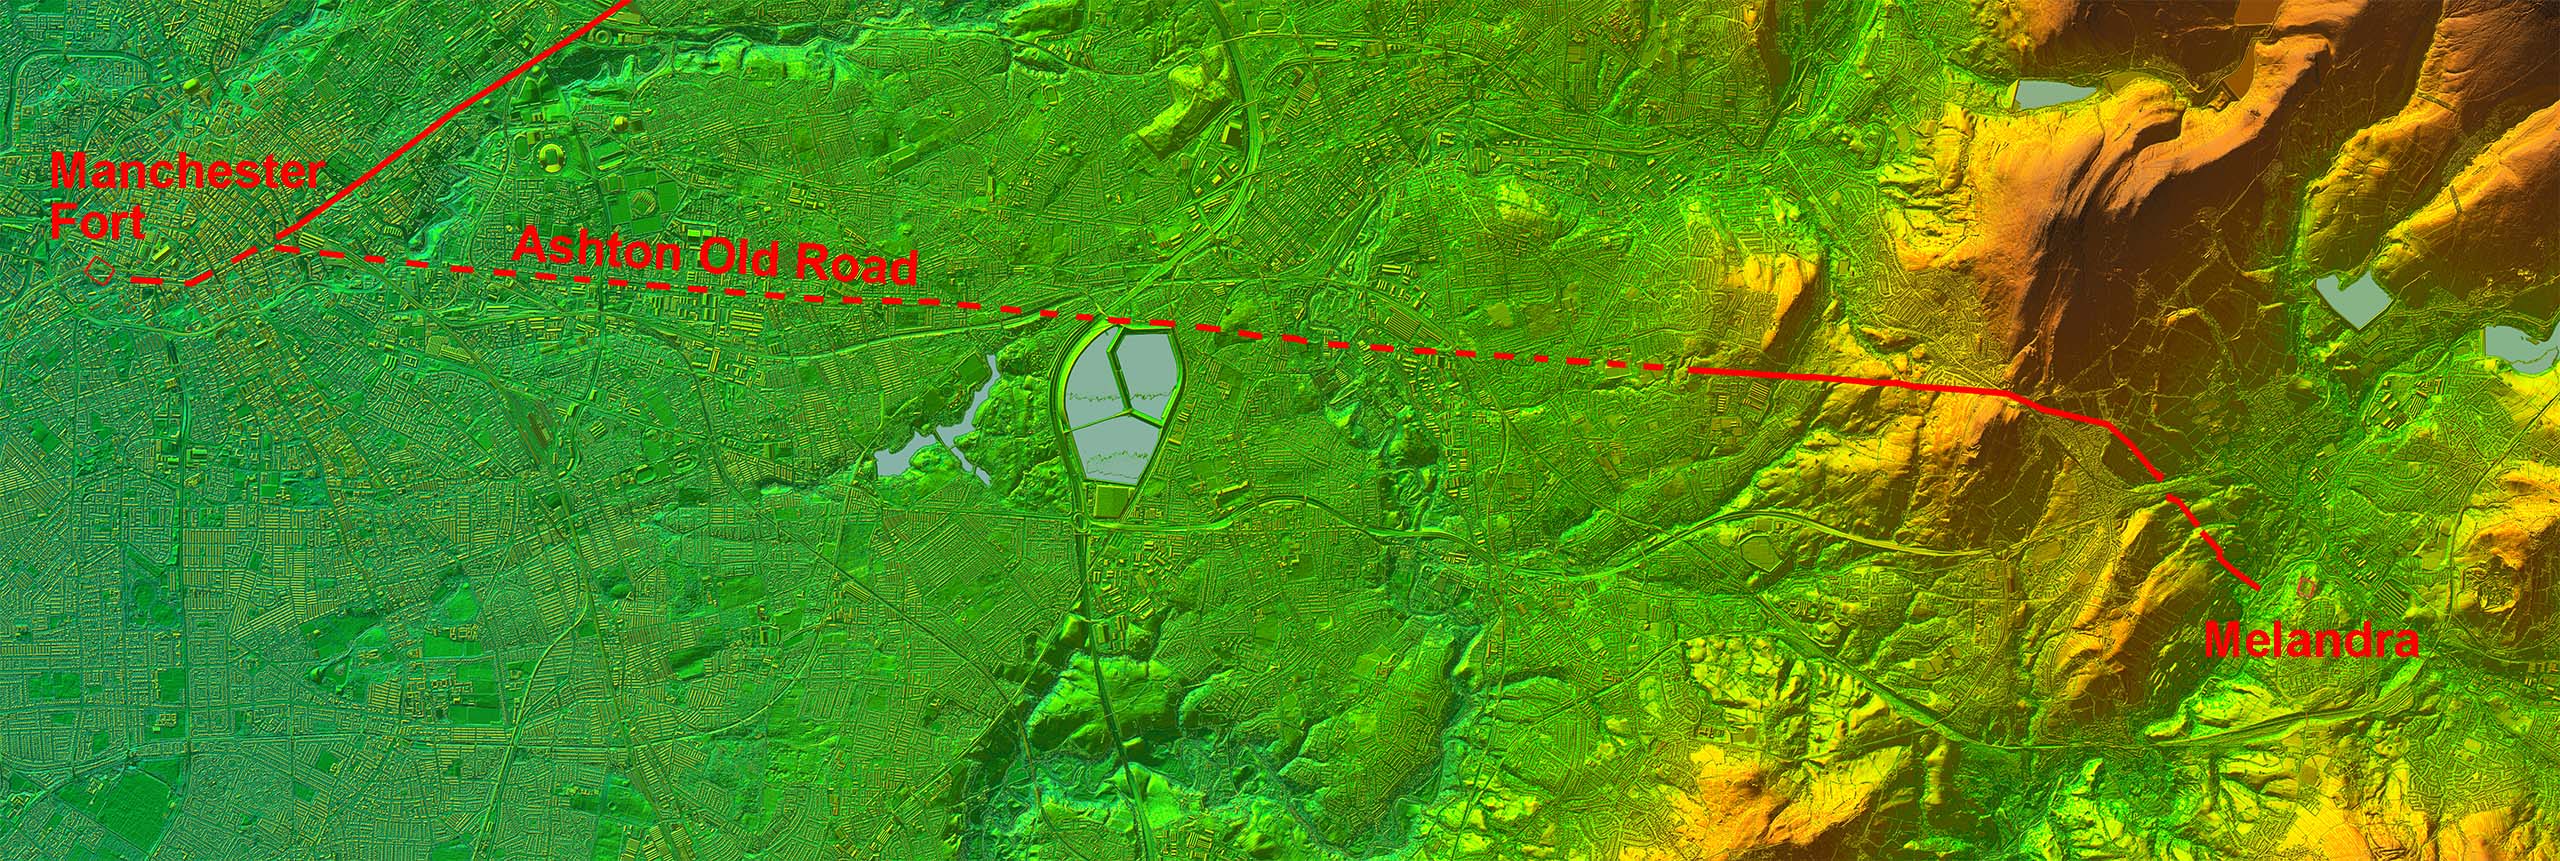
Lidar Image - Manchester to Longdendale For comprehensive details of the section of this road from Manchester to Melandra Castle and the Longdendale Valley please follow link. This web page will continue the story from there onwards. |
Click for larger view |
 |
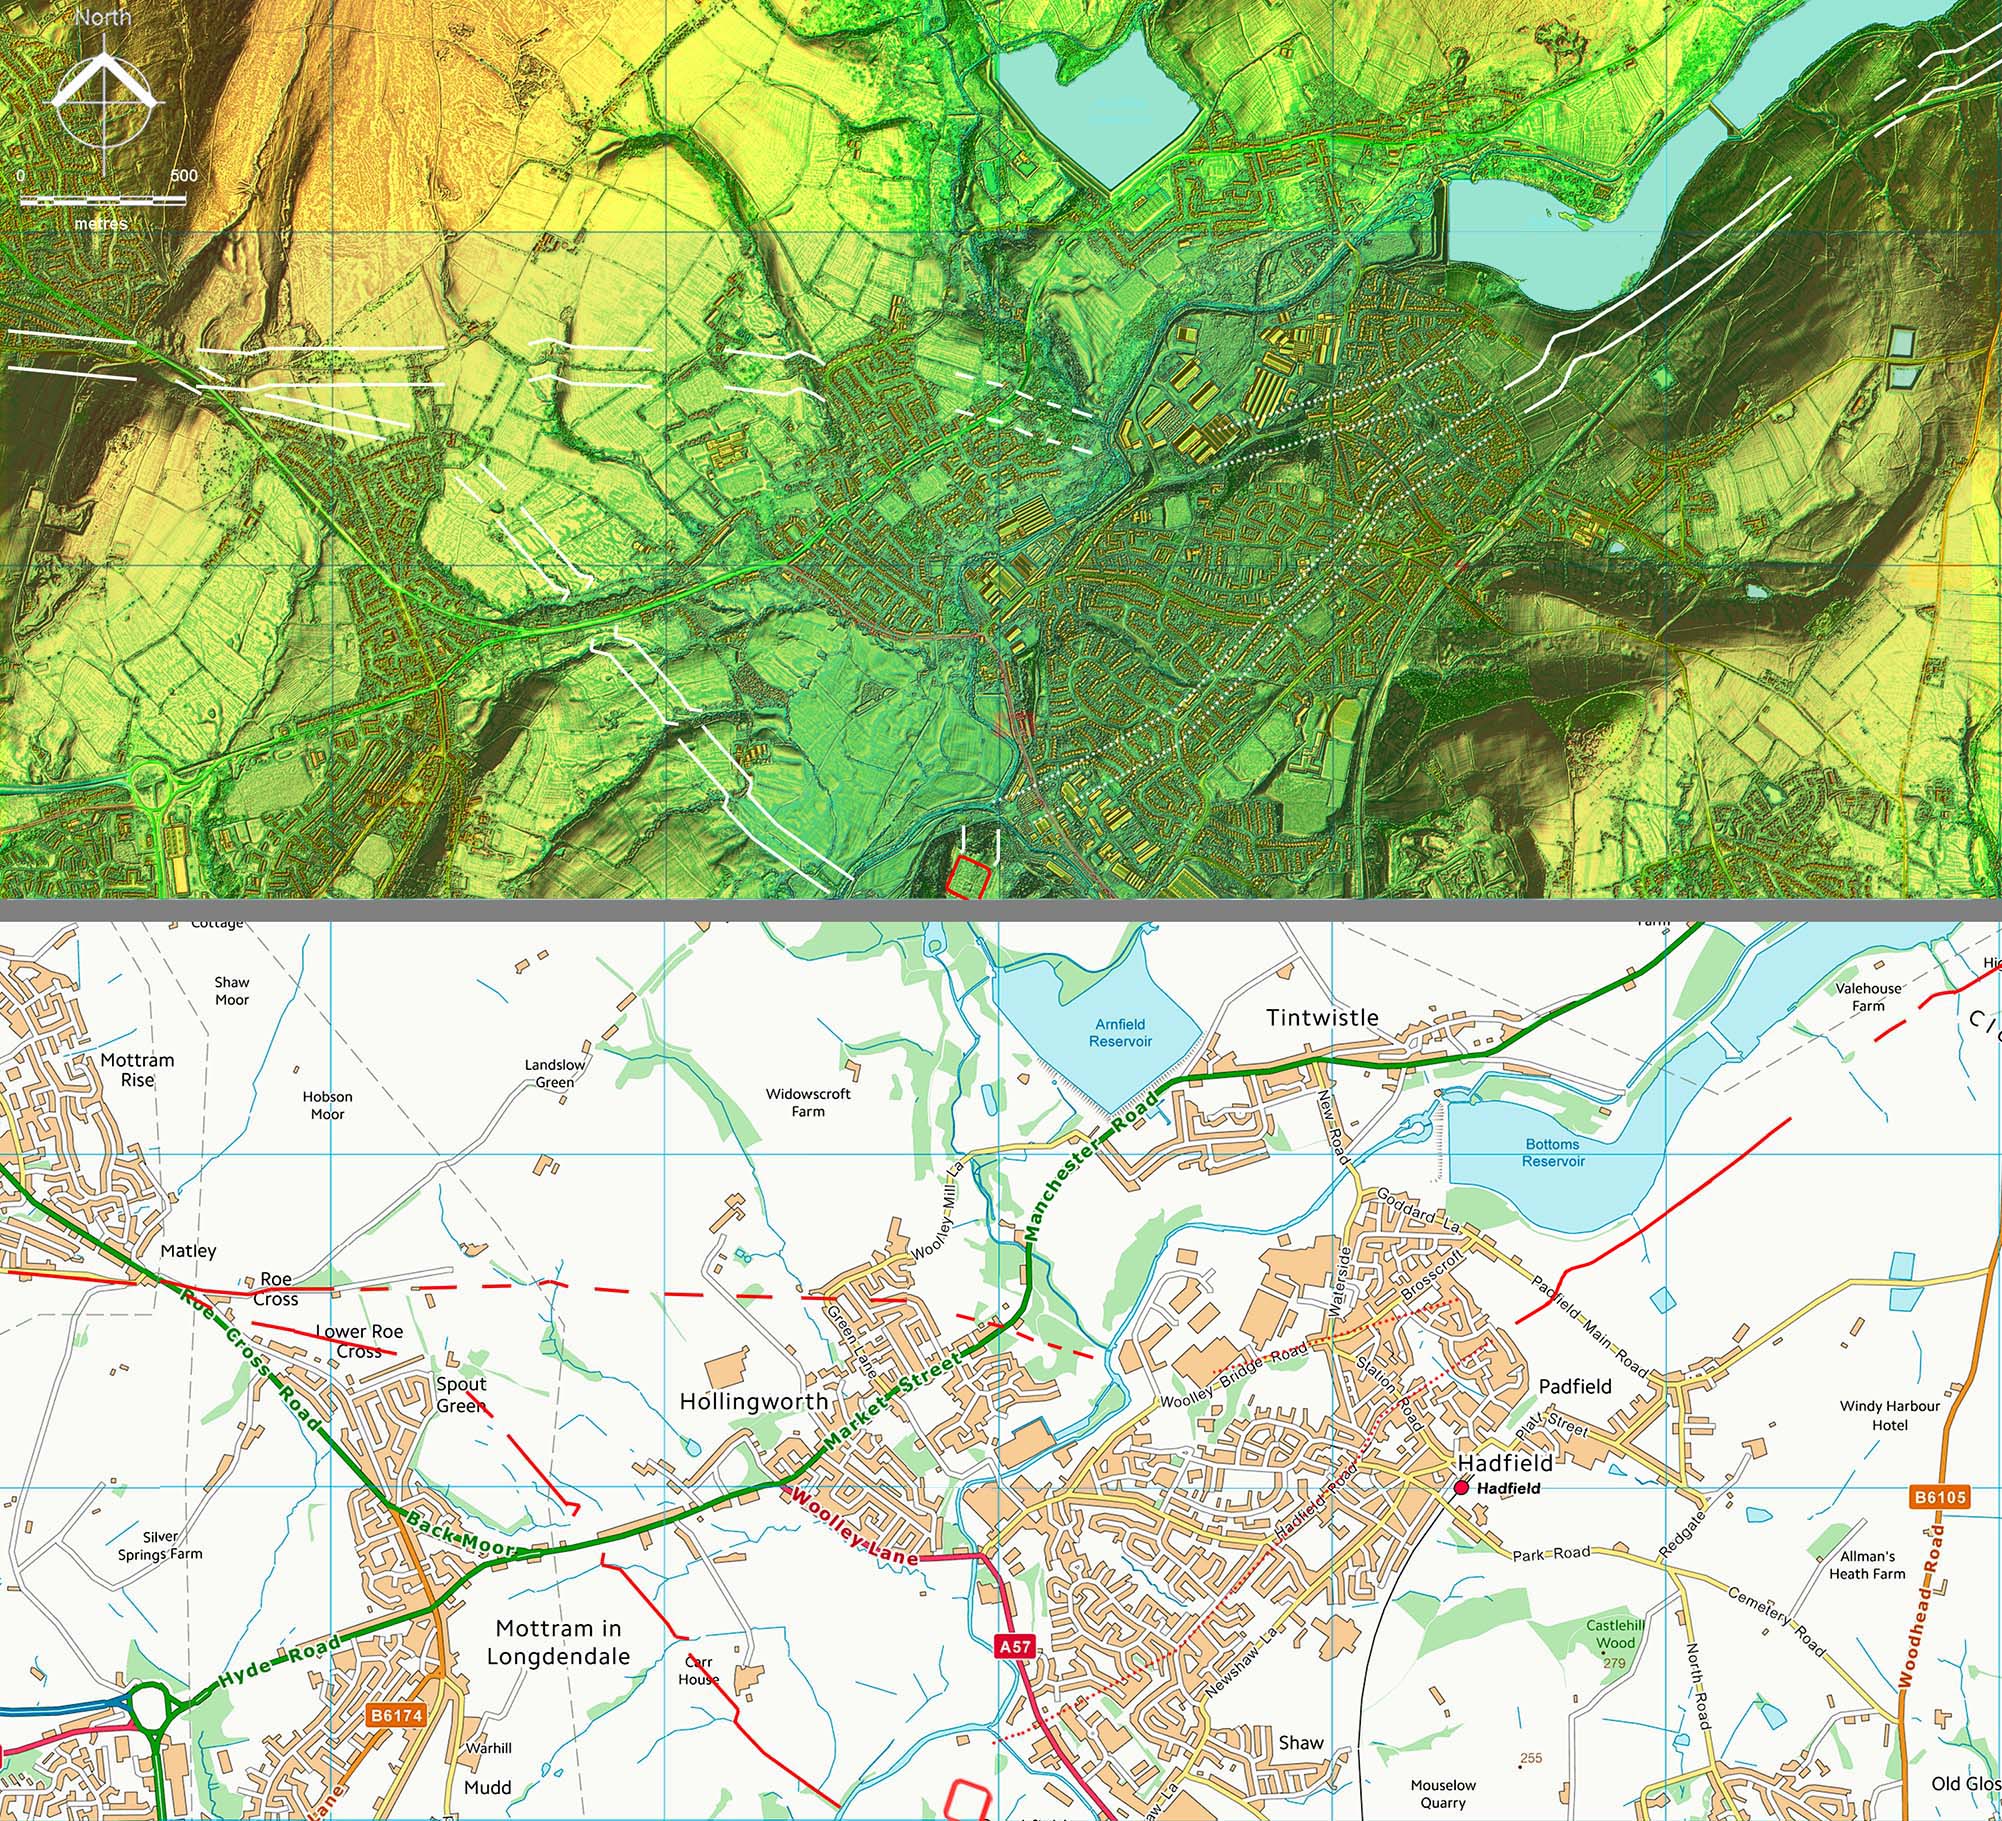
Longdendale Lidar Image & Route Map 1 The alignment of the Roman road from Manchester was around one mile north of Melandra fort and projecting this would suggest a route towards the north side of Hadfield. Link roads would have been needed serving Melandra fort resulting in a triangle of roads. The evidence is reasonably certain away from modern developments but is somewhat speculative across Hadfield. Thanks are due to Neil Buckley who first suggested the likely route down to cross the River Etherow on the through road.. This a alongside Hollingworth Brook. |
Click for larger view
|
 |
Oblique Lidar Image - Entering the Longdendale Valley The road was first spotted in the lower part of the Longdendale valley by Glossop and Longdendale Archaeological Society. This needed a slight correction here and there plus they aimed the road out of the valley heading north towards Holme but we now know it continued through the valley to Salter's Brook.
|
Click for larger view
|
 |
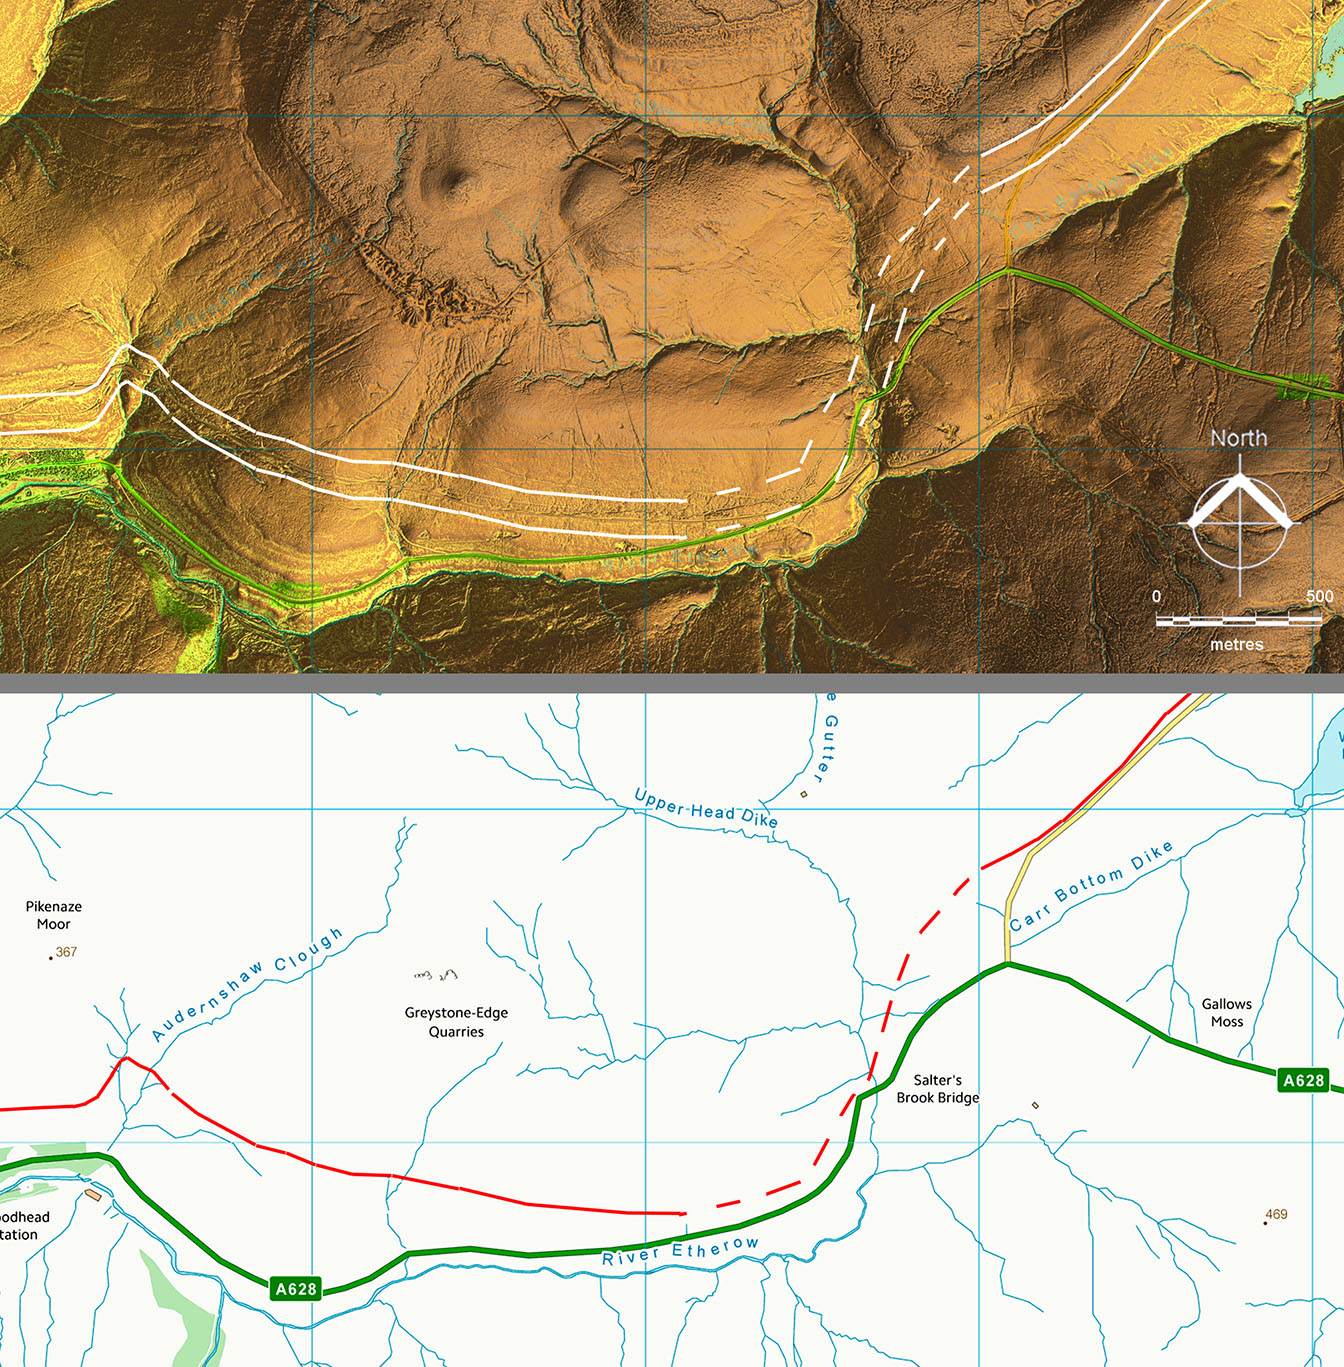
Longdendale Lidar Image & Route Map 2
We are fortunate Lidar reveals the probable point where the road crosses from the south side of the valley to the north. It could easily have been lost under a reservoir.
|
Click for larger view
|
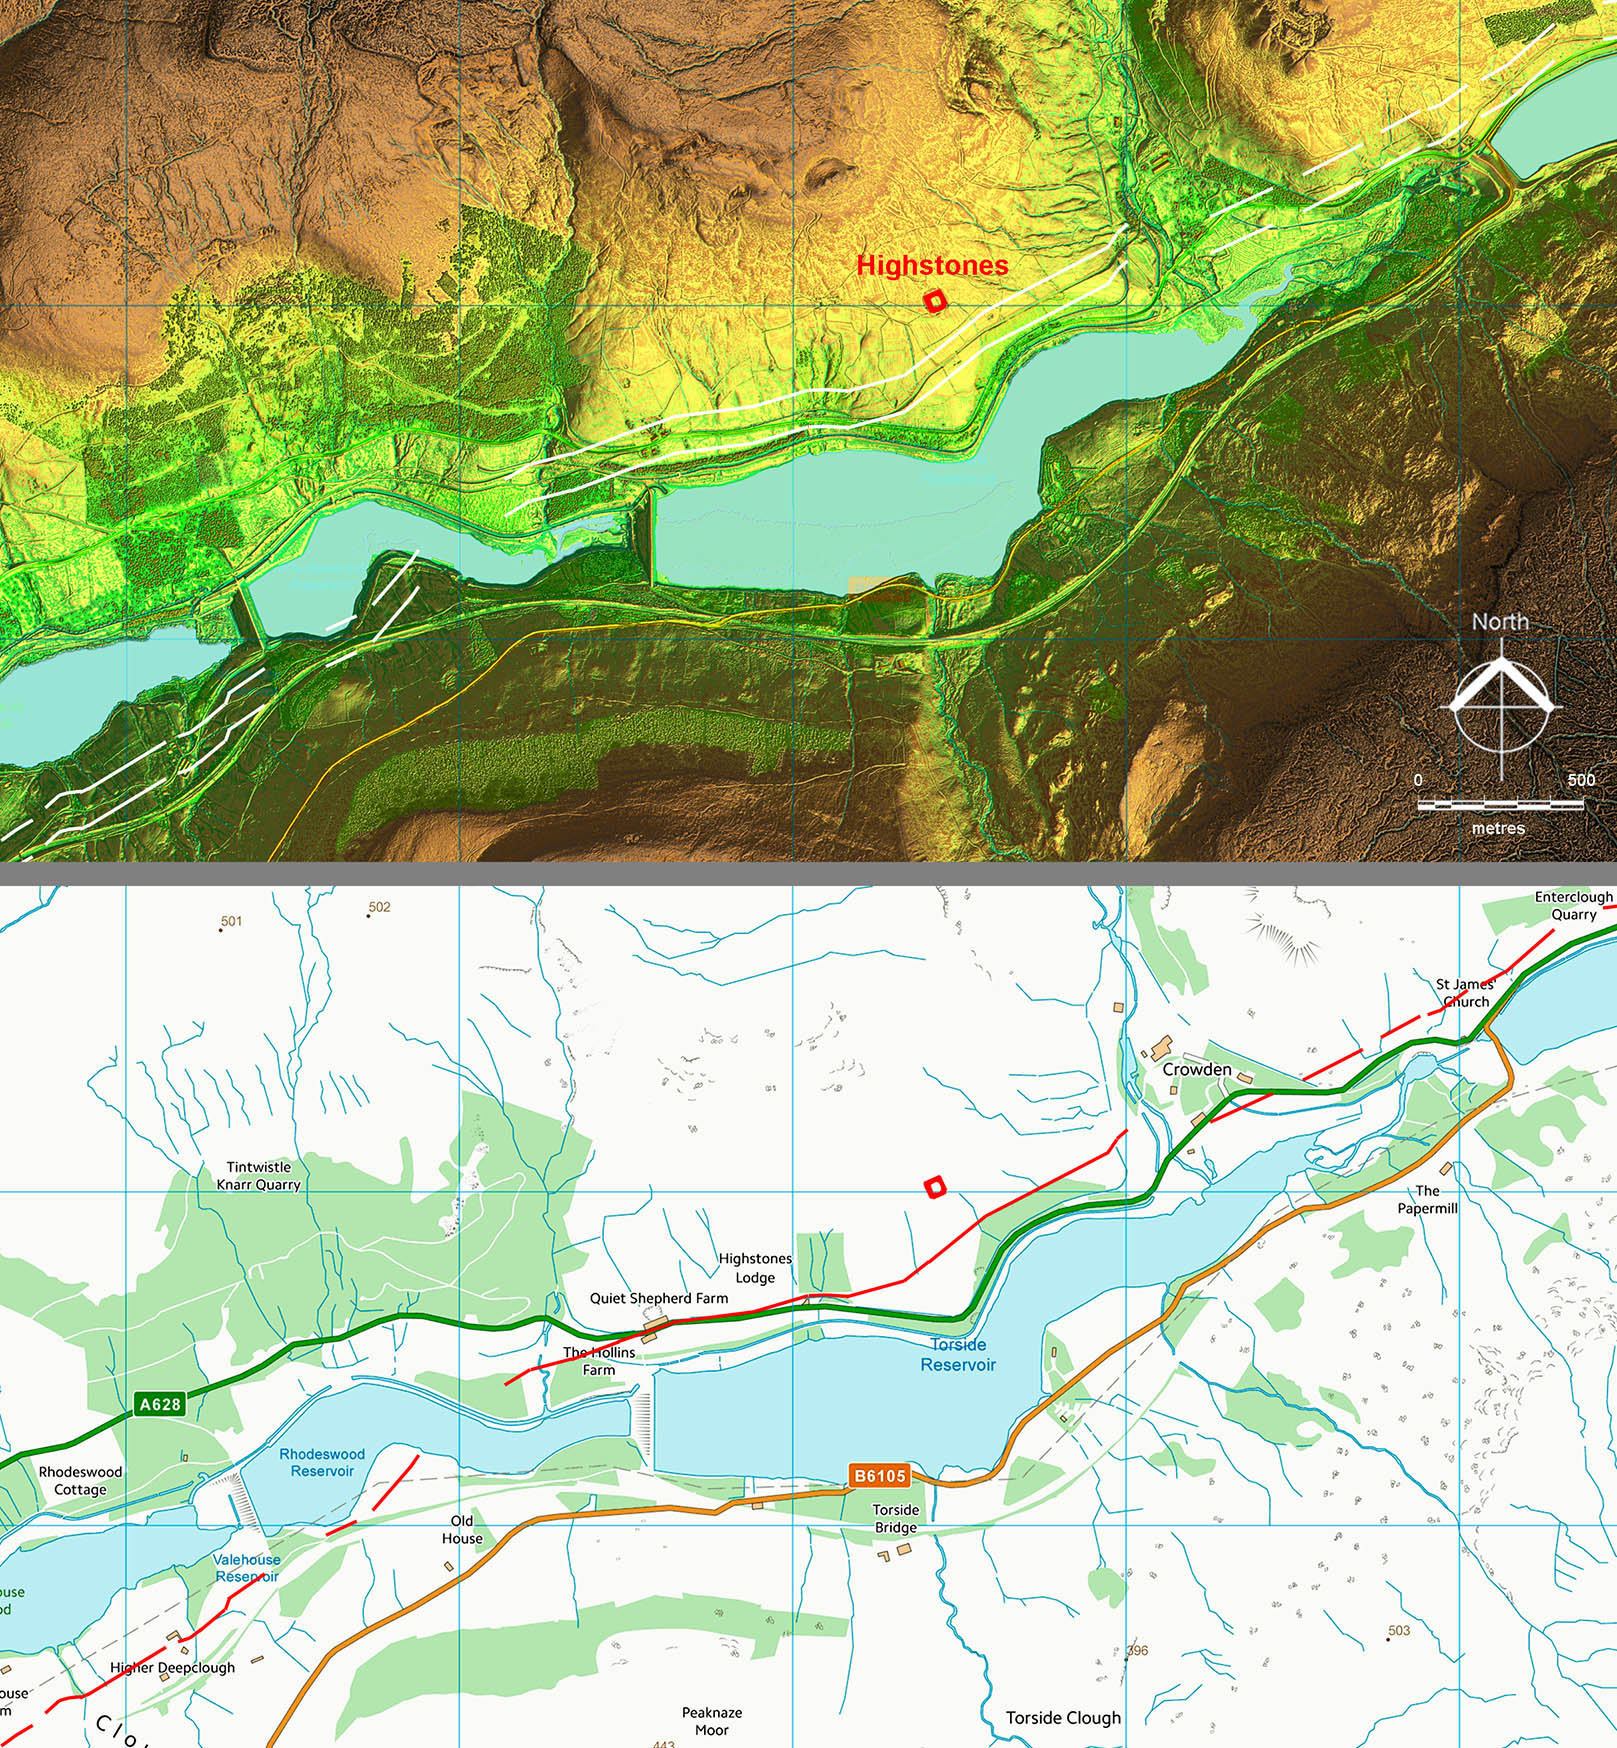 |
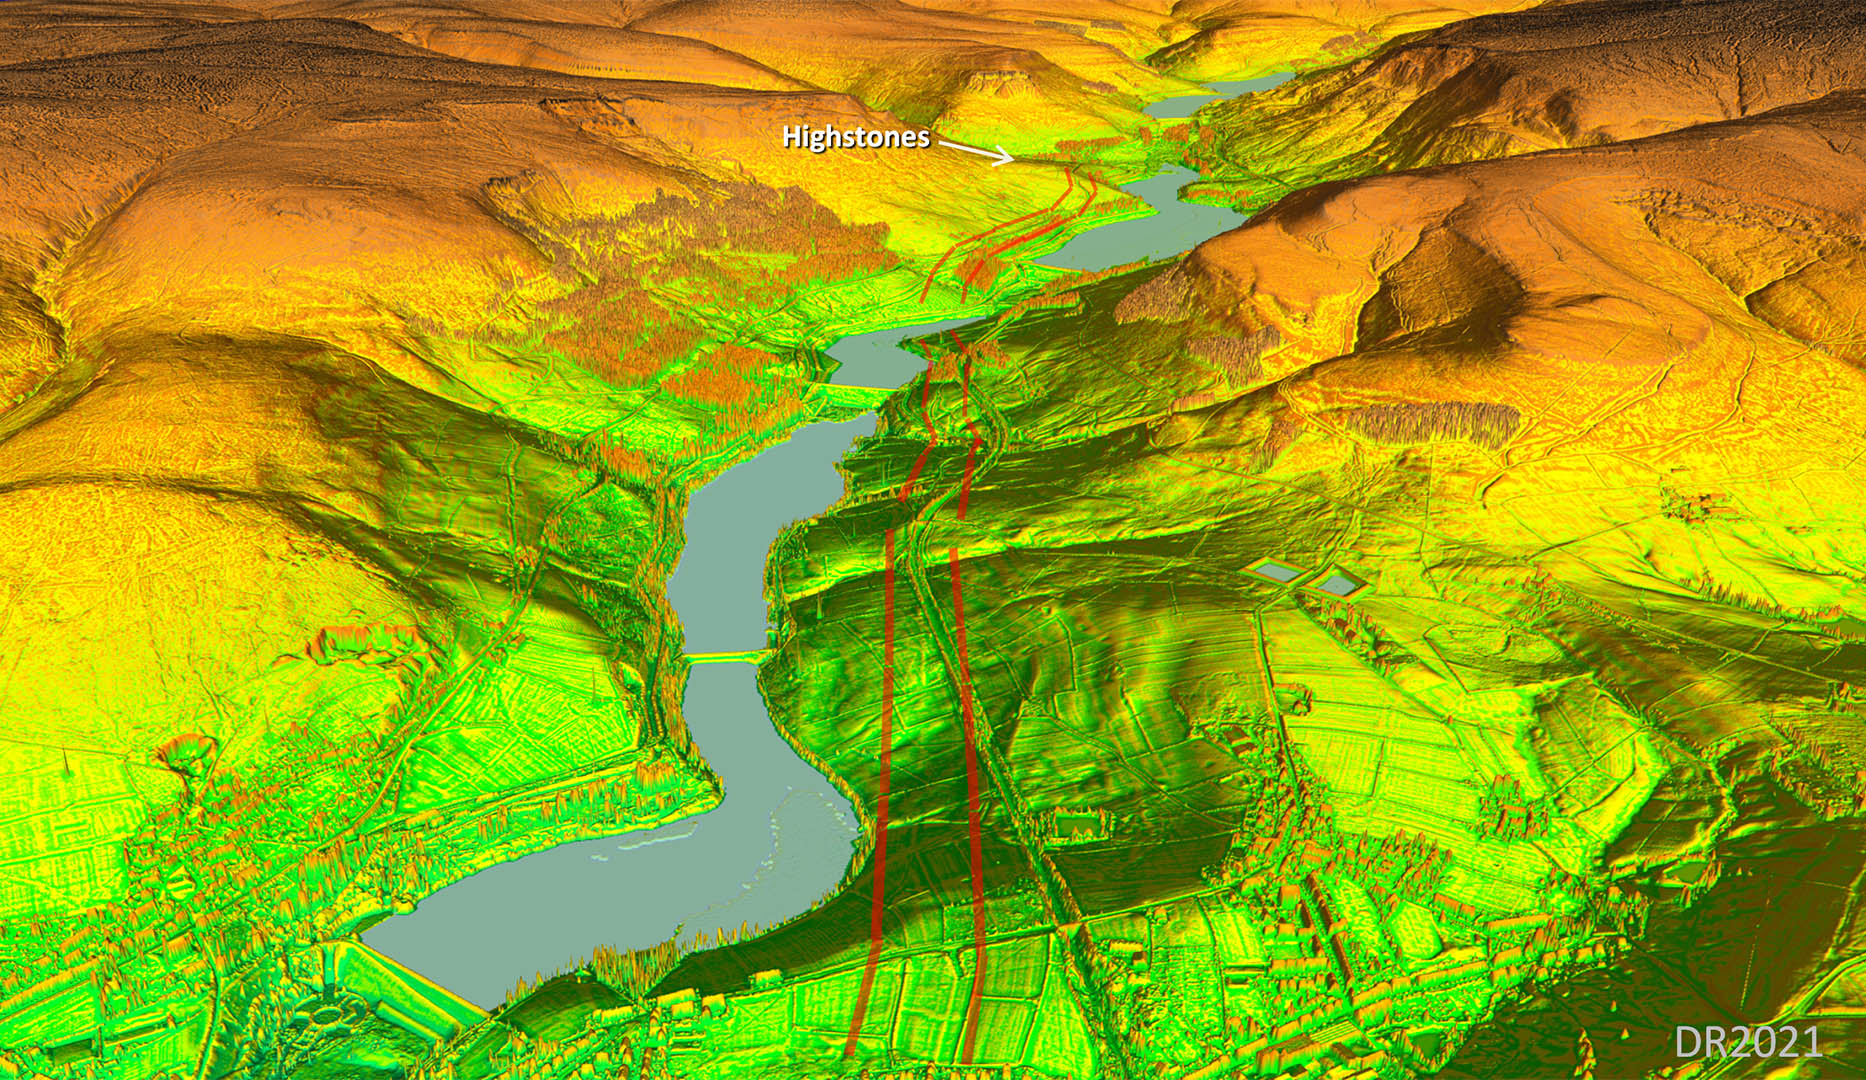
Oblique 3D Lidar Image - Highstones Roman Fortlet There can be no doubt now about Highstones. Lidar clearly shows it to be a Roman fortlet with two entrances - west and south. It is a well chosen spot with excellent view both up and down the valley. |
Click for larger view |
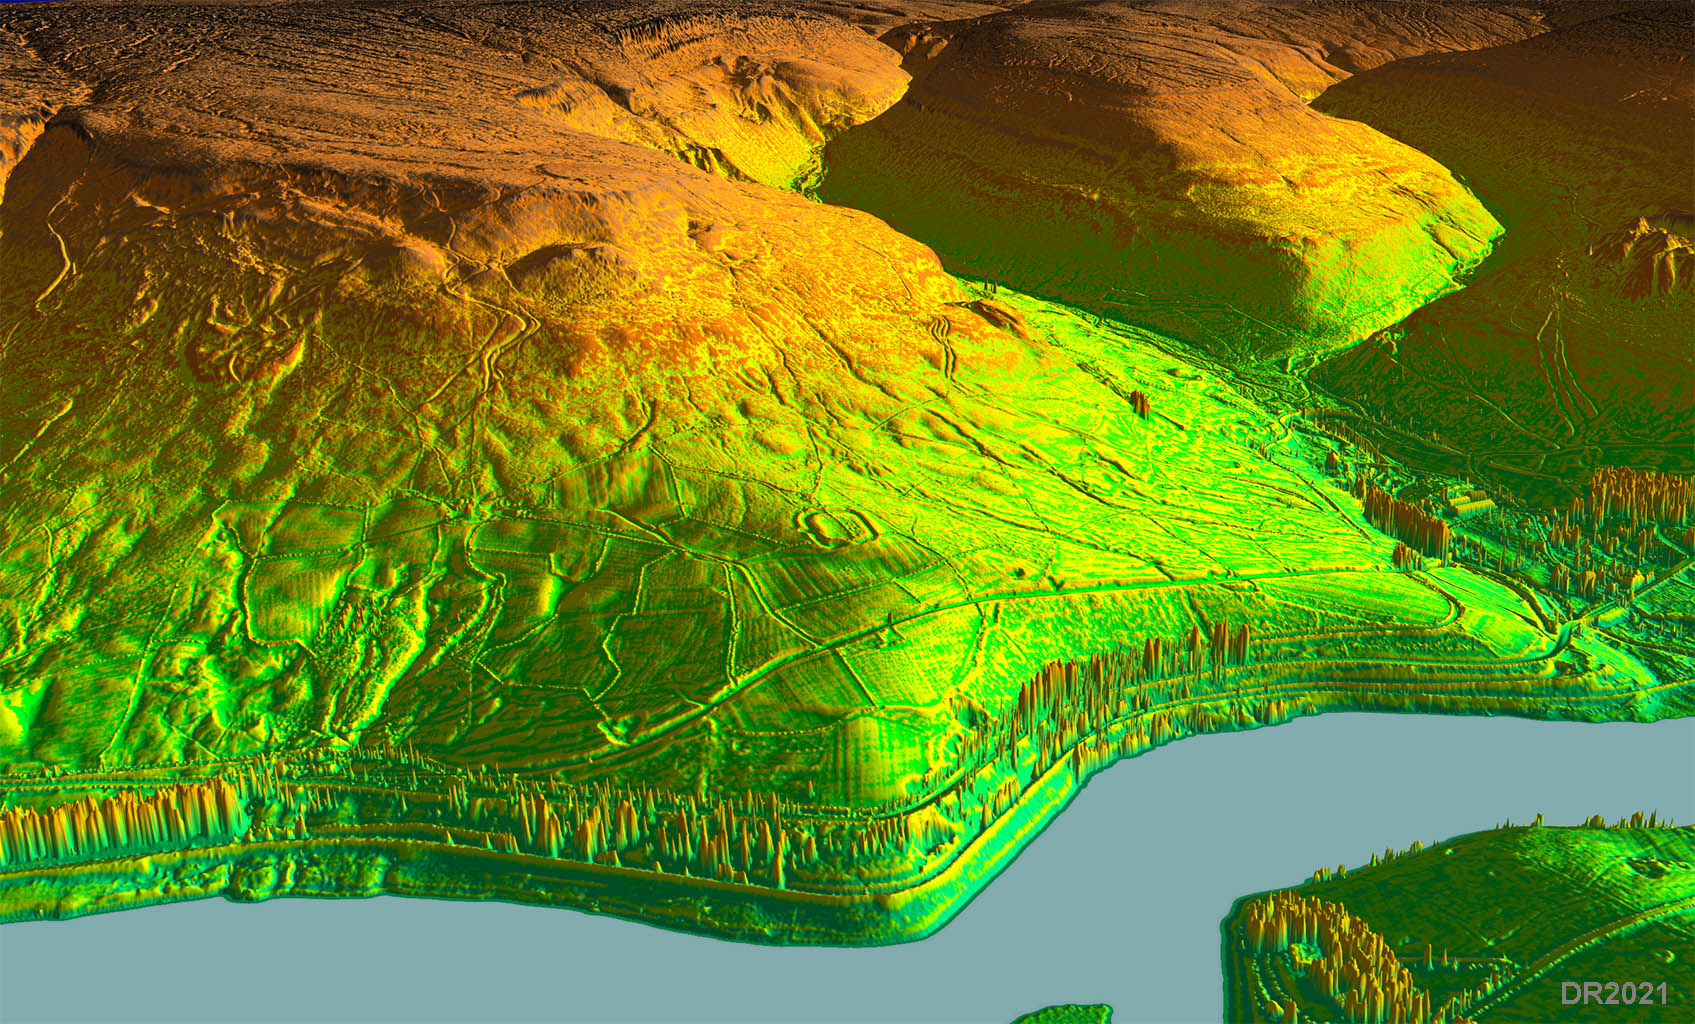 |
Oblique 3D Lidar Image - Highstones Link Road The fortlet would have been connected to the main Roman road and the link road up it is faintly visible. |
Click for larger view |
 |
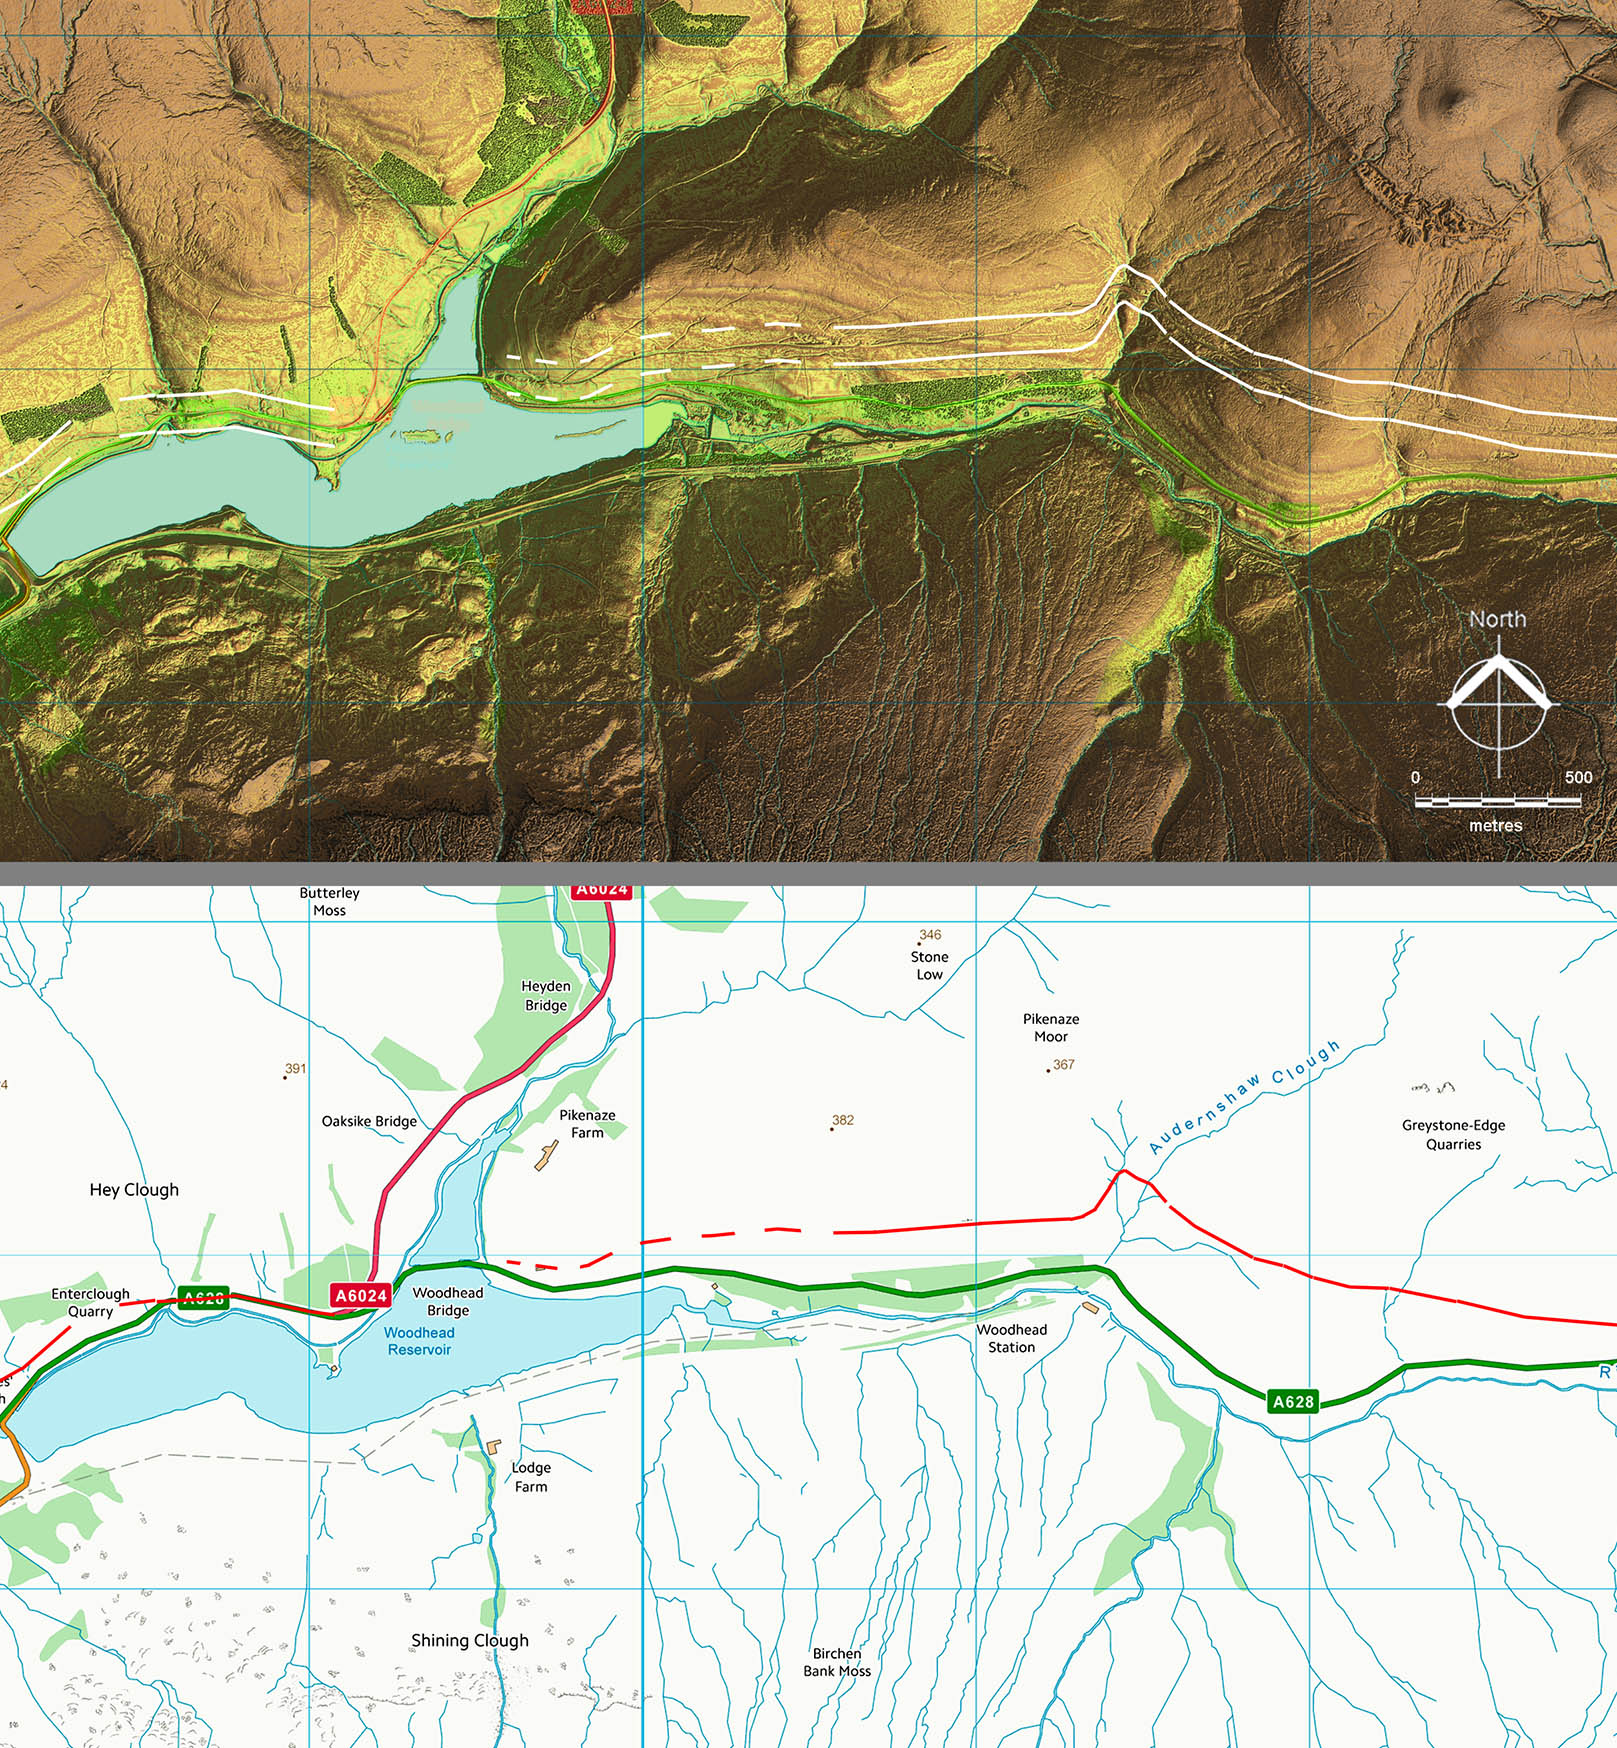
Longdendale Lidar Image & Route Map 3 Sorting out the Roman line from all the other roads and tracks that used this valley over the centuries is not at all easy. The route shown is the best guess as it appears to be the oldest and it does have several Roman characteristics i.e. a series of straights, a long steady climb and upstream crossing of side streams. It was probably upgraded as a turnpike but upgrading on top of a Roman line was fairly common. |
Click for larger view
|
 |
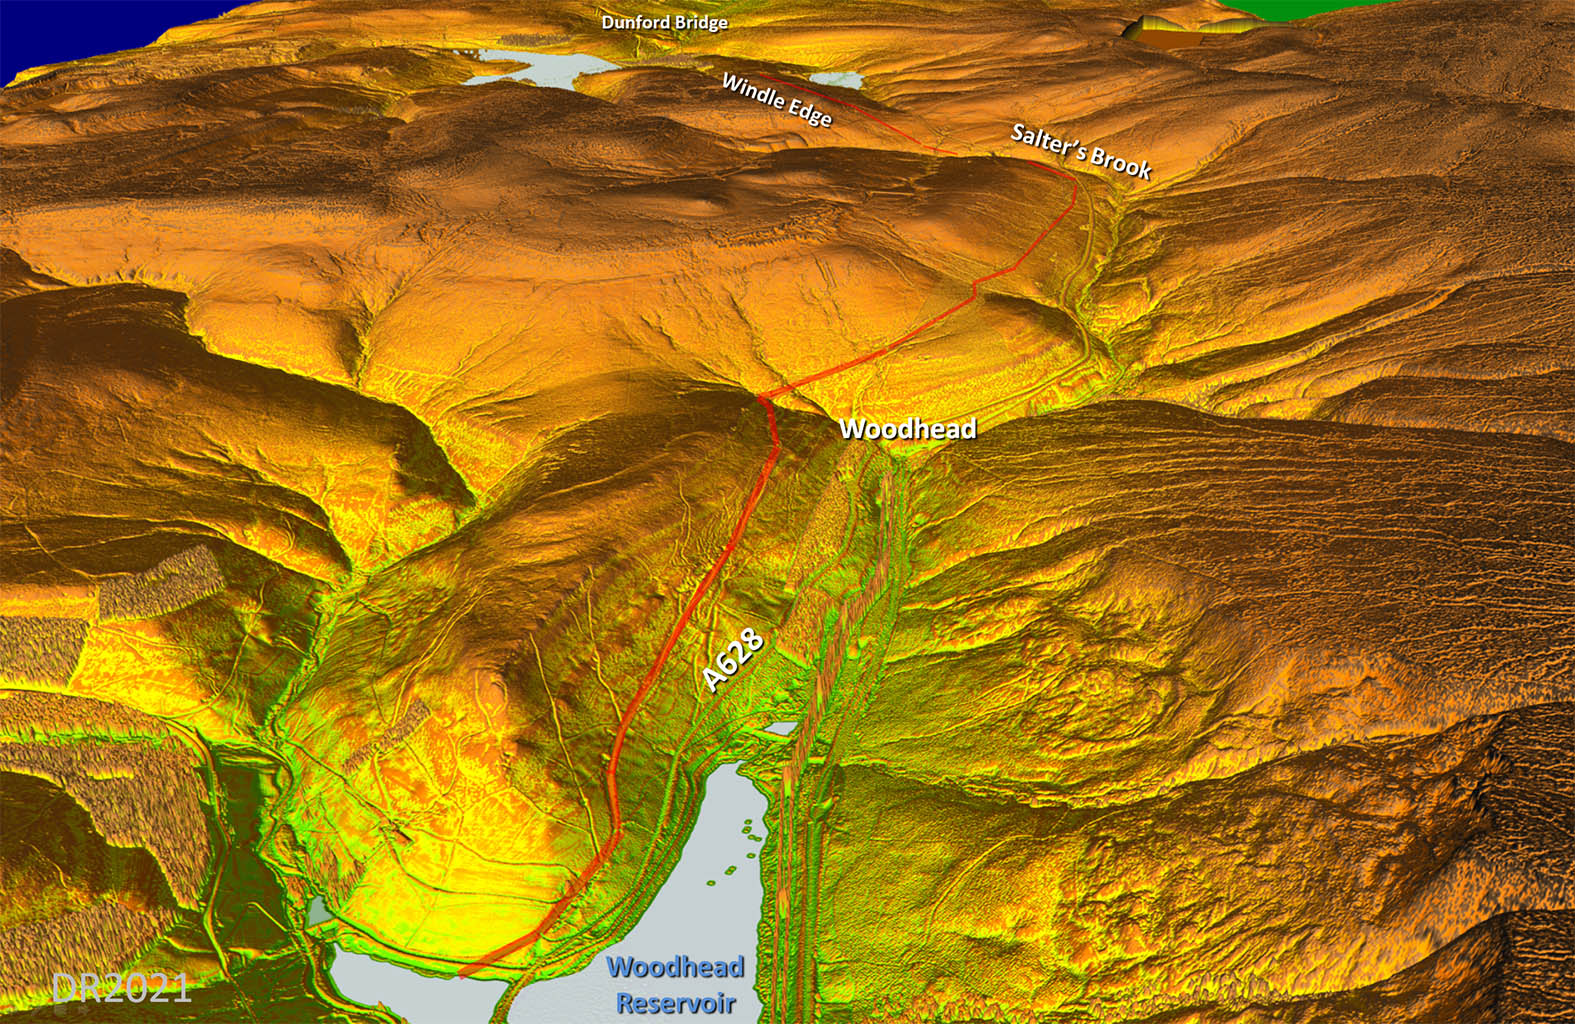
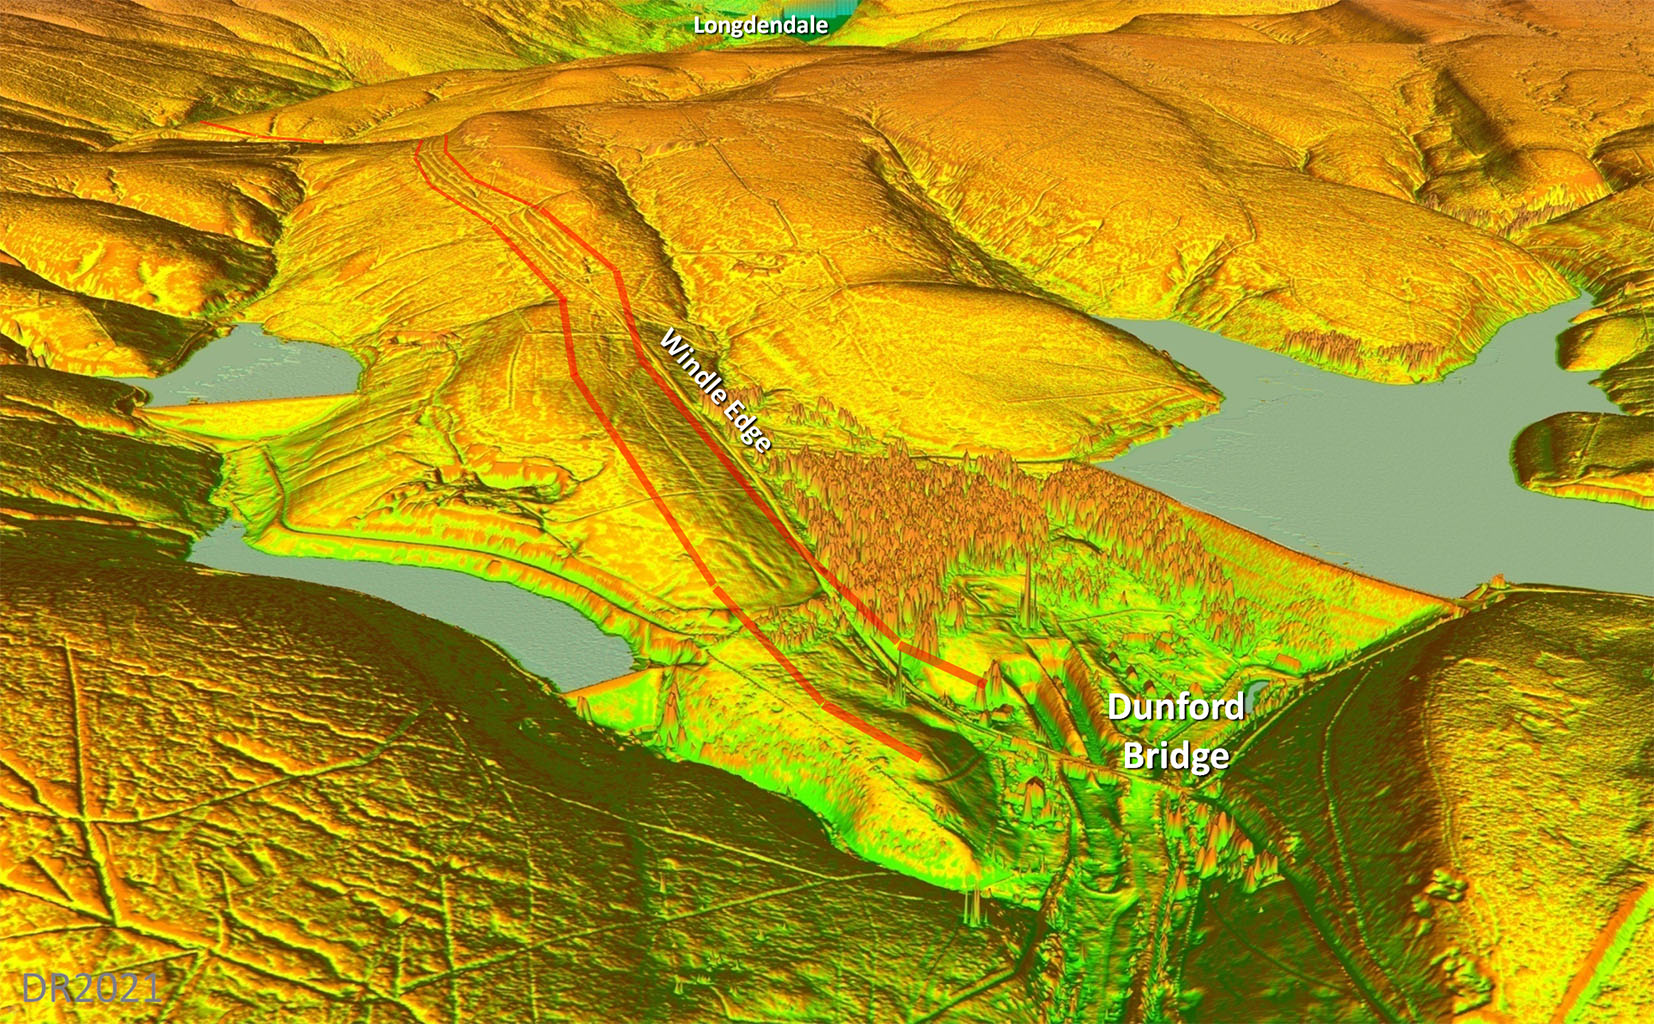
Oblique 3D Lidar Image - Upper Longdendale to Dunford Bridge It is almost certainly the best route from Longdendale to the upper Don Valley. Roman surveying at its best. |
Click for larger view |
 |
Longdendale Lidar Image & Route Map 4 The connection from the valley to Windle Edge is faint but of high confidence. |
Click for larger view
|
 |
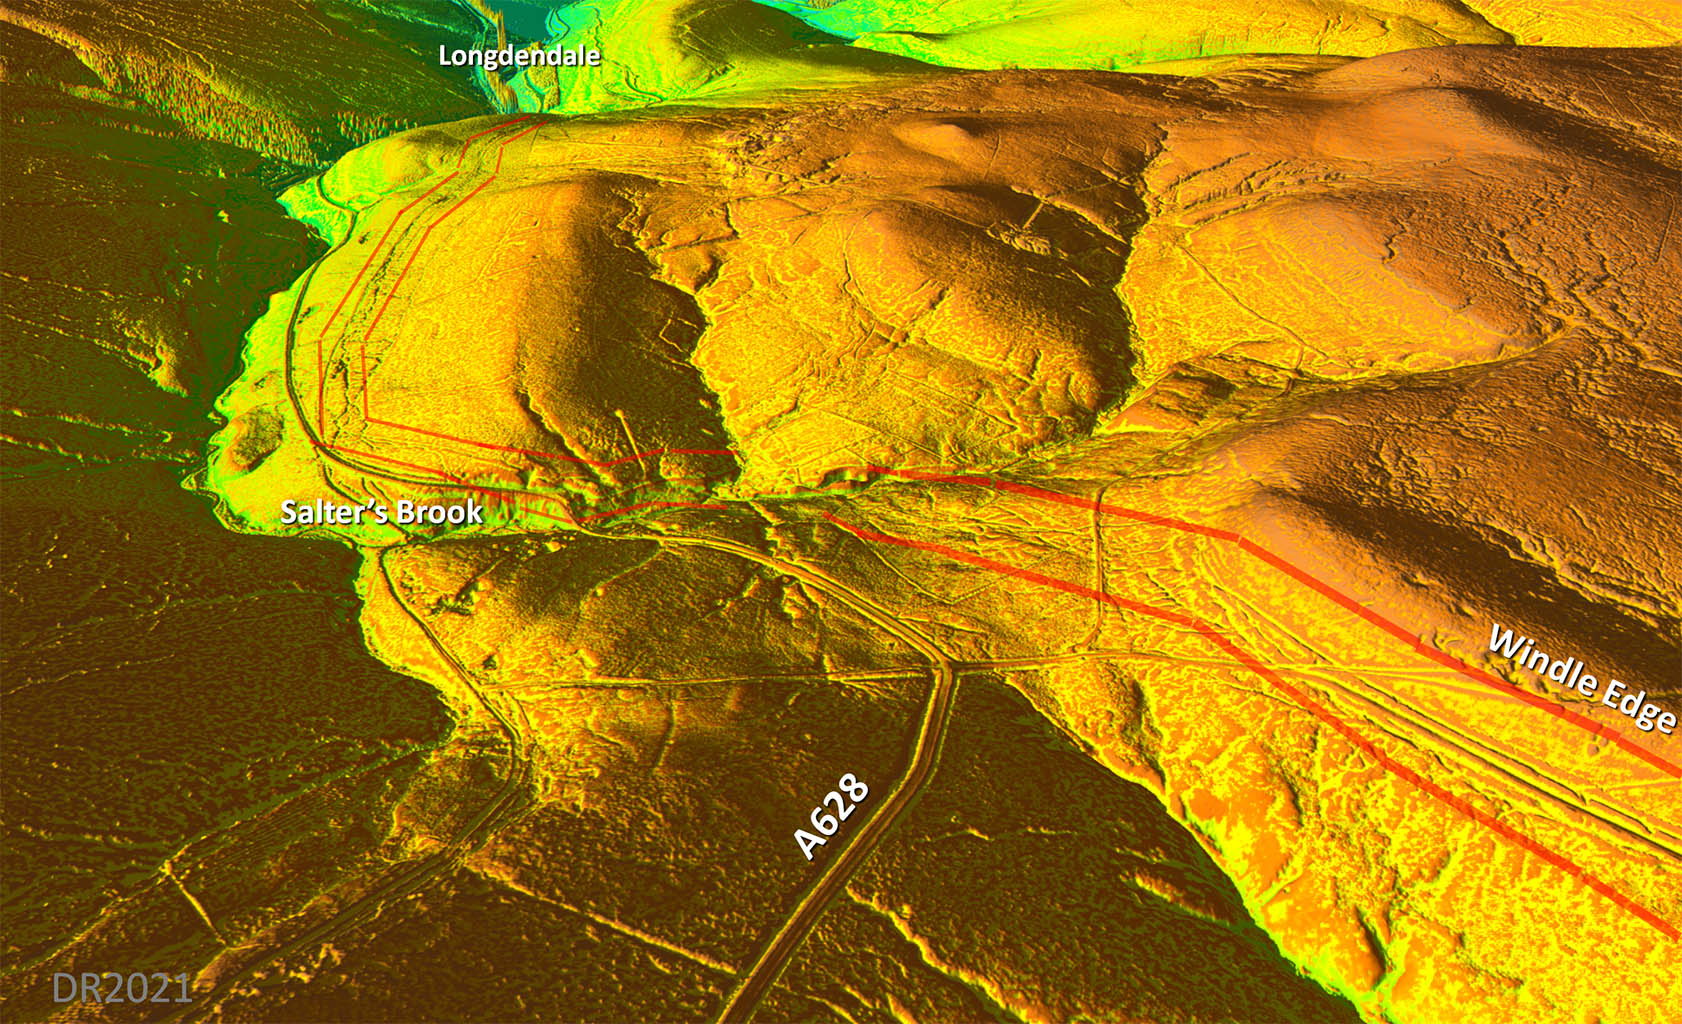
Oblique 3D Lidar Image At Salter's Brook our road swing more to the north and heads towards Windle Edge. The traces are faint but this is considered the most likely course. |
Click for larger view |
 |
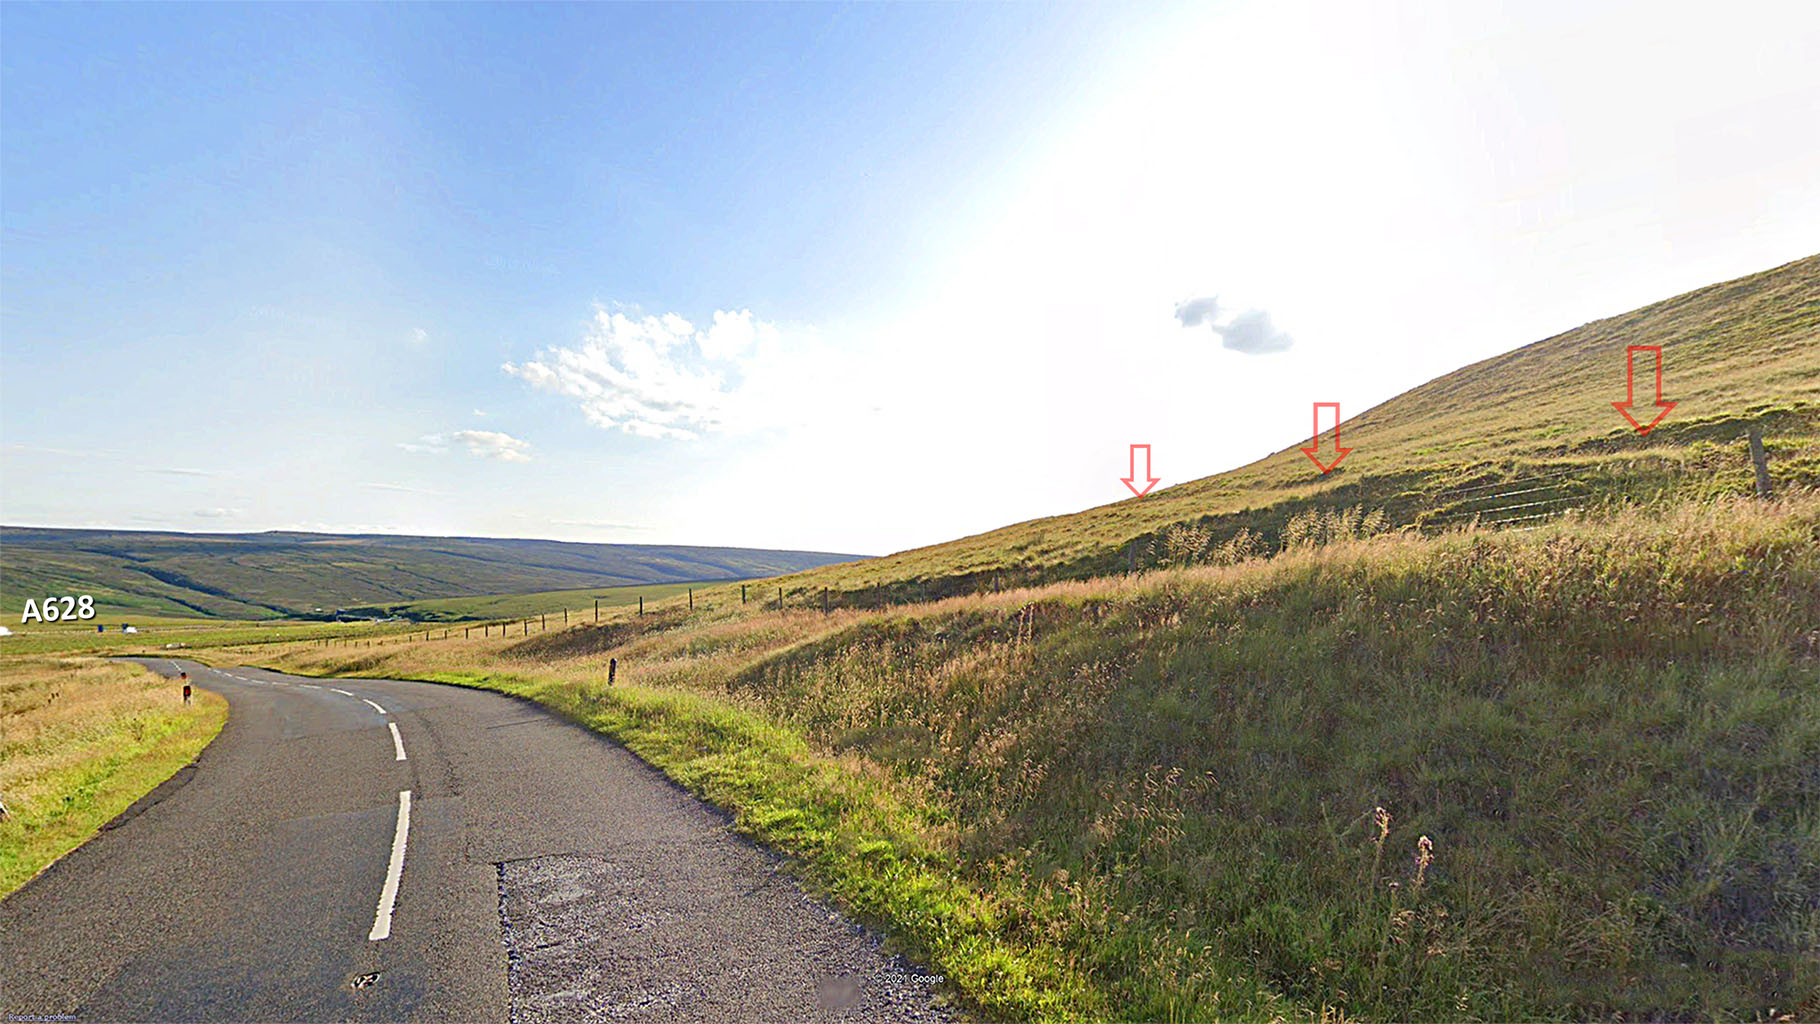
Lidar Image & Route Map 2 At the beginning of Windle Edge the modern road swing towards the Roman line but keeps below it initially. Image: David Ratledge. |
Click for larger view |
 |
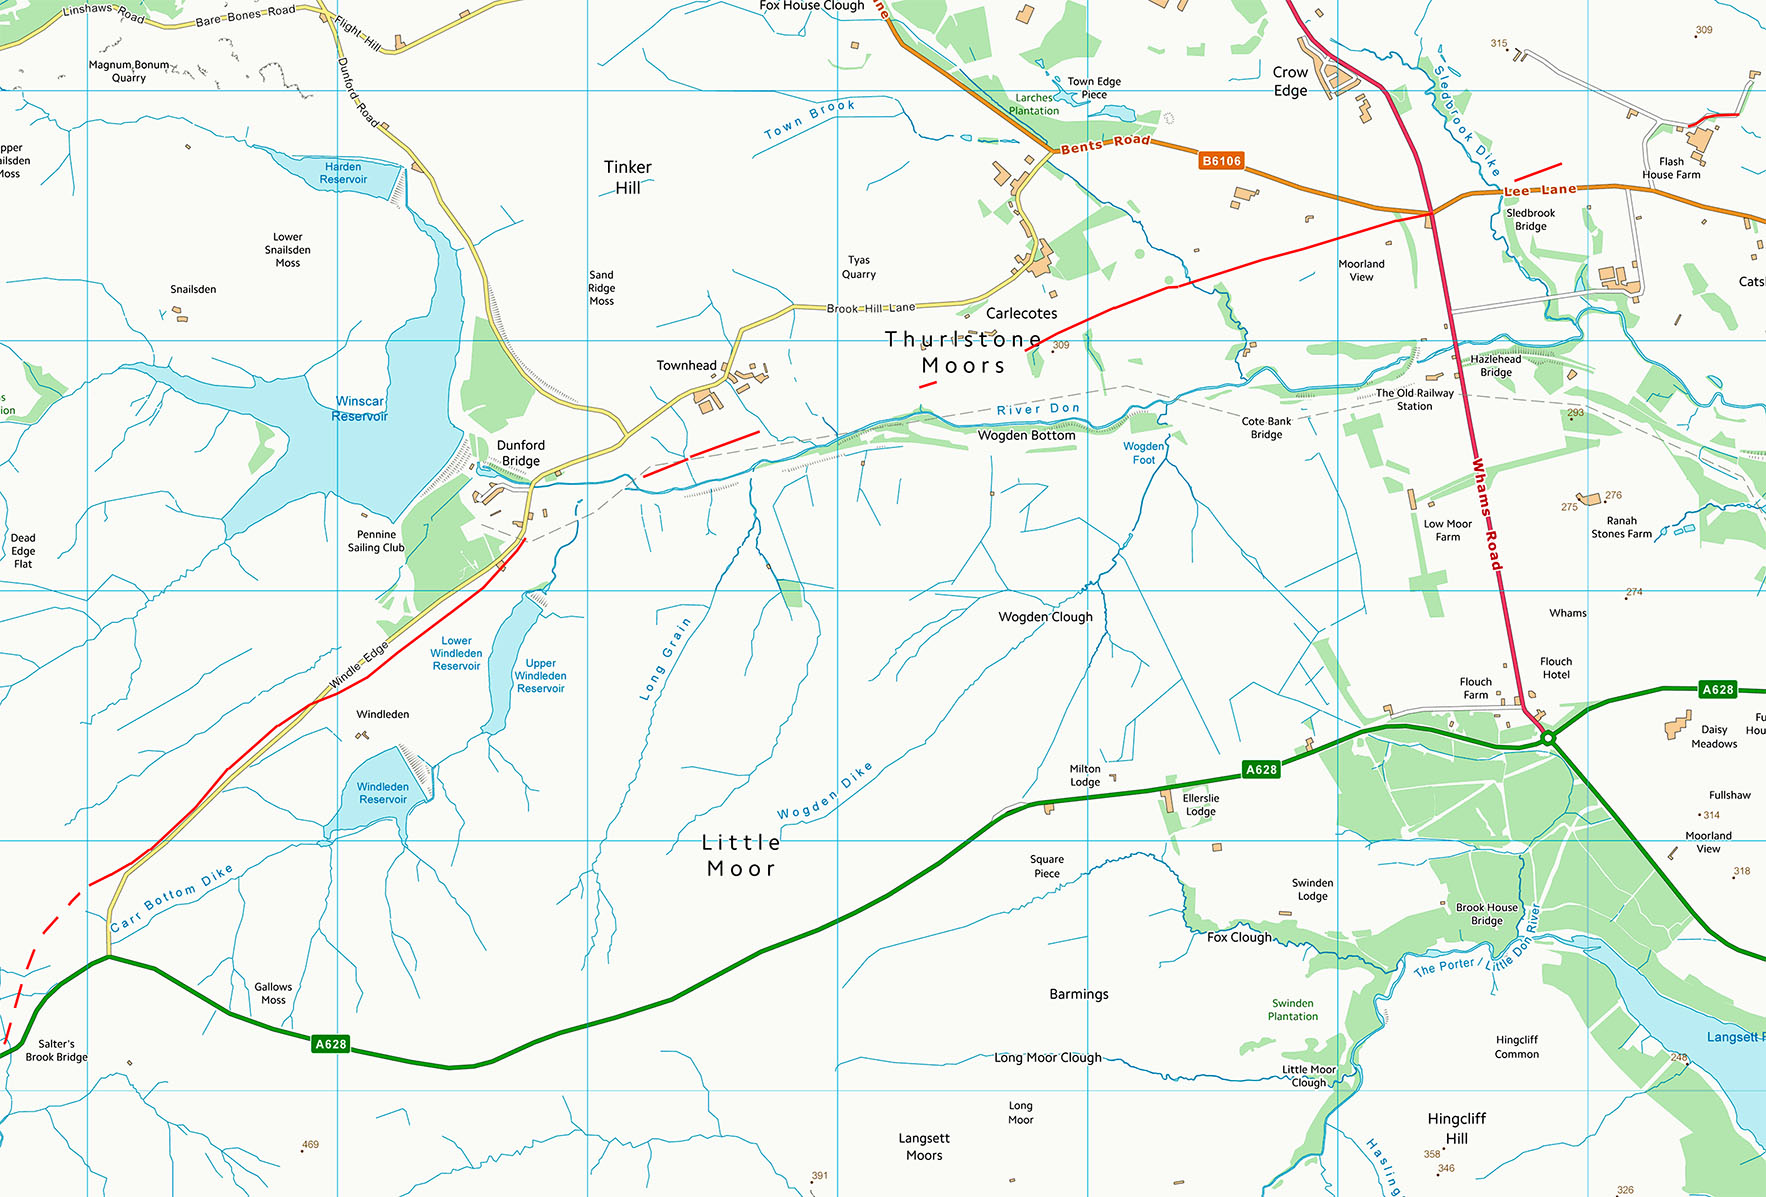
Route Map 3 Basically two alignments. The first along along WIndle Edge and the second across the north side of the Upper Don Valley. |
Click for larger view |
 |
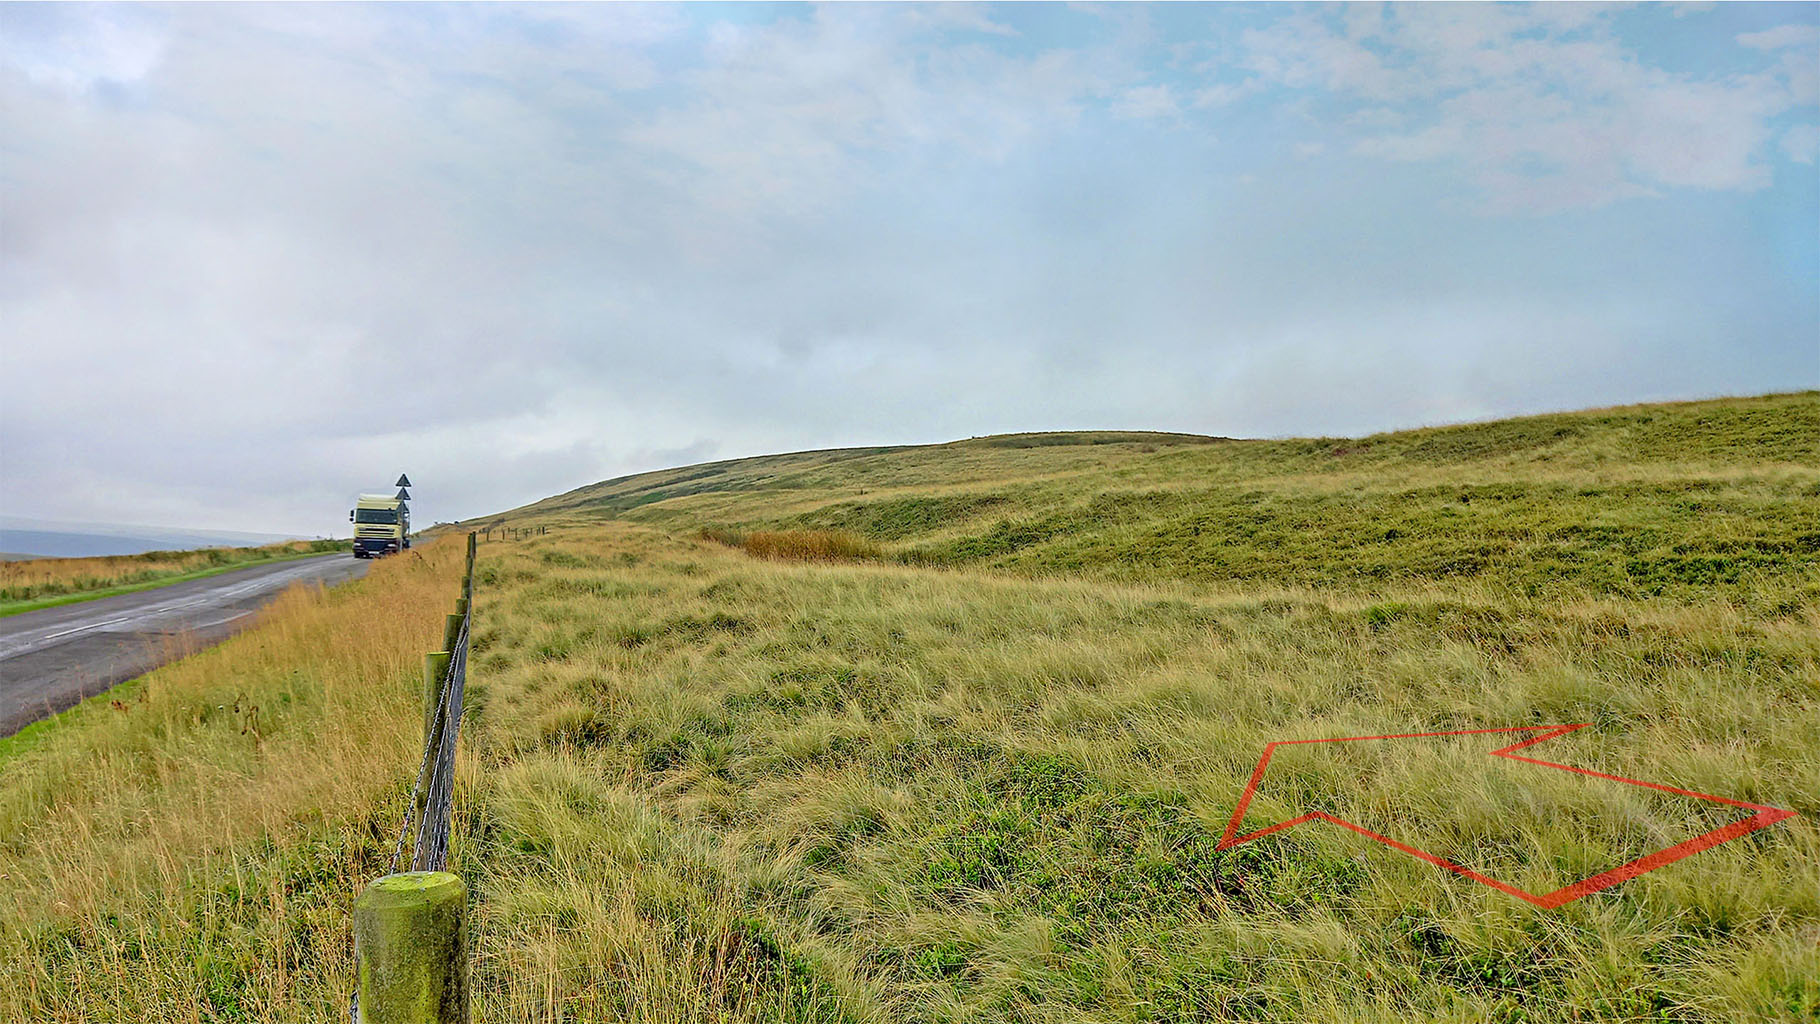
Oblique 3D Lidar Image - Champion Carr The arrow is point back towards Longdendale along the prominent Roman agger. Note the cutting or terrace (right of the agger) which had to be cut into the side sloping ground here. Image: David Ratledge. |
Click for larger view |
 |
Oblique 3D Lidar Image - Windle Edge and Dunford Bridge Half way along Windle Edge the Roman route switches sides of the modern road. By doing so follows more towards the crest of the ridge - a typical Roman trait. |
Click for larger view |
|
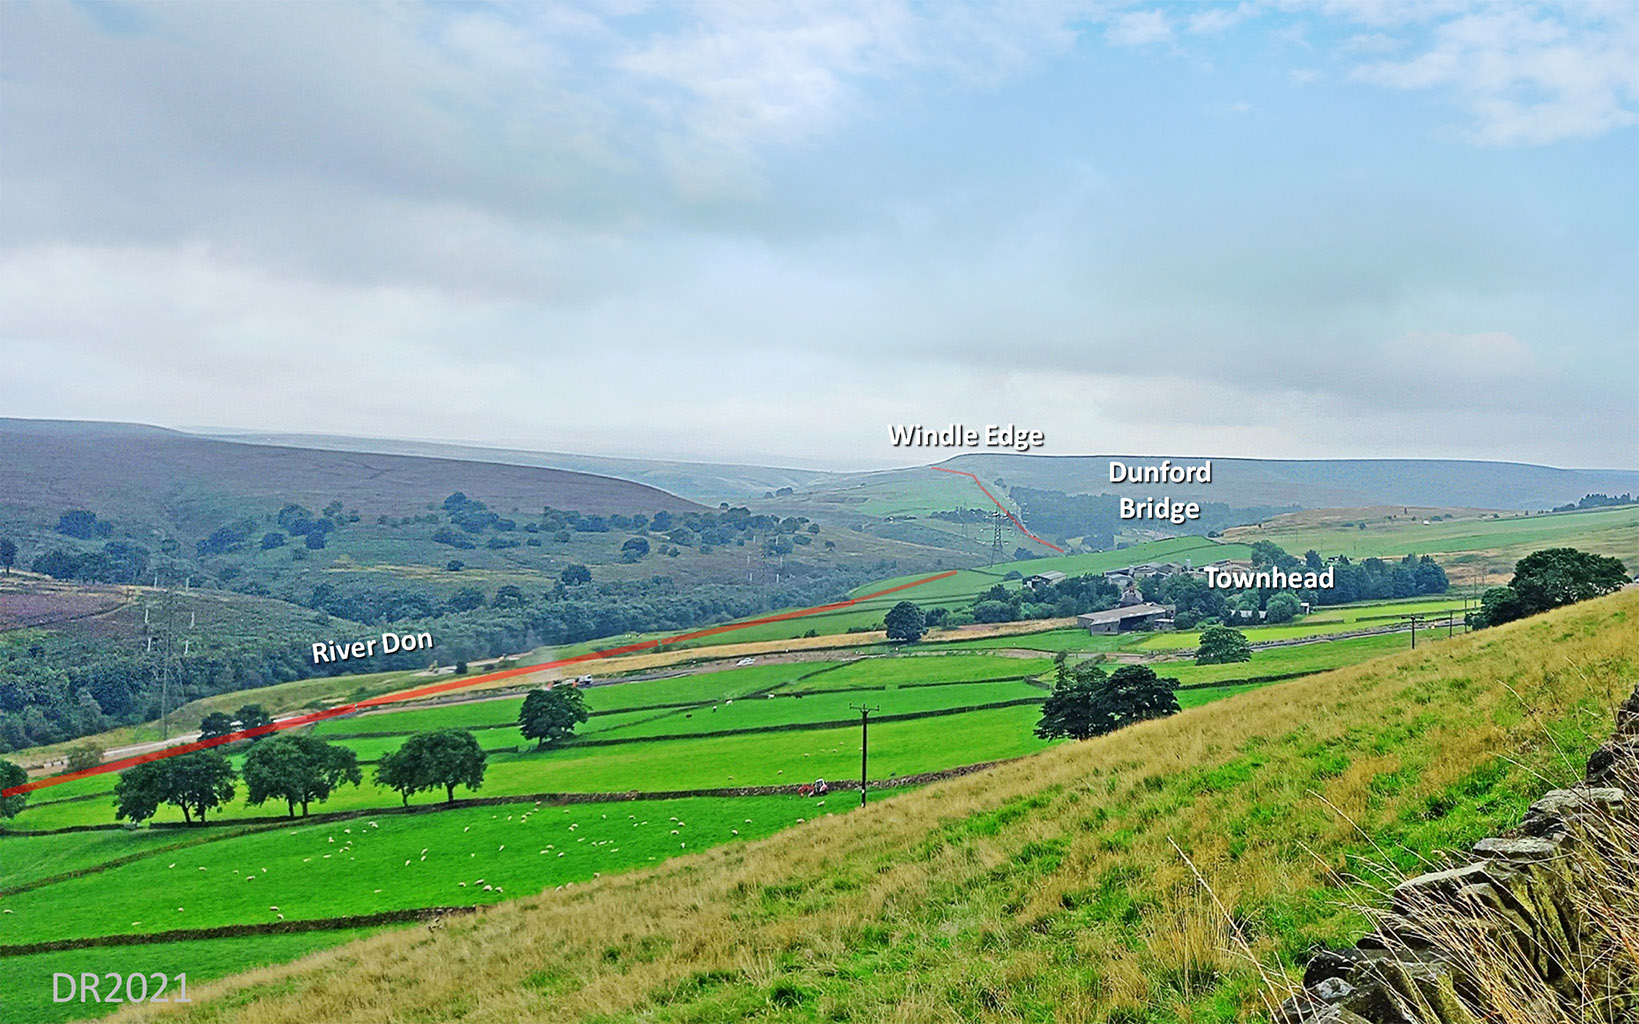
View from Brook Hill Lane Looking back, this time from Brook Hill Lane. The Roman road is down towards the river and not obvious at all but the ascent it has to make up to Windle Edge is visible in the distance. Image: David Ratledge
|
Click for larger view |
 |
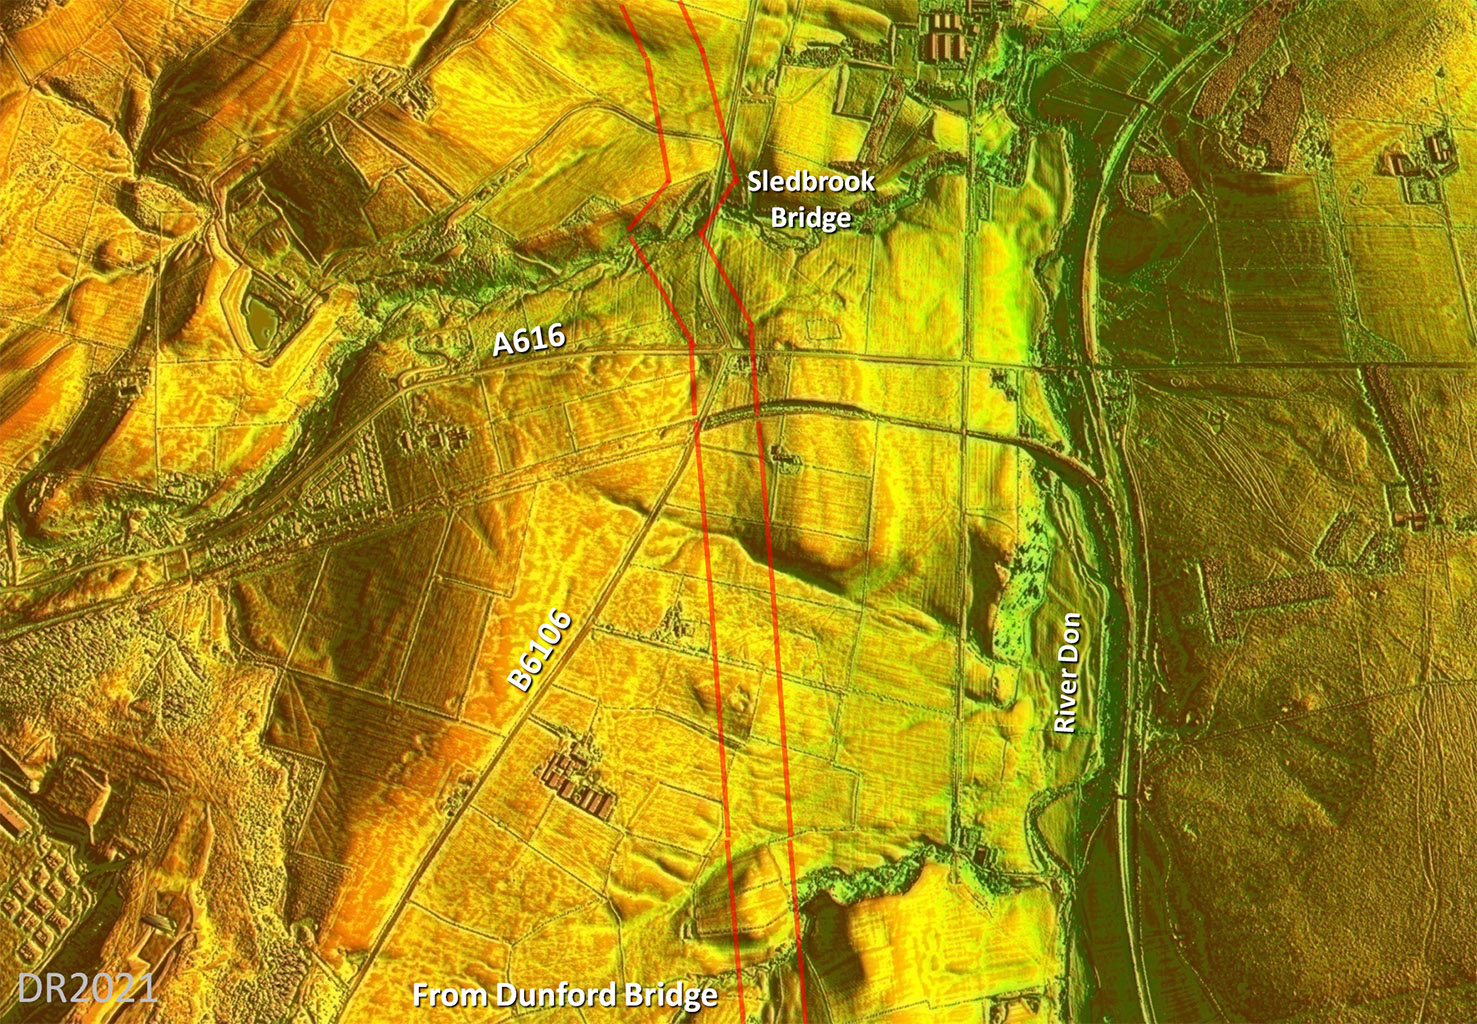
Oblique 3D Lidar Image - Sledbrook Bridge This was the breakthrough LiDAR image that revealed the road in the Upper Don Valley. |
Click for larger view |
 |
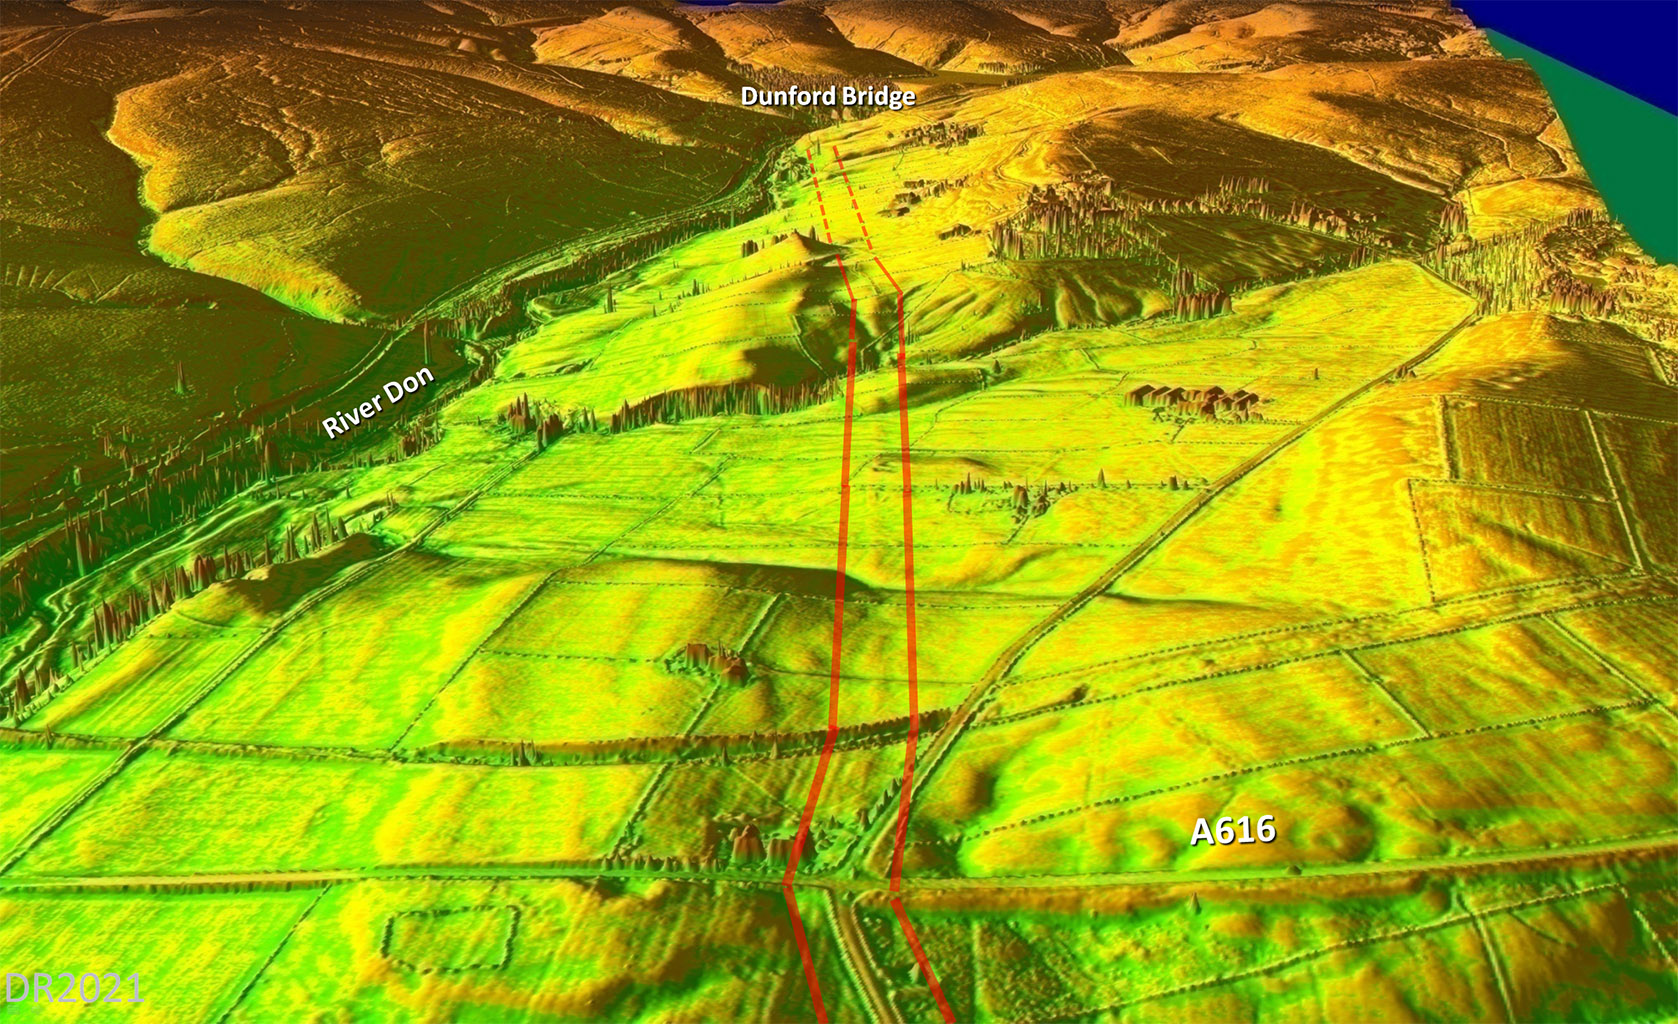
Oblique 3D Lidar Image - Sledbrook Bridge to Dunford Bridge The equivalent 3D view of the image above looking back towards Dunford Bridge. |
Click for larger view |
 |
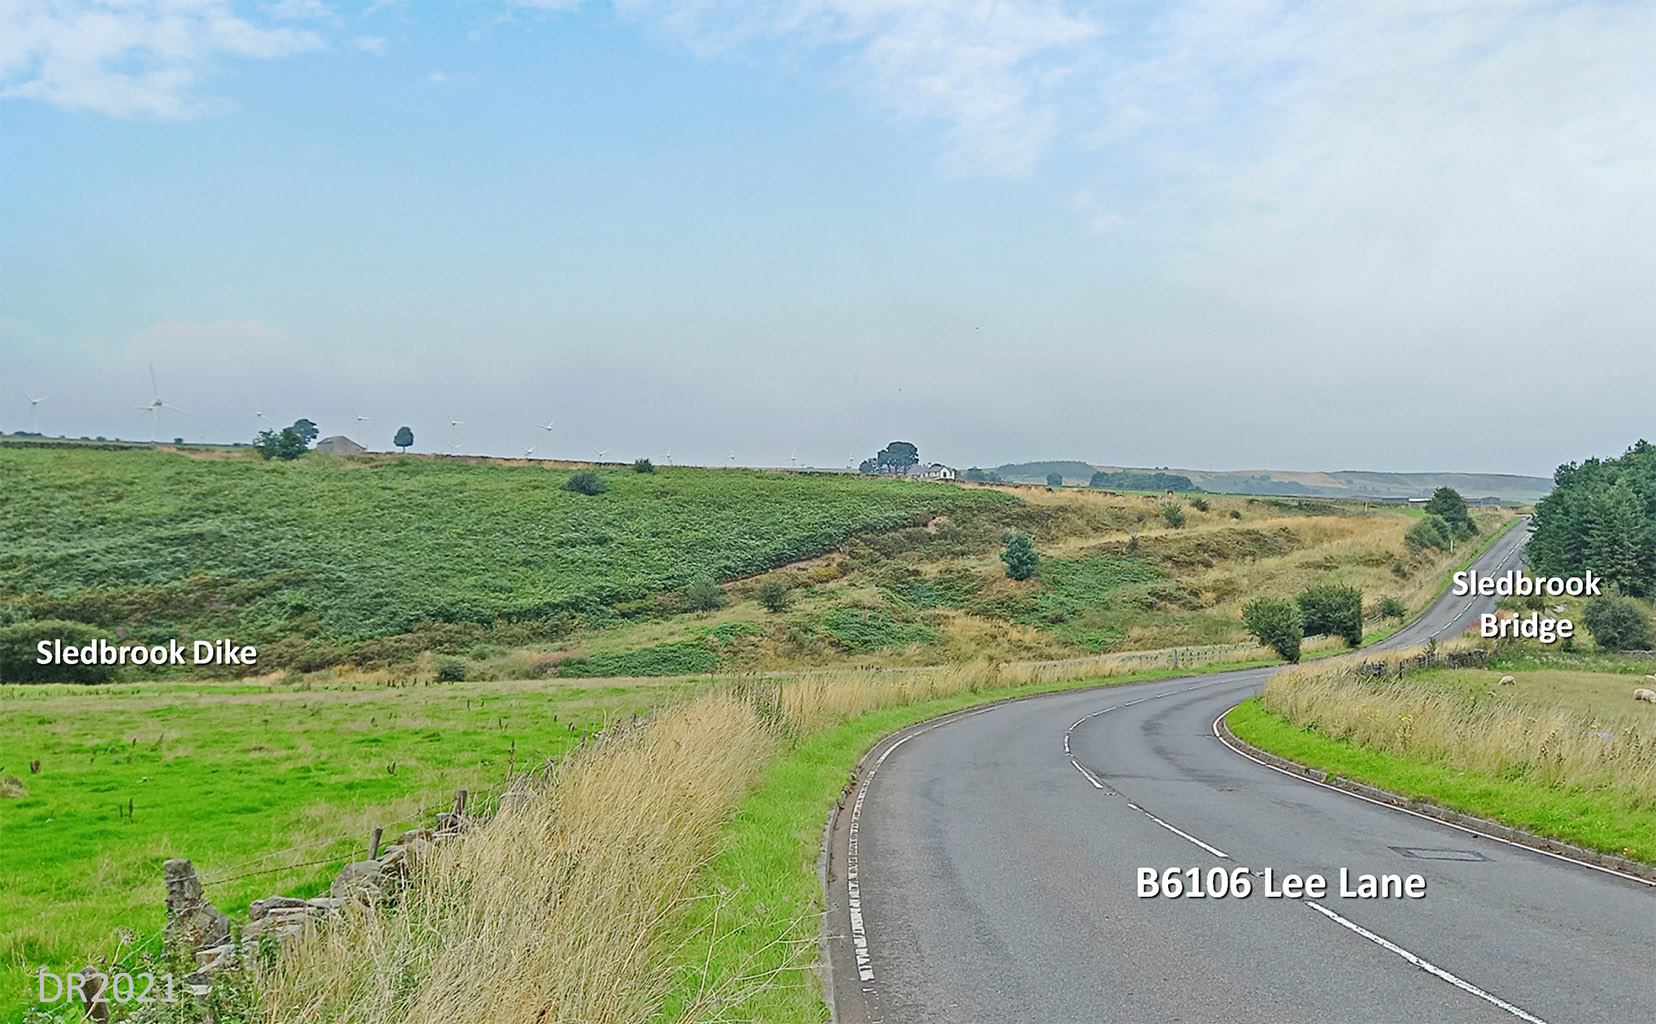
Lee Lane, Sledbrook Bridge A very obvious terrace climbing up diagonally from Sledbrook Dike. It would fit the Roman alignment but if Roman then why was it not spotted before? Image: David Ratledge. |
Click for larger view |
 |
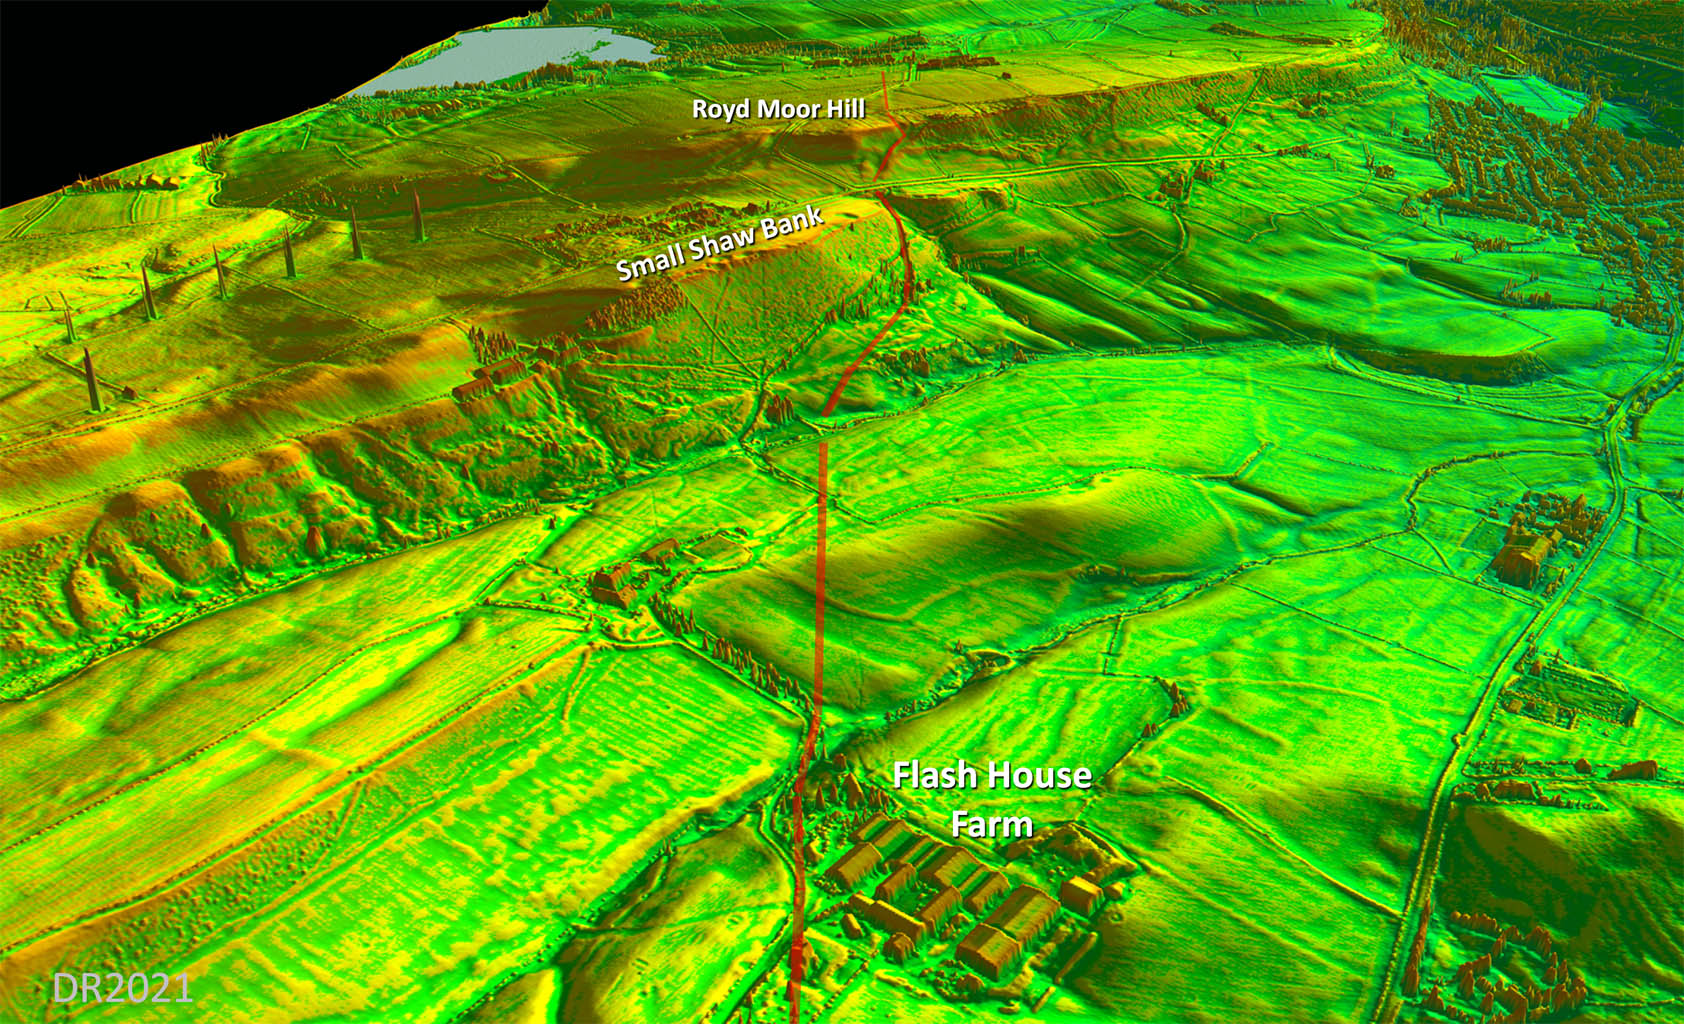
Oblique 3D Lidar Image - Flash House Farm to Royd Moor Small Shaw Bank and Royd Moor Hill were obstacles for the Roman surveyor to negotiate. For small Shaw Bank and natural valley was exploited. For Royd Moor Hill a typical zig-zag ascent was employed. |
Click for larger view |
 |
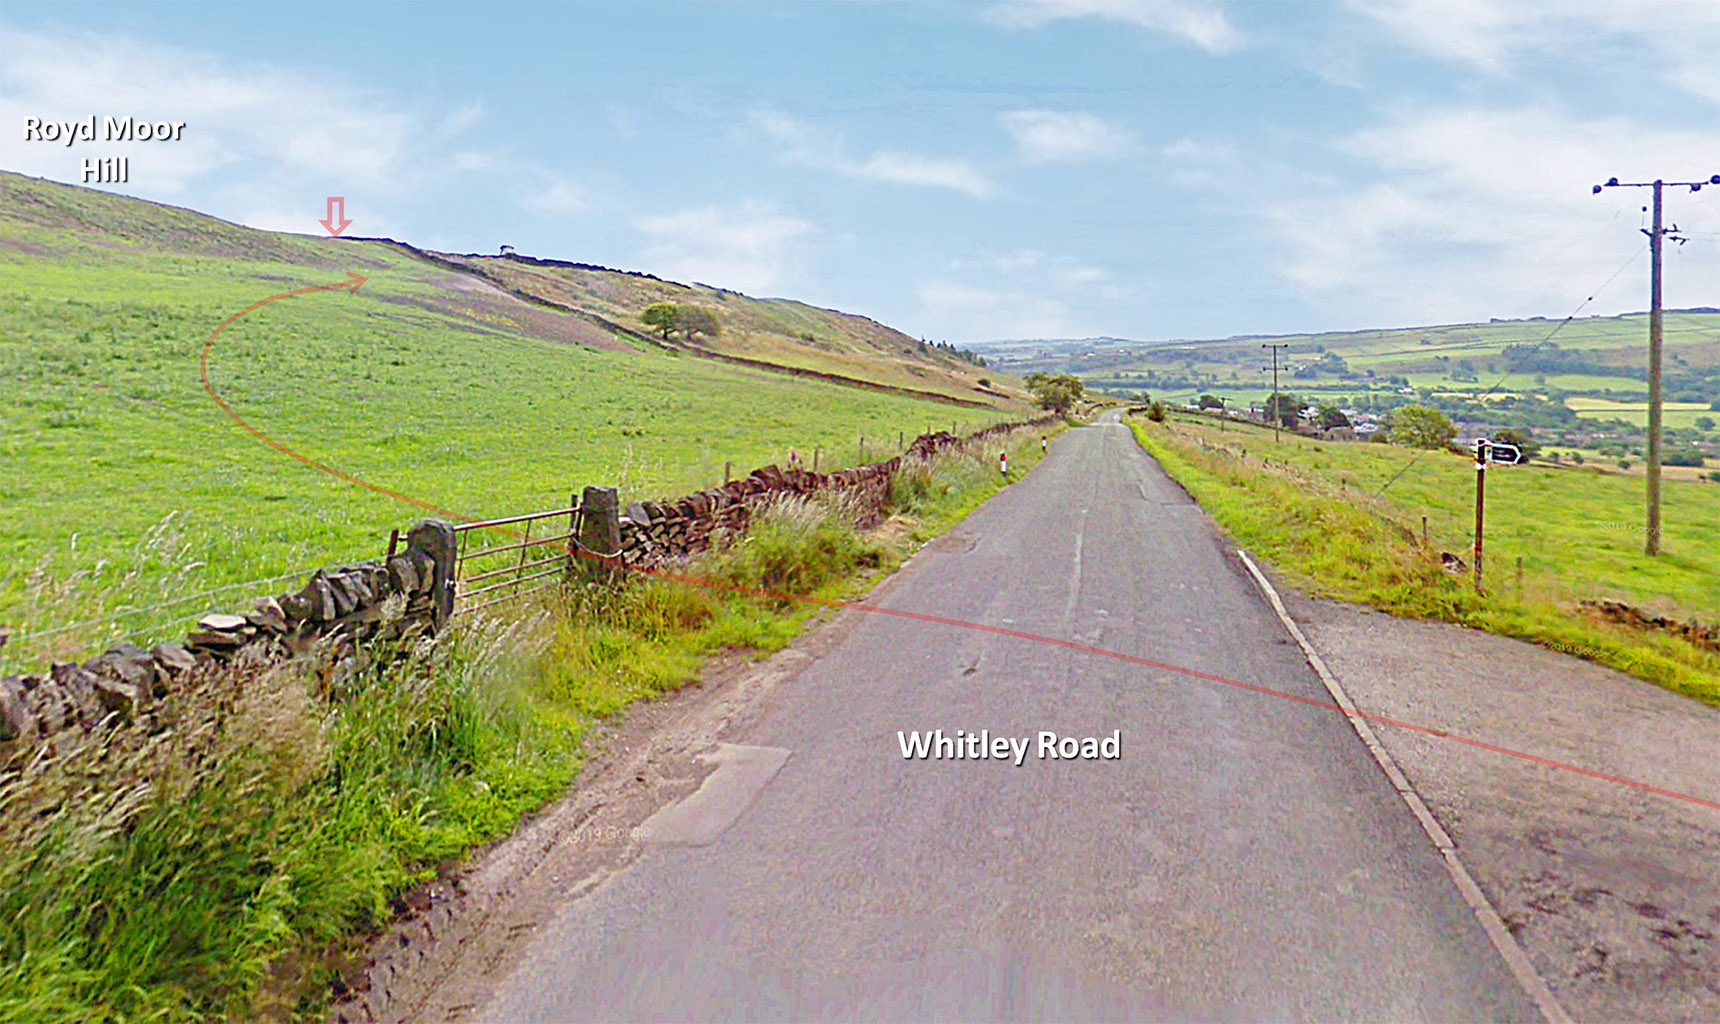
Crossing Whitley Road We are between Small Shaw Bank and Royd Moor Hill here and the road can be seen ascending the latter in a typical zig-zag indicated by a greener shade of grass. Image: Google |
Click for larger view |
 |
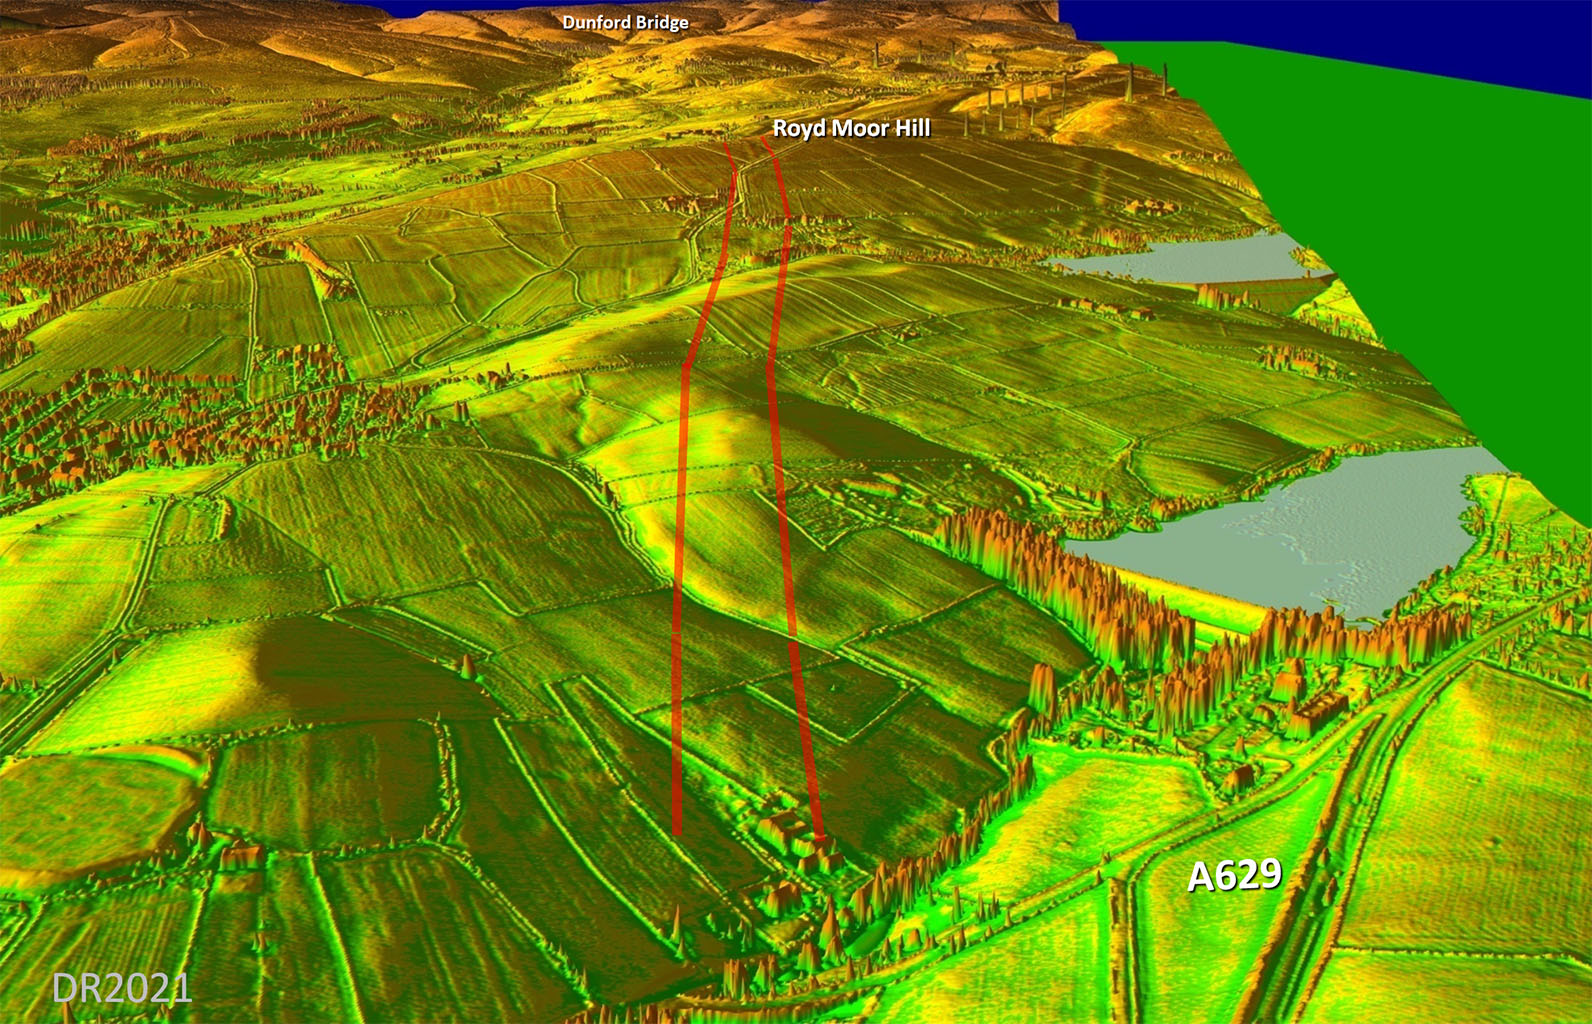
Oblique 3D Lidar Image - Royd Moor to Hoylandswaine We are looking back (west) towards Royd Moor. The clues are faint but because they all line up we can be certain of the road's course here. |
Click for larger view |
 |
Oblique 3D Lidar Image - Hoylandswaine looking East This was the last trace where the series 1 the lidar ran out at Hoylandswaine. |
Click for larger view |
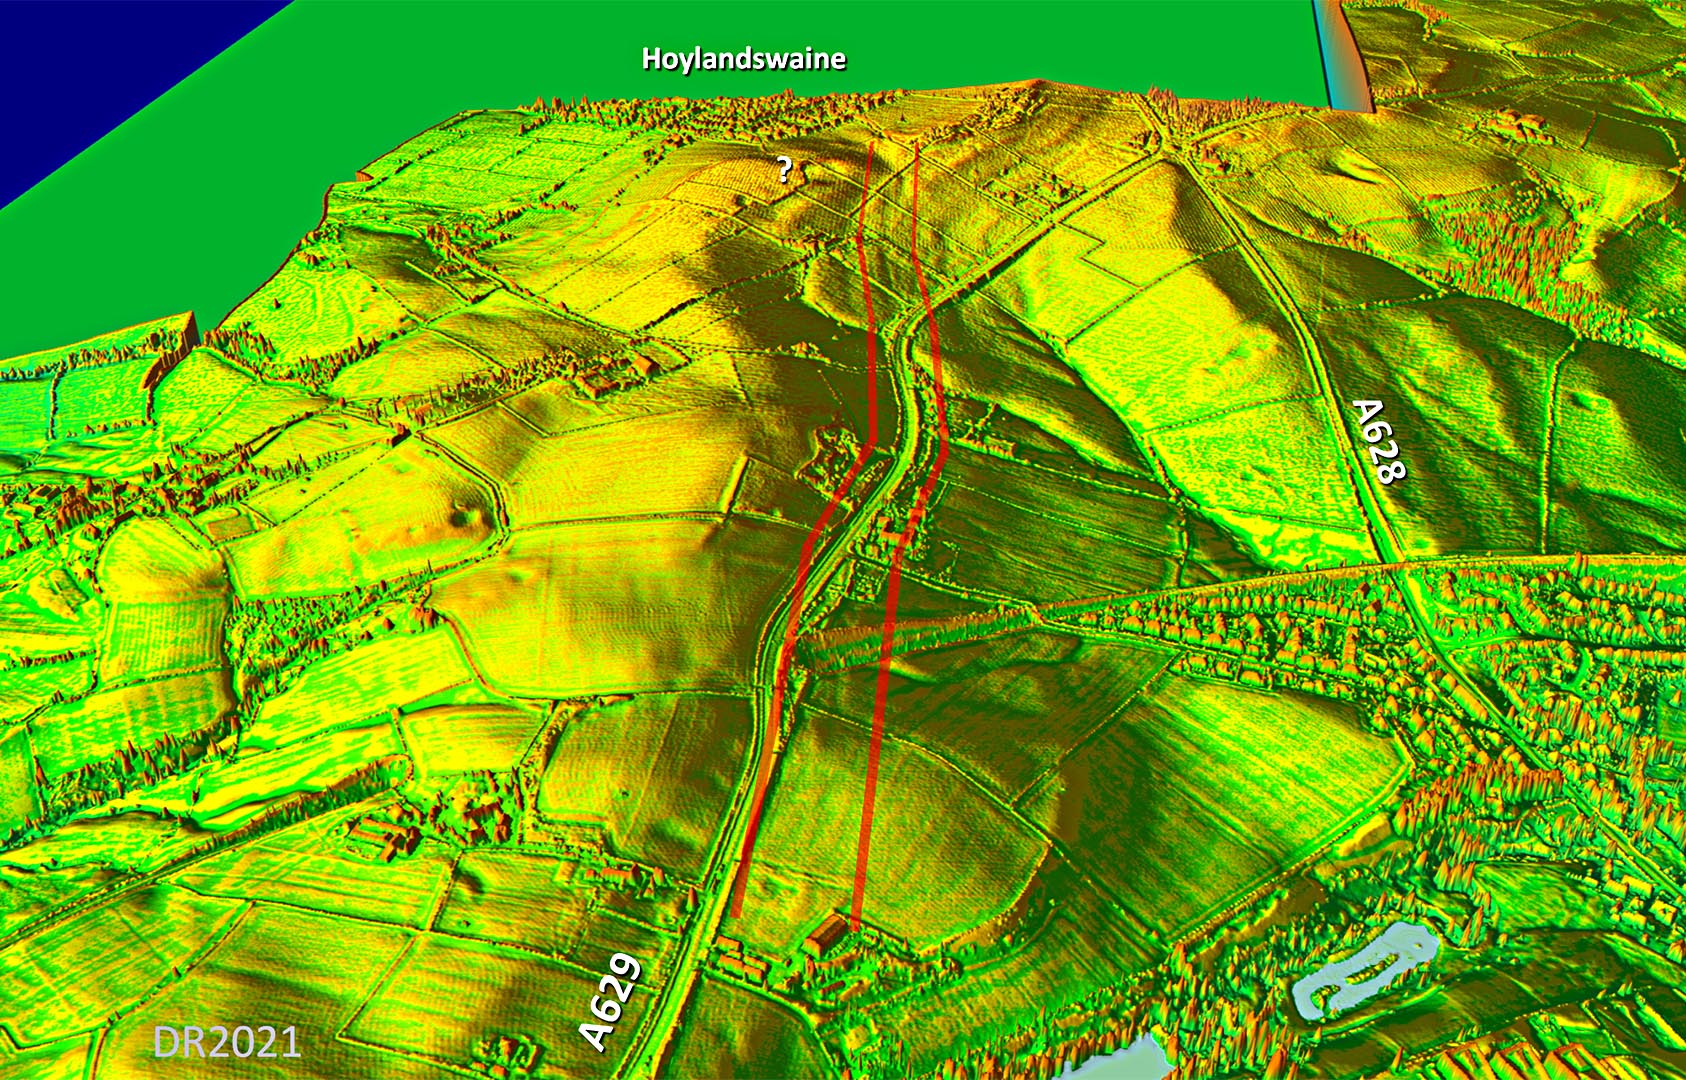 |
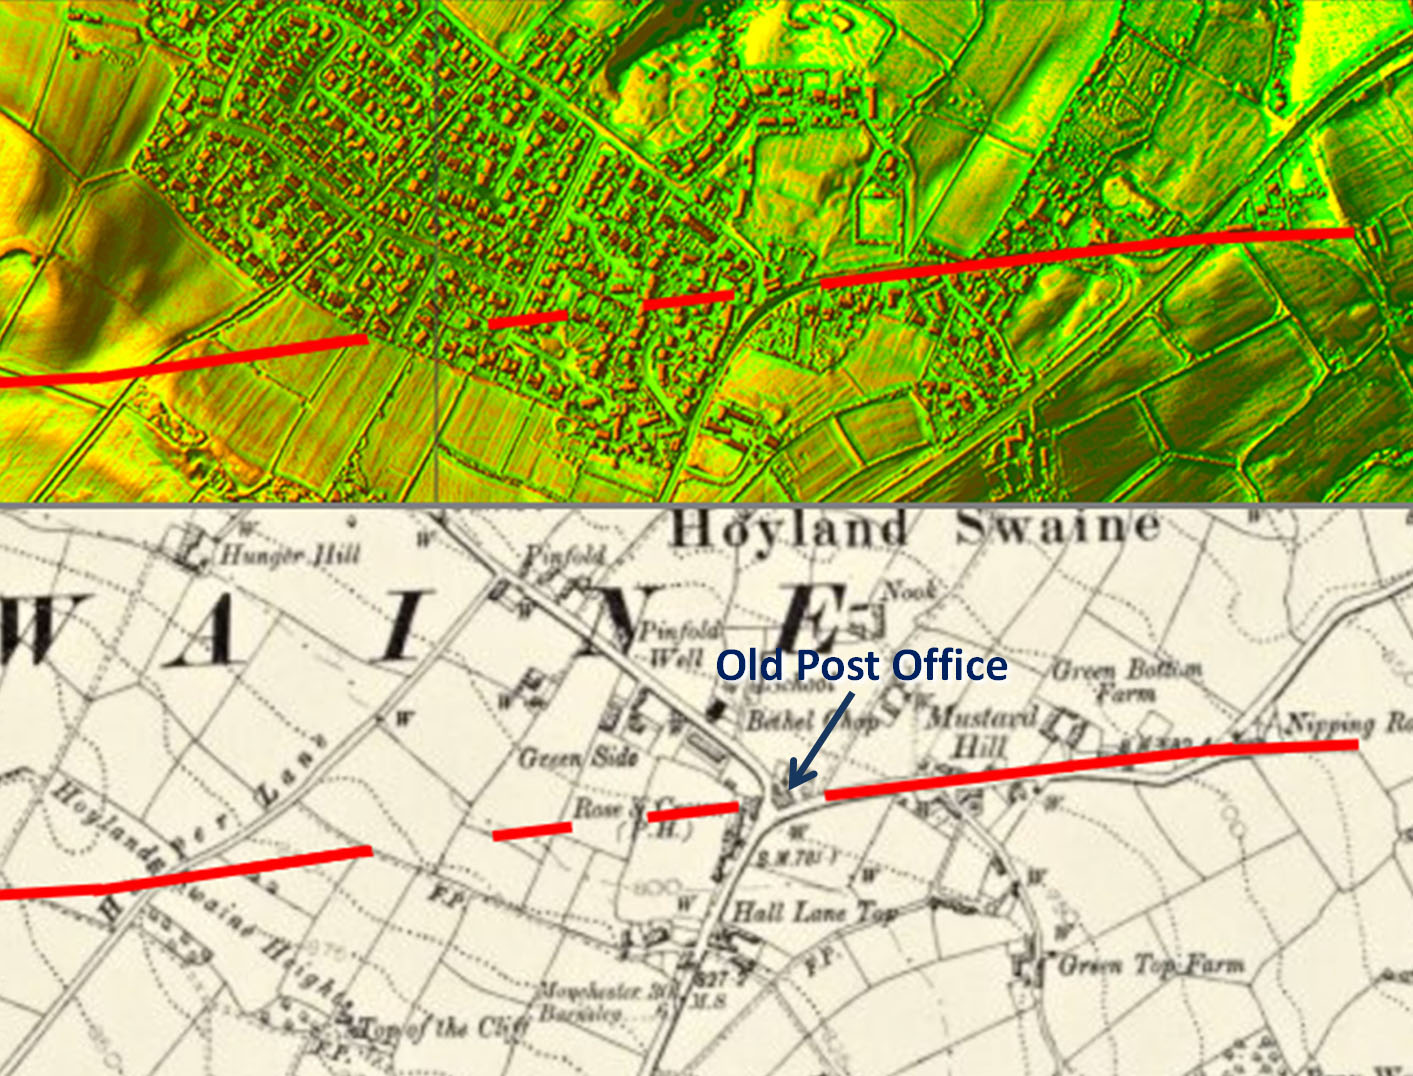
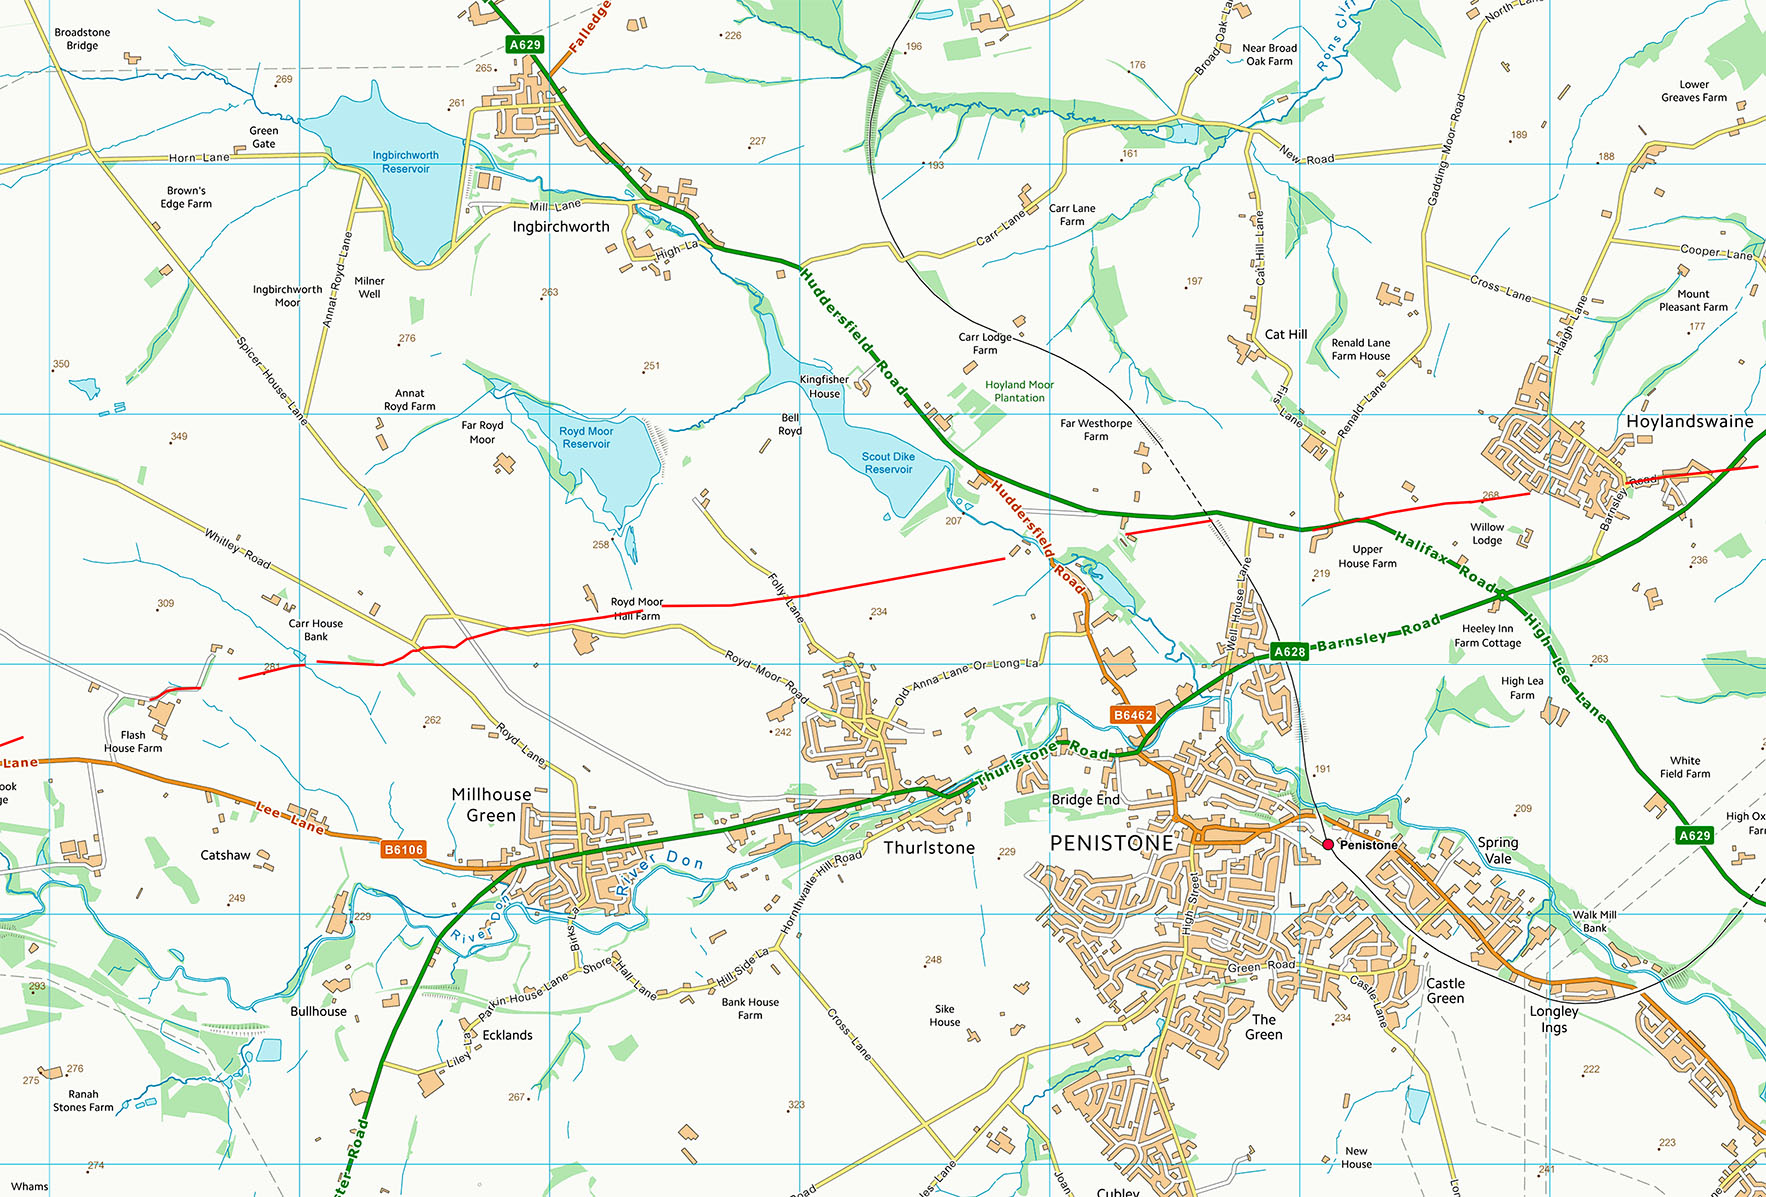
Hoylandswaine - Route across the village Projecting the last alignment from west of Hoylandswaine then the road headed towards Barnsley Road and looked to pass under the Old Post Office.. |
Click for larger view |
 |
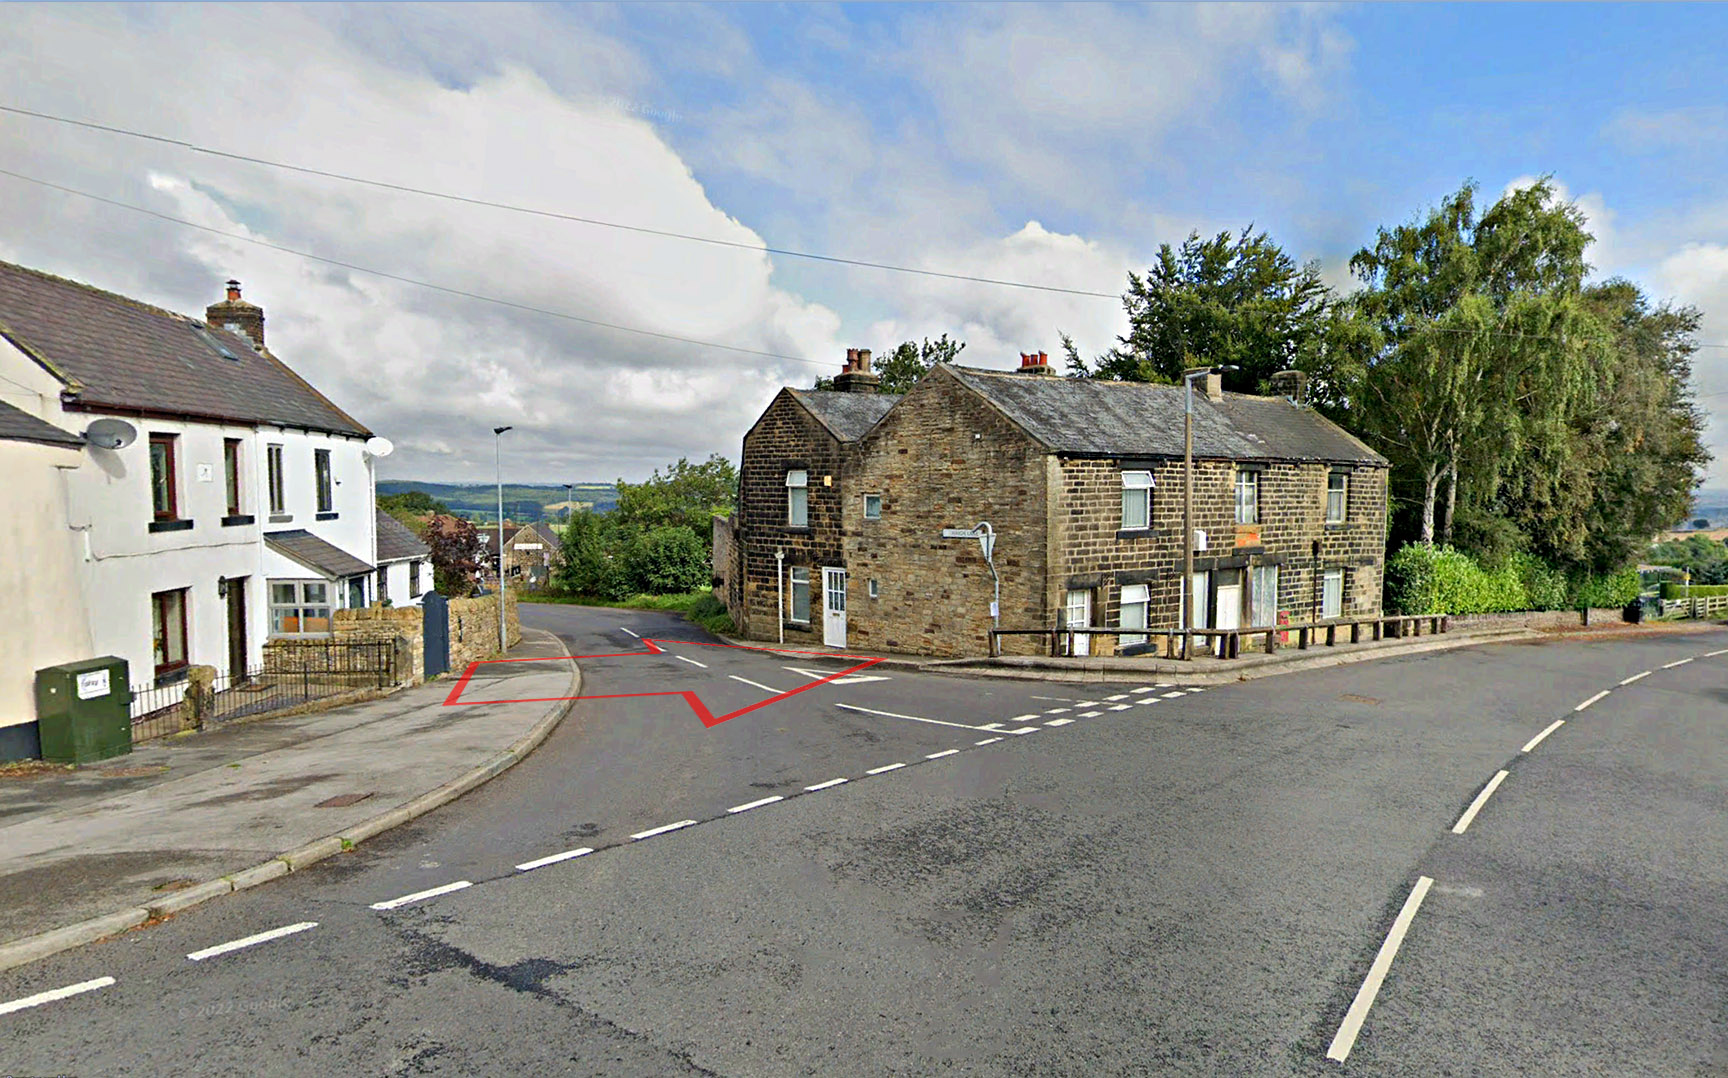
Barnsley Road, Hoylandswaine The Old Post Office (red post box on wall) before it was demolished. Note how it is well below the modern road level. |
Click for larger view |
 |
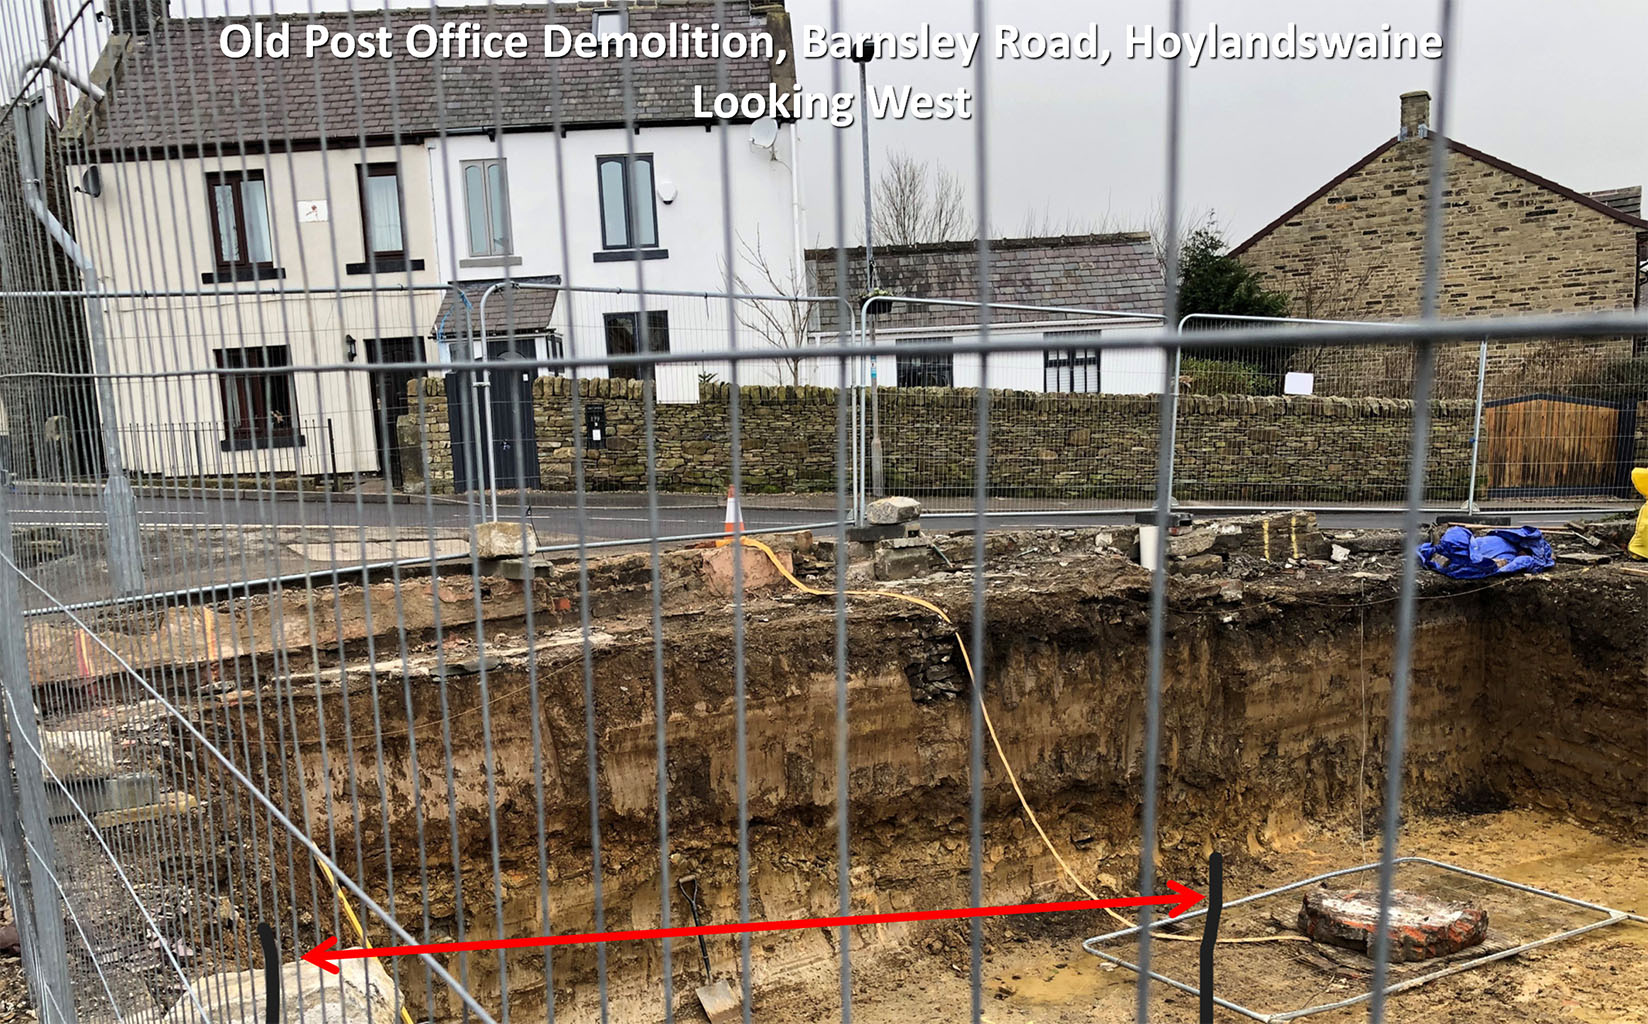
Barnsley Road, Hoylandswaine - Excavation of Old Post Office, SE26306 04731 My discovery of the Roman road heading through Hoylandswaine prompted Steve Lapish from the village to raise awareness there of the road. As a result when the Old Post Office was being demolished and its cellars dug out, Philip Jones spotted what looked like the Roman road revealed in cross section. This was a layer of sandstone slabs around 7 metres wide exactly on the predicted line. It did though look a long way down, which at first made interpreting this as the road doubtful. However, the Post Office was well below the modern road level and even had guard railings alongside the road protecting the drop (see image above). There can be little doubt now that this is indeed the Roman road with the sandstone being the surviving foundation layer. Congratulations to Steve and Philip. Image: Philip Jones |
Click for larger view |
 |
Route Map 4 A fairly direct route all the way to Hoylandswaine where the series 1 Lidar ended. Following it beyond Hoylandswaine would have to wait for series 2 Lidar - see later.
|
Click for larger view |
 |
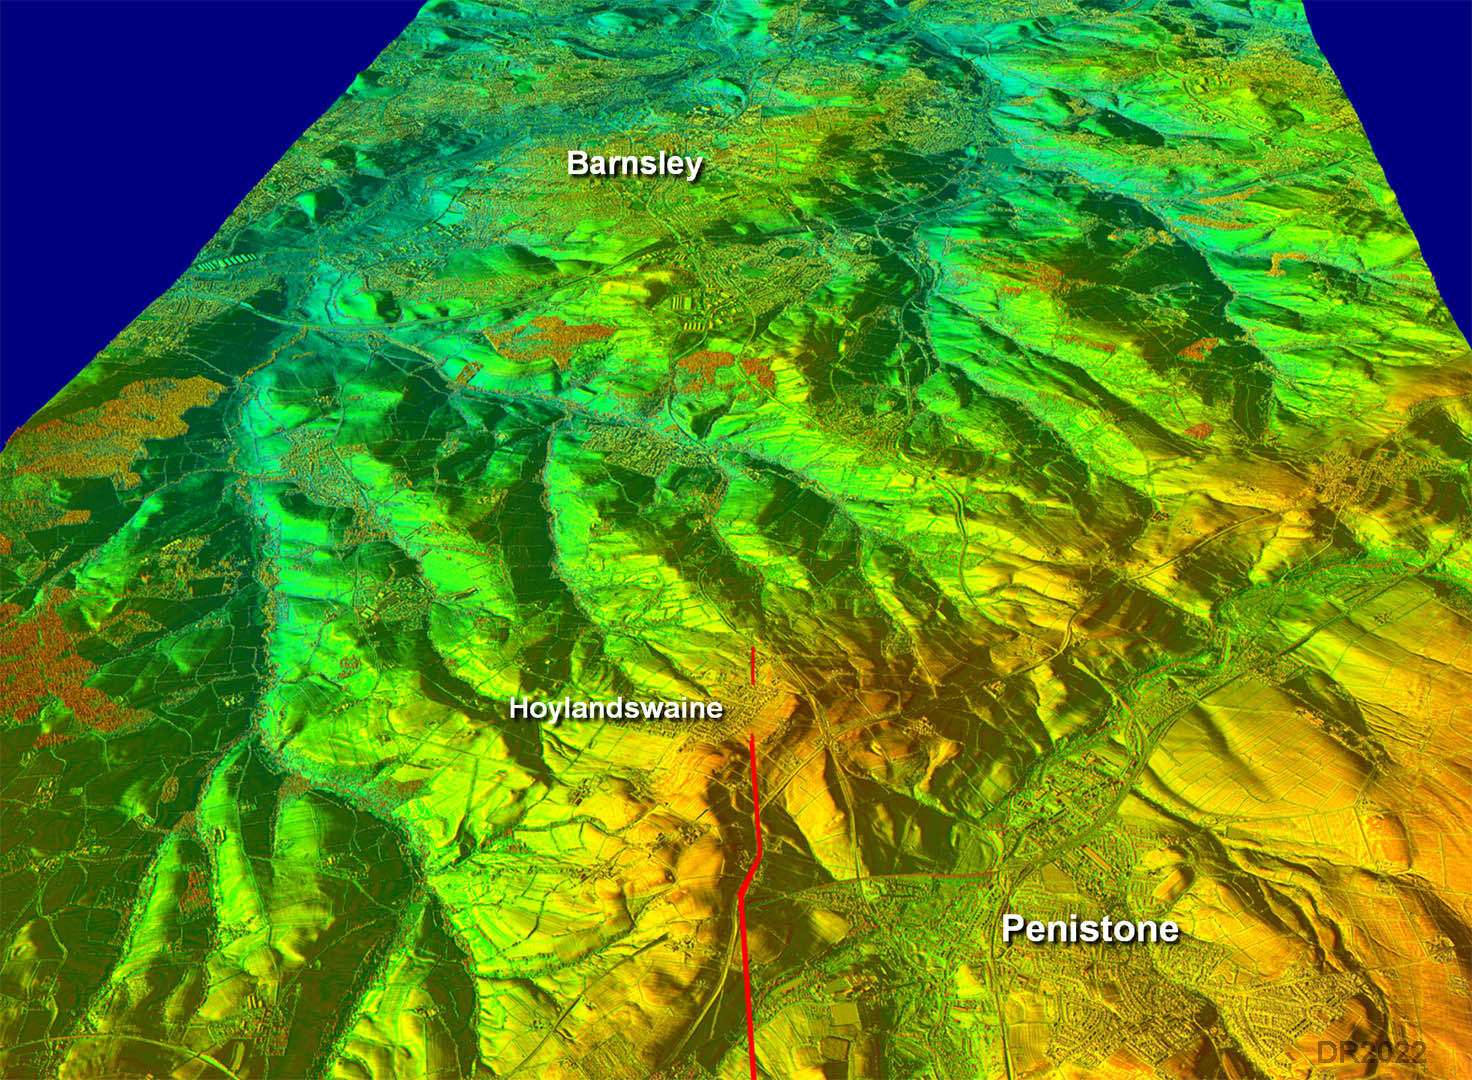
Oblique 3D Lidar Image - Hoylandswaine to Barnsley This is where tracing the road ended as the Lidar ran out here. We now have series 2 Lidar for the full distance to Doncaster. So which way would the road go? It is clearly aiming for that "triangle" of high ground at Barnsley |
Click for larger view |
 |
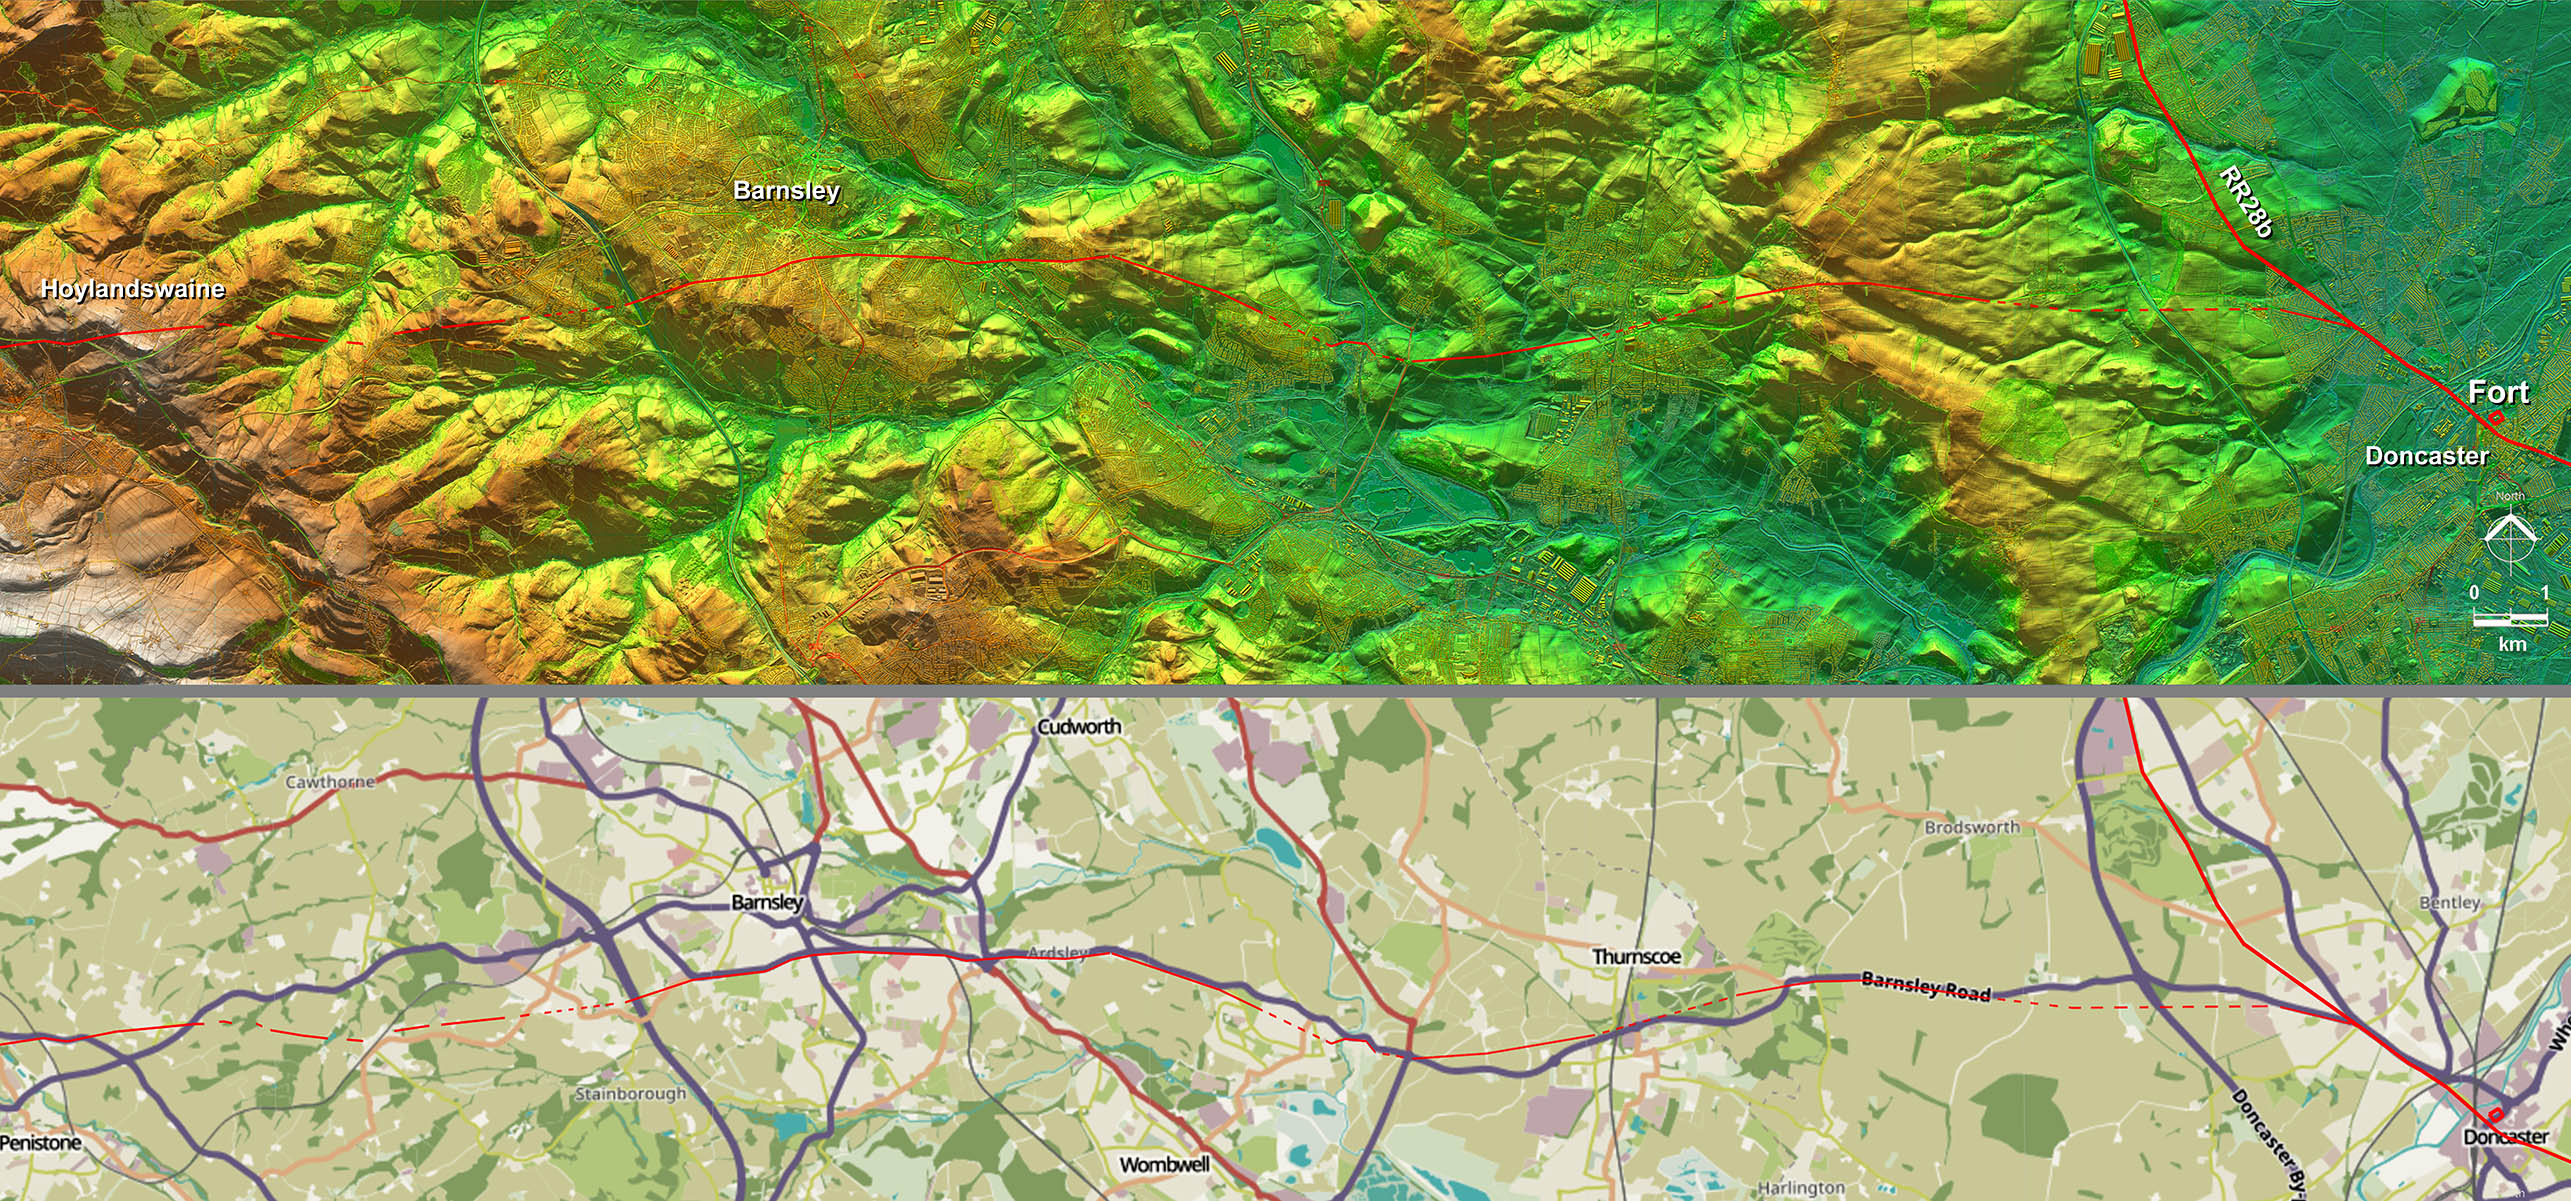
Route Map 5 - Possible connection to Doncaster Across Barnsley then it when never going to be easy to find with so much industrial workings and coal mining. The Lidar model was a big help as it indicated the high ground and valleys. The Roman surveyors preferred the former and tended to avoid the latter so a logical route could be inferred. The route depicted is the most practical route bewtween Hoylandswaine and Doncaster. As a former highway engineer it is the way I would have chosen. There are several clues along this line that give me some confidence that this was indeed the route the road followed. I would have liked a bit more evidence so until that turns up I would regard this as the "probable" route. |
Click for larger view |
 |
|
|
|
Last update: January 2023 |
© David Ratledge |