I have to admit it was Geoff Lunn who prodded me into reconsidering the reality of this road. The section in Hockering Wood was independently spotted by David Staveley, Geoff Lunn and myself. But was it part of a completed road? I am ashamed to say I long ago gave up trying to extend it and it was thanks to Geoff and a David Staveley video that I took a fresh look. In my defence, the Lidar coverage was very patchy back when I gave up searching, and even now with full coverage, the Lidar clues are still pretty faint. Several of the clues were spotted by David Staveley although the precise course described here is often different in detail.
The Hockering Wood agger is spectacular in Lidar imagery leaving no doubt it is a Roman road but on the ground it is a different story. It is very difficult to pick out from all the other disturbances in Hockering Wood. It was a WW2 ammunition base with concrete roads all over the place.
Following more research and site visits there is no doubt now about this road.
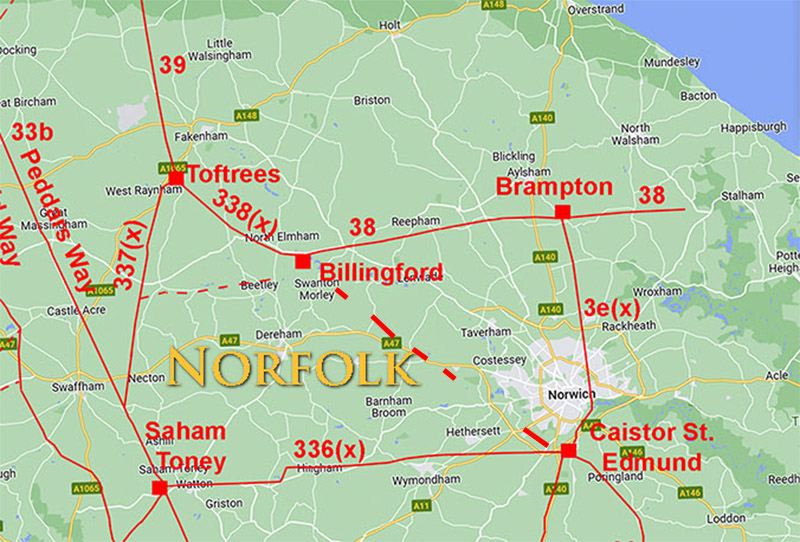
These were the two definite sections, at Keswick and Hovering Wood, that started the search for more of the road.
WIth a fresh look there has been much progress and we can now be confident in much of the route. We even have a Roman bridge (remains of) to back it up!
Click for larger view
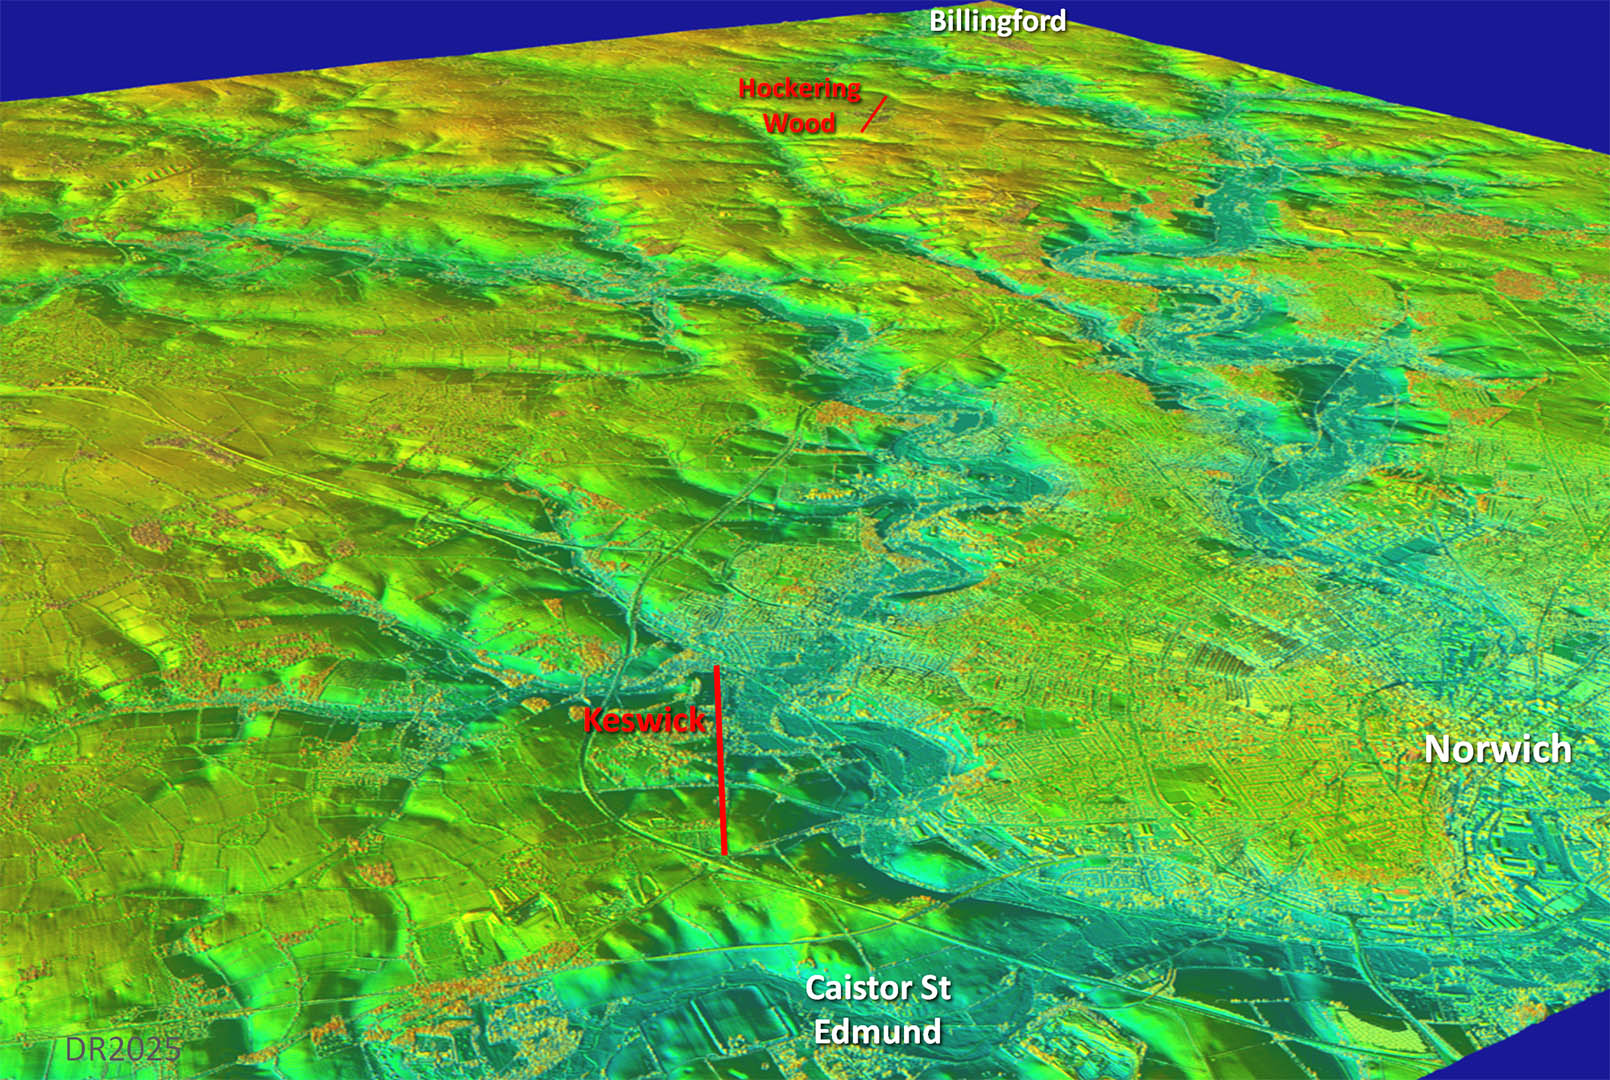
VIDEO Flyover
Very much a working video in an attempt to tease out any faint clues.
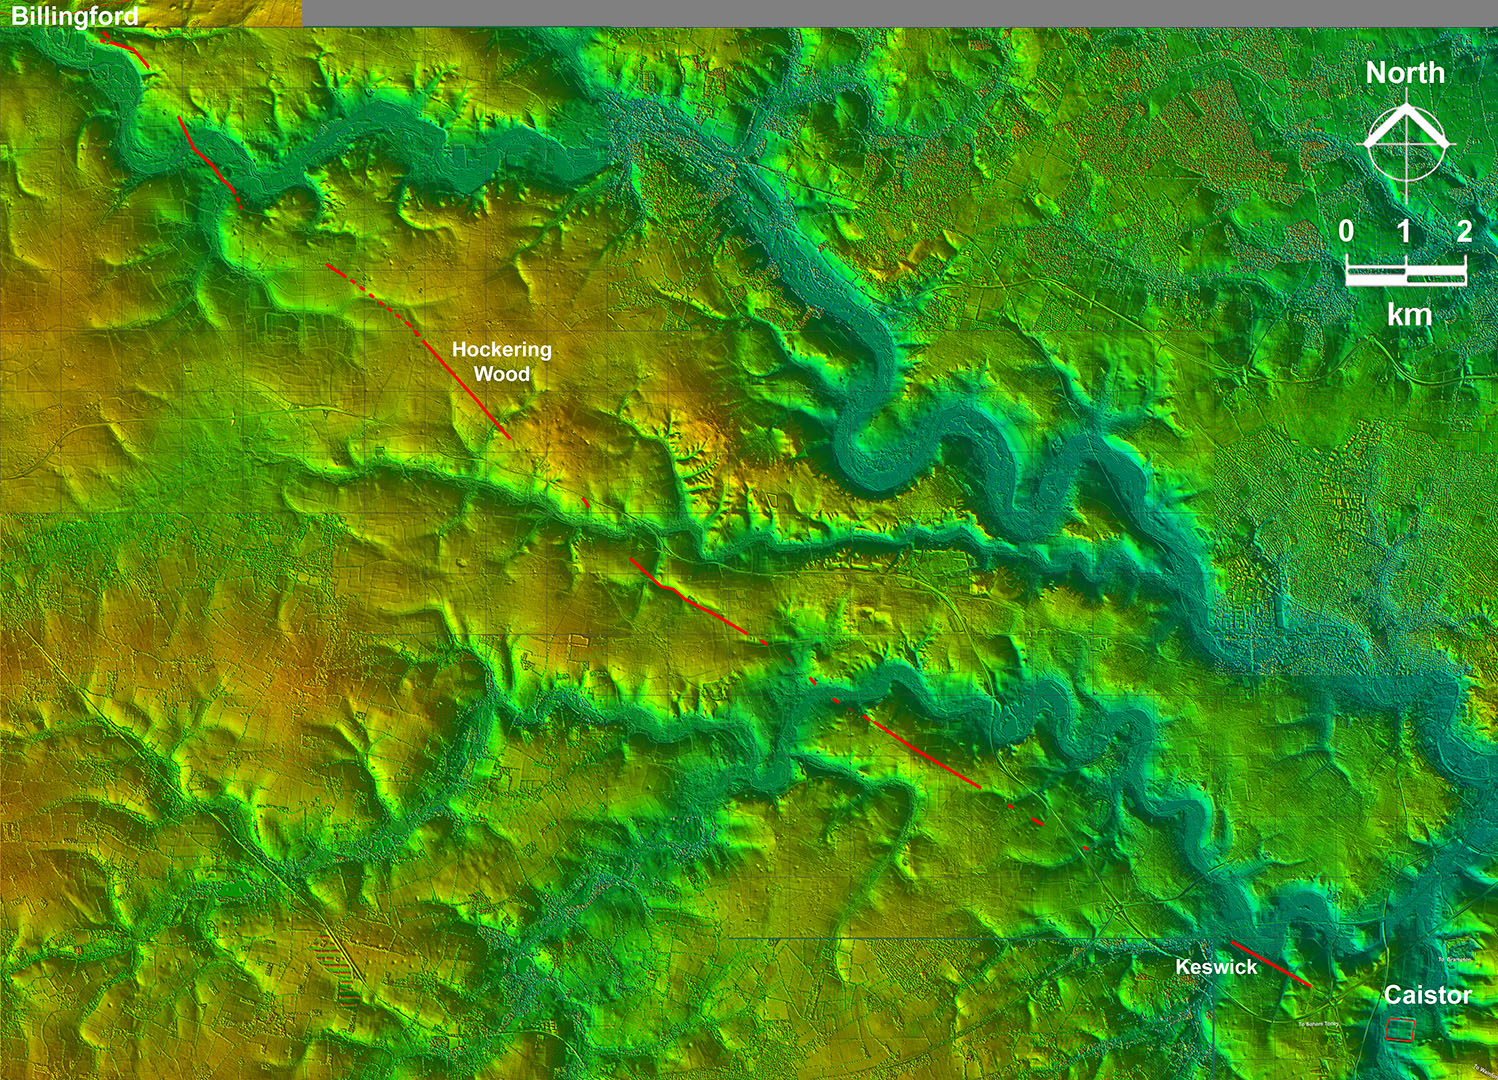
Full Route Map
Still some gaps to fill in but the basics of the route and its alignment are now confirmed.
Click for larger view
Lidar Image - Caistor St Edmund Site
The road system of Caistor St Edmund. The yellow hatched area is the original settlement area before the walls were constructed.
It looks like the road to Wainford Bridge and our road to Billingford were aligned.
Click for larger view
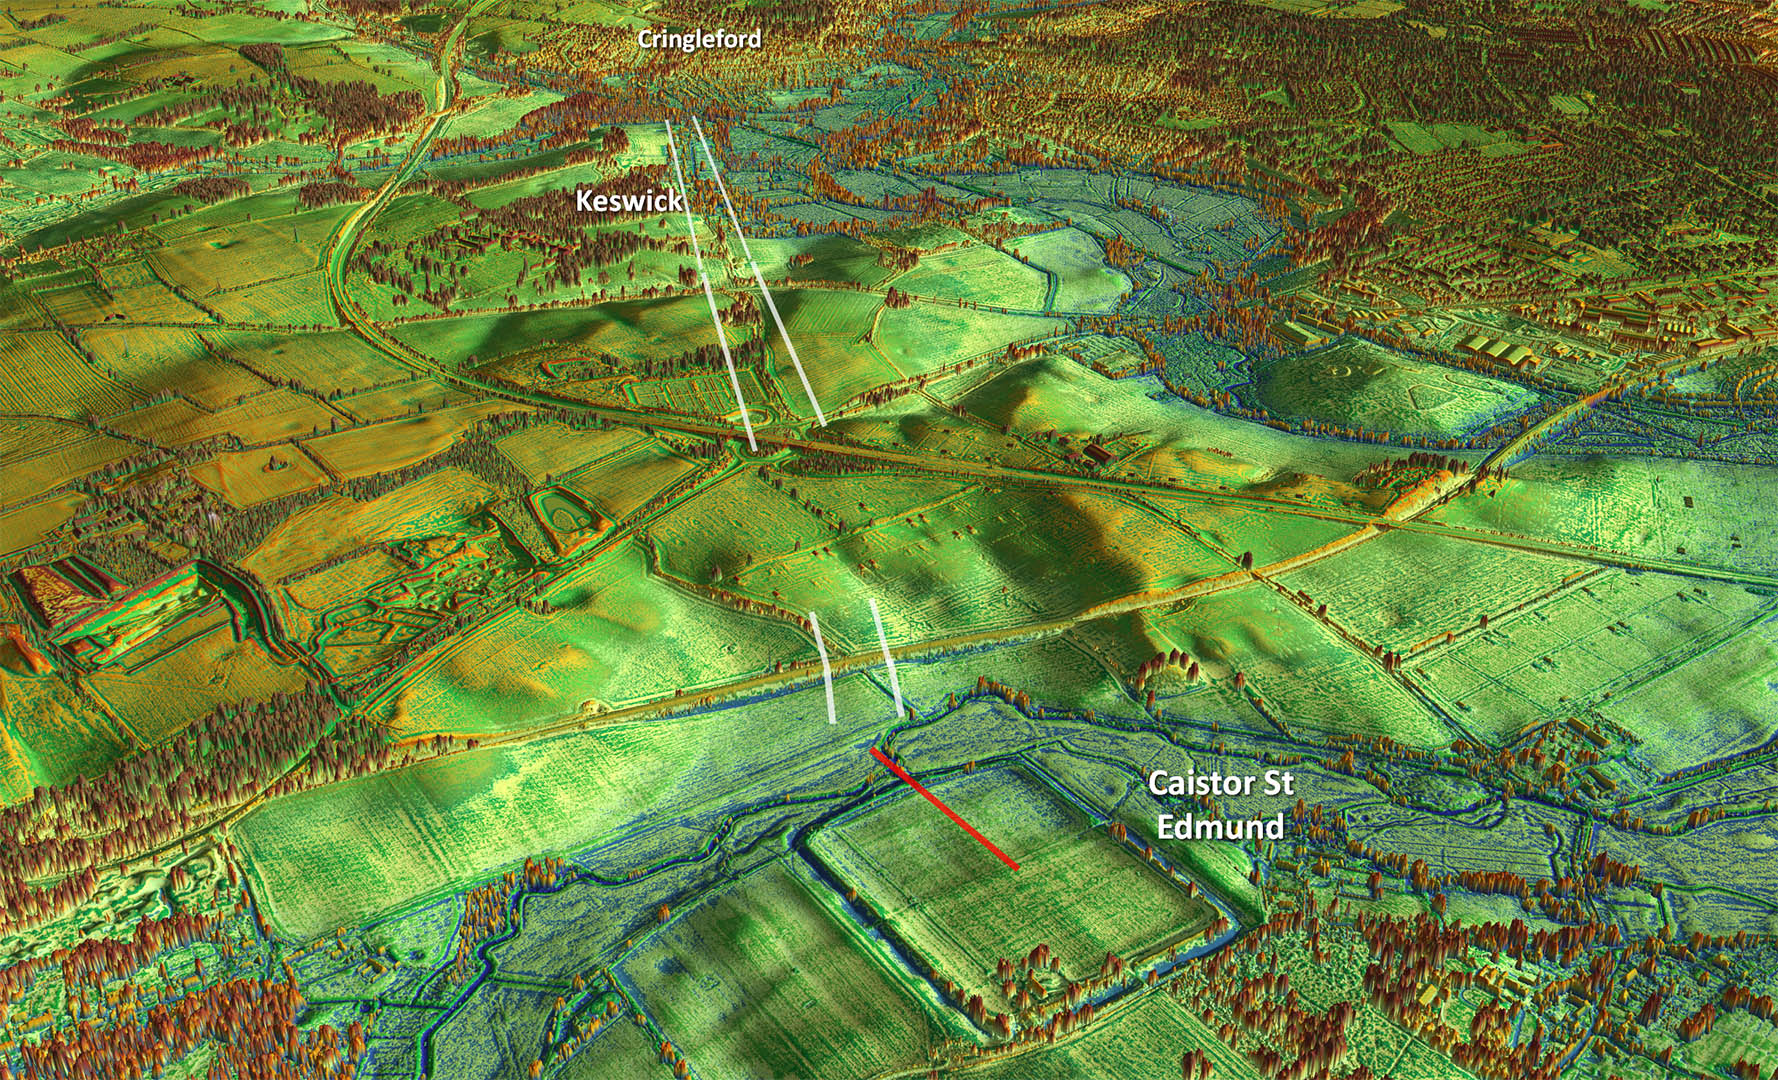
Oblique Lidar Image - Caistor St Edmund
Our road shared a route out of Caistor's west gate with roads to Saham Toney and Scole. There is just the faintest of traces of it either side of the railway line.
Click for larger view
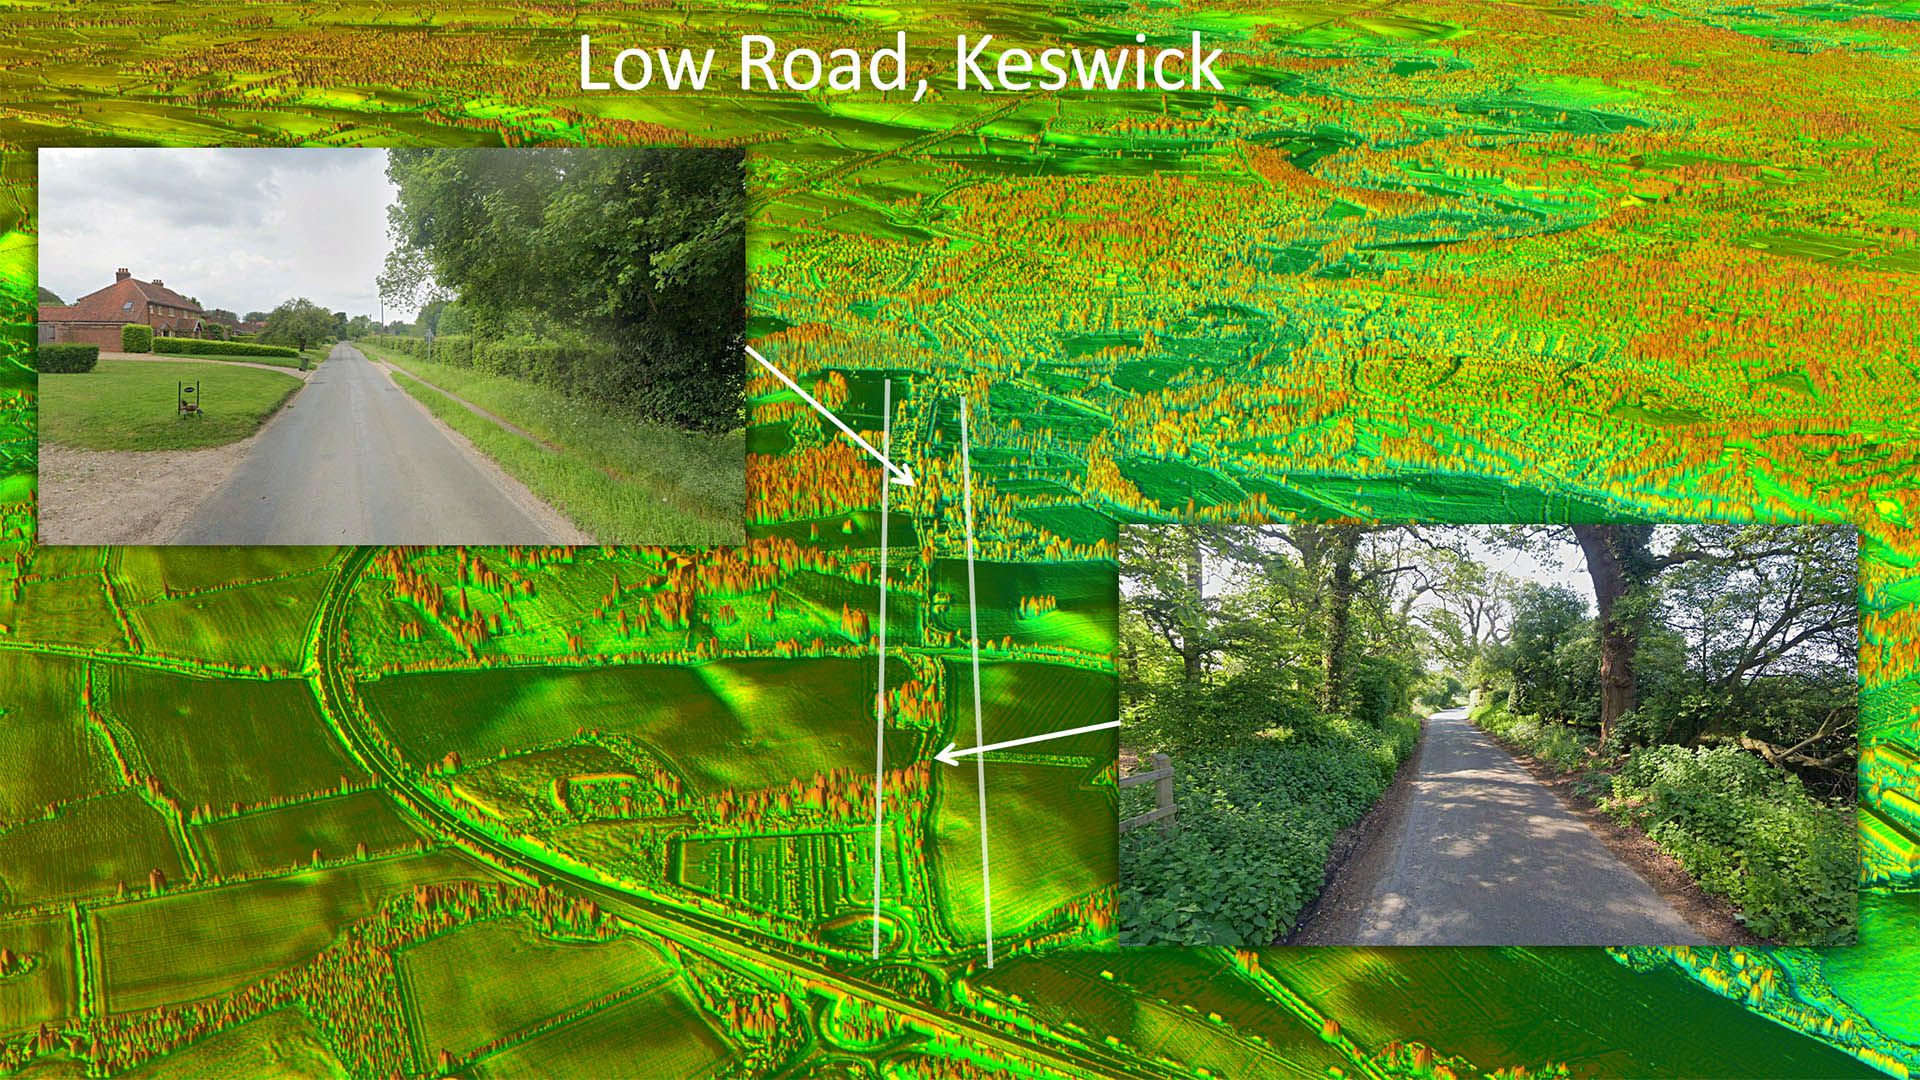
Oblique Lidar Image - Low Road, Keswick
With the old road through Keswick aligning with Caistor St Edmund this length was always suggested it must be Roman. But was it just a local road or did it continue to Billingford?
Images: Google
Click for larger view
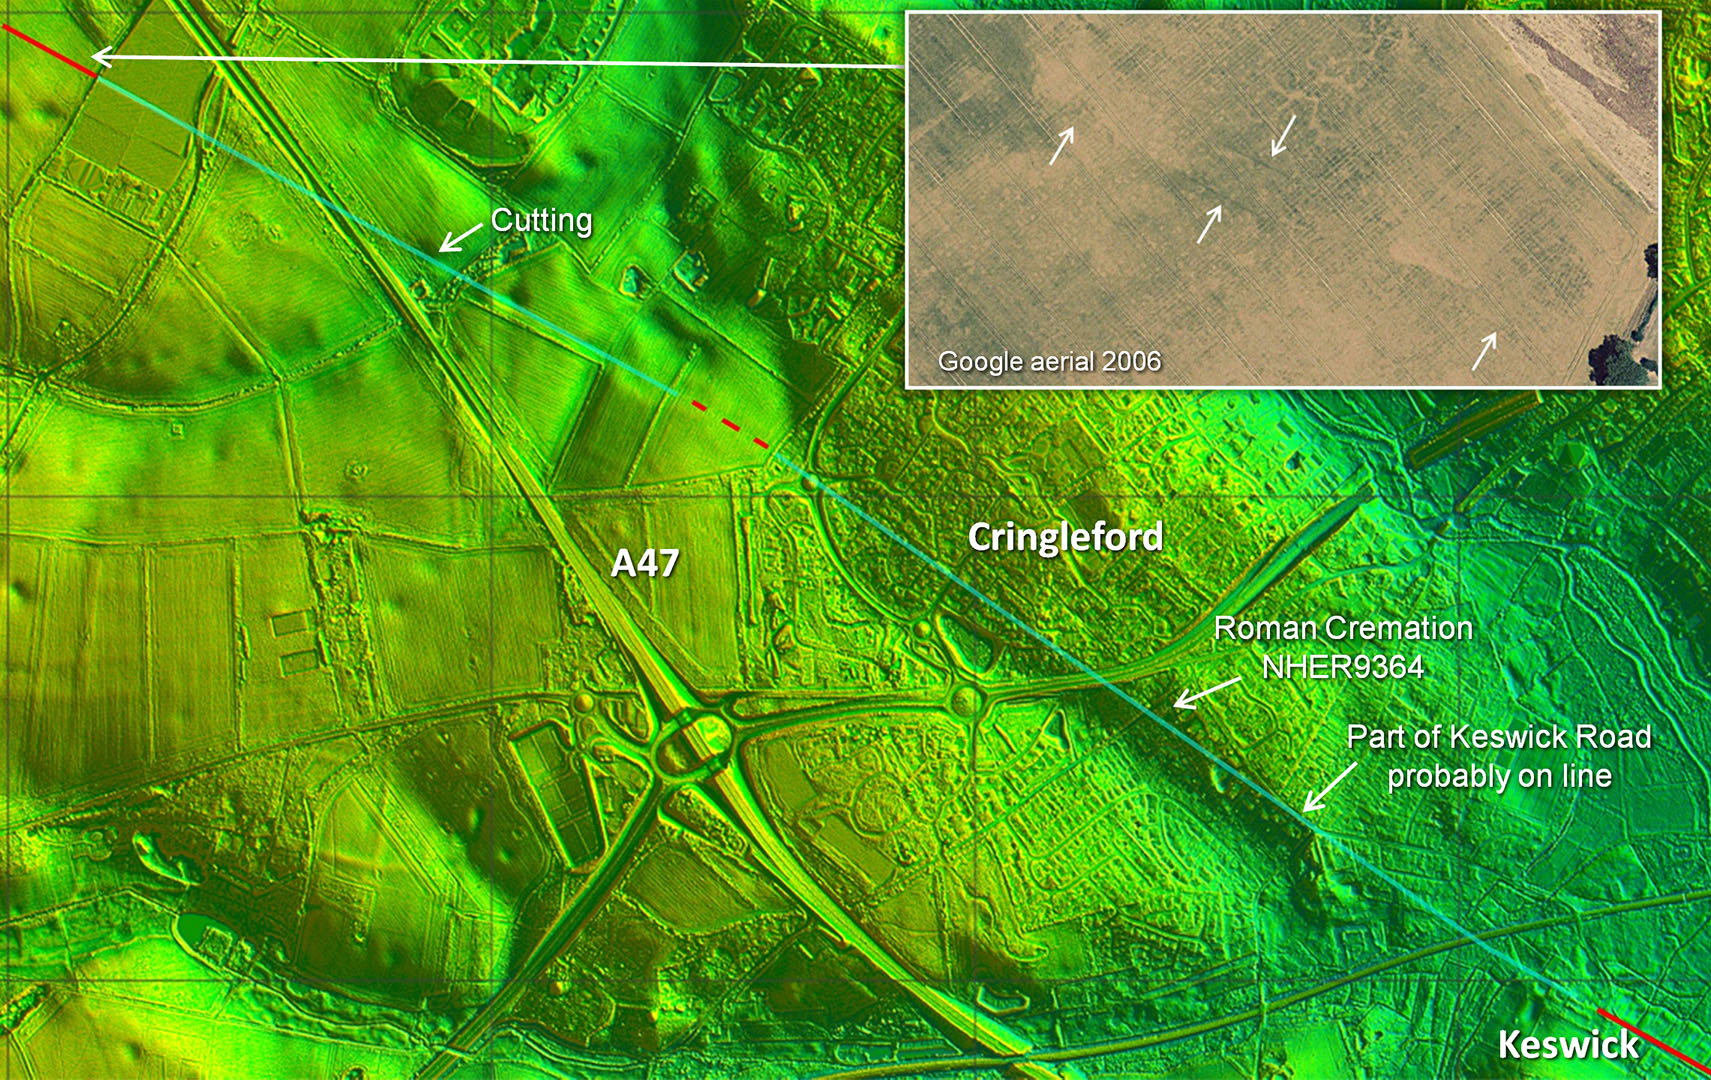
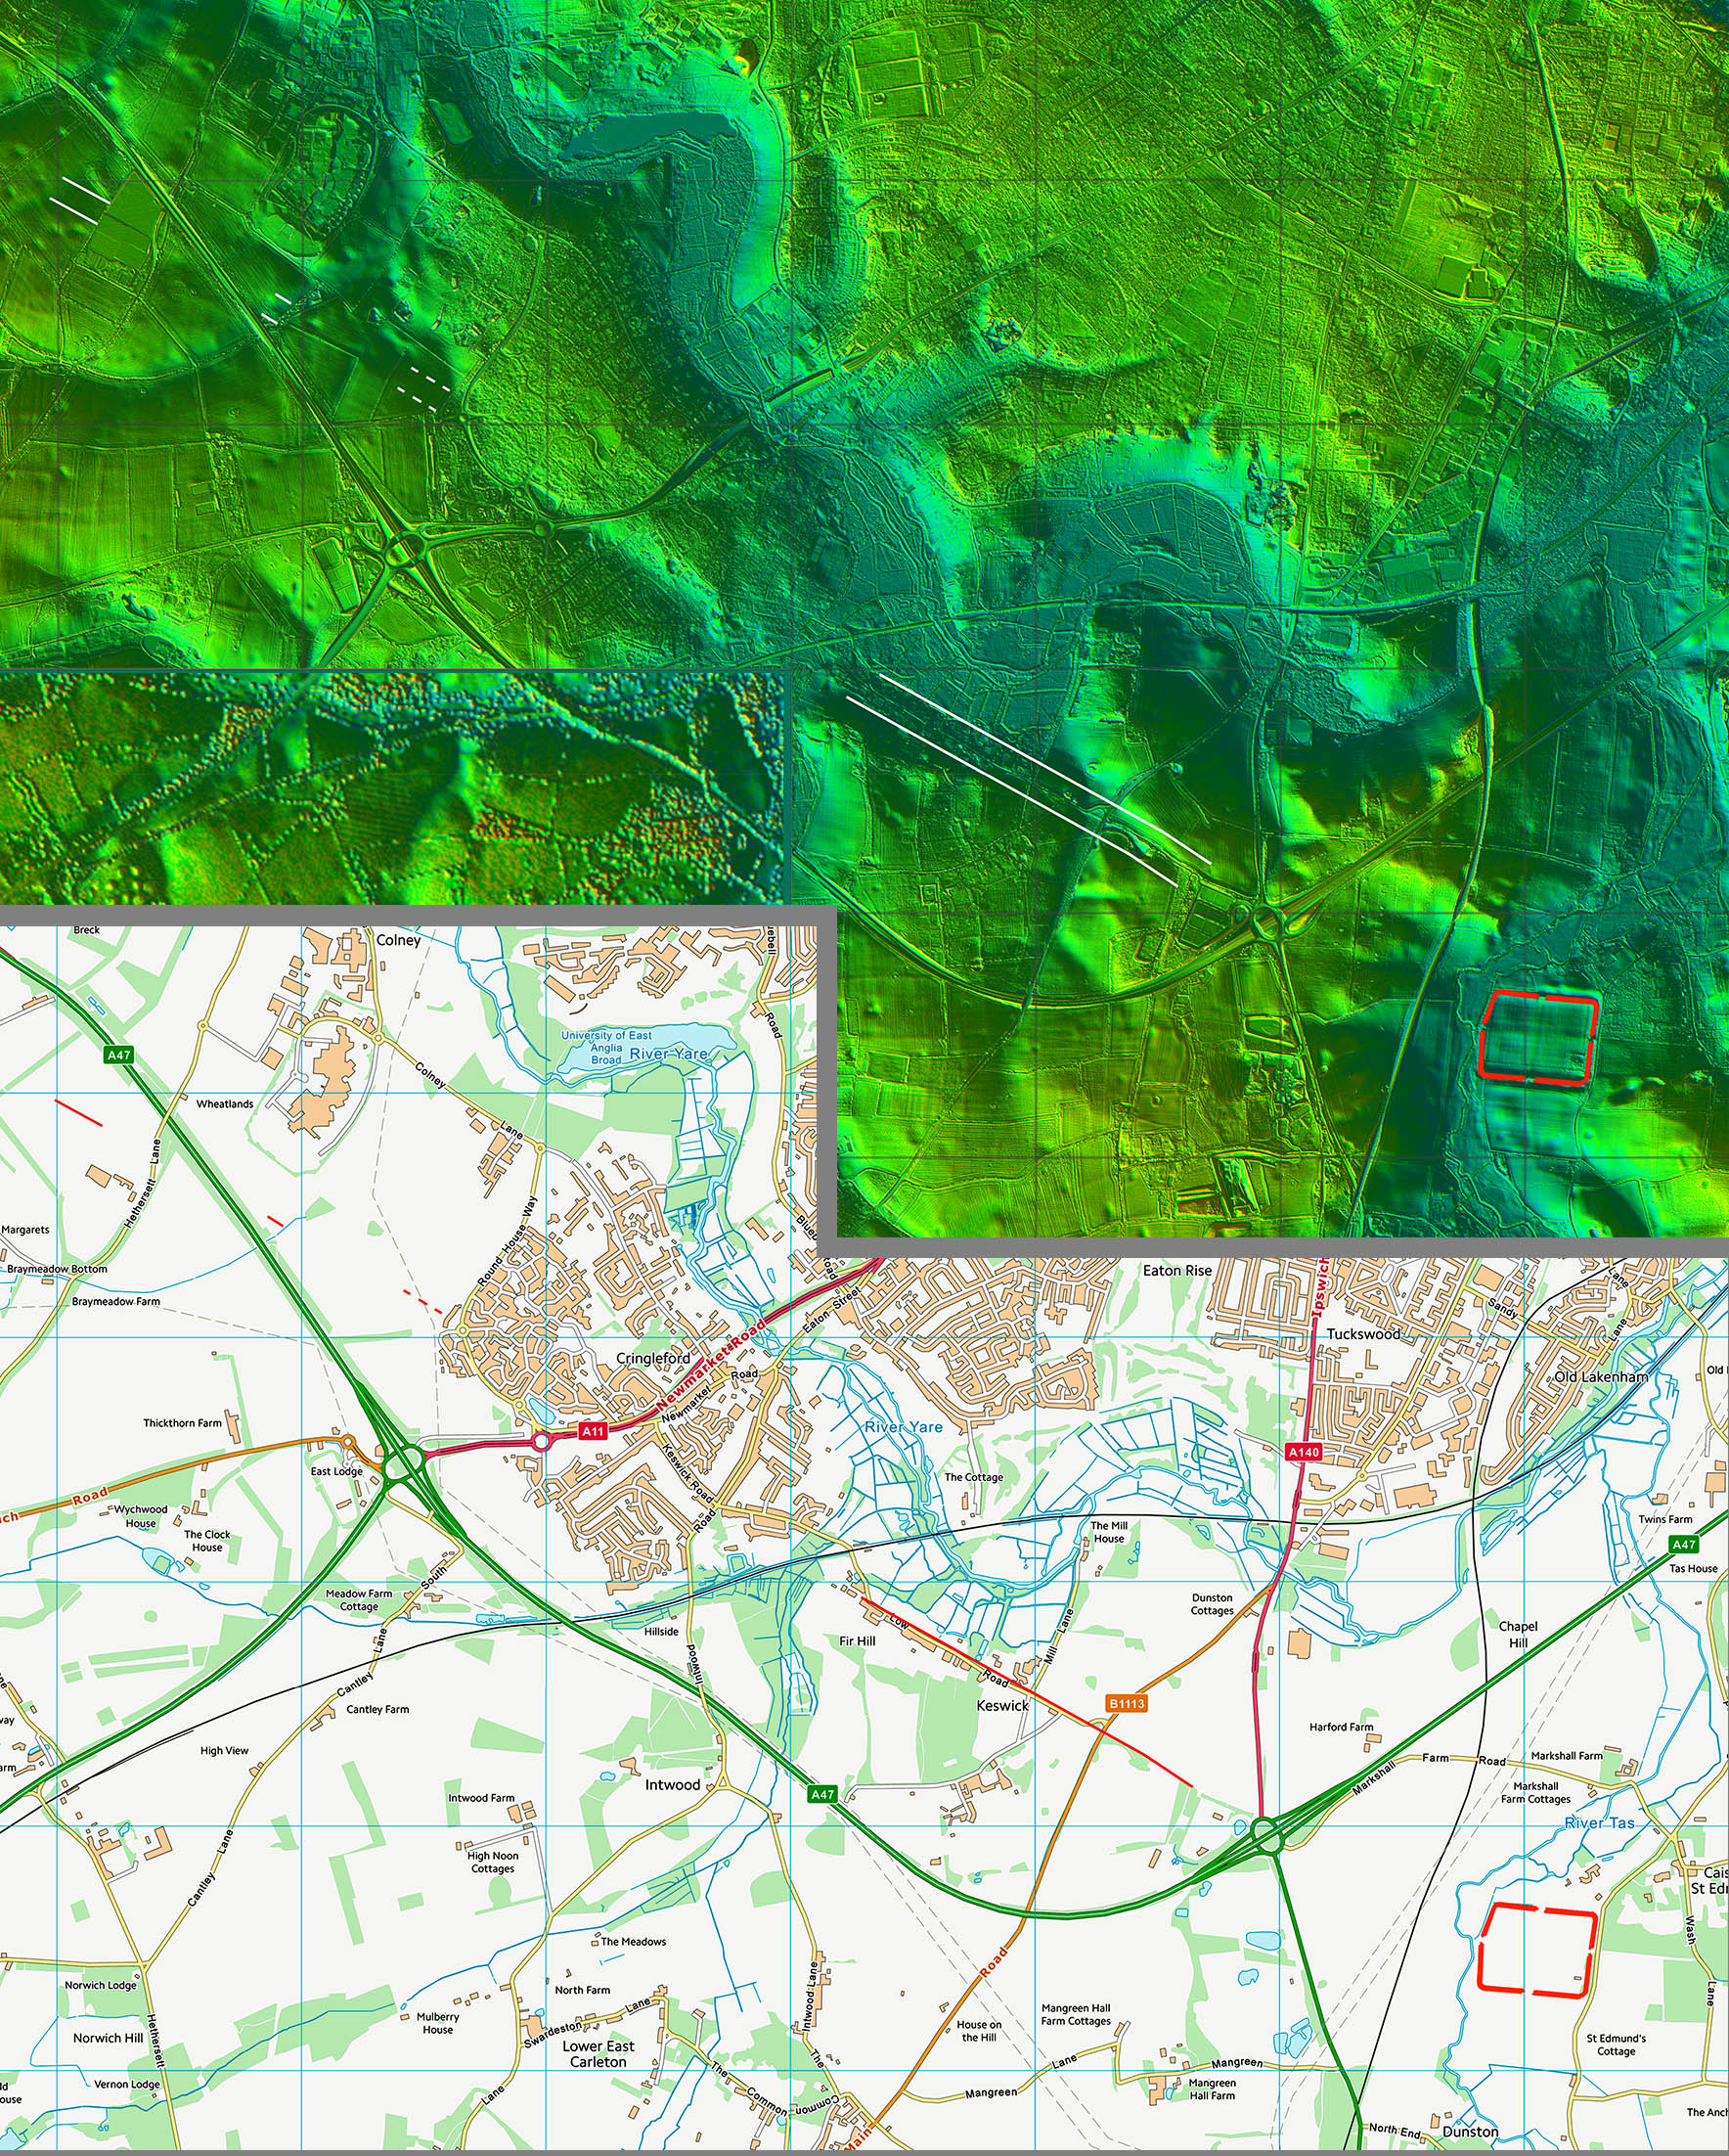
Lidar Image - Cringleford Possible Route
We can be reasonably certain of the road's course across Cringleford despite modern development. That natural valley was obviously what the Roman surveyor would have targeted. Probably part of Keswick Road just beyond the junction preserves the line. Couple of half-clues before the A47 but one across there is a certain section confirmed by an aerial photo. The cyan line is my interpolation of the route.
Inset: Google Earth Aerial Photo 2006
Click for larger view
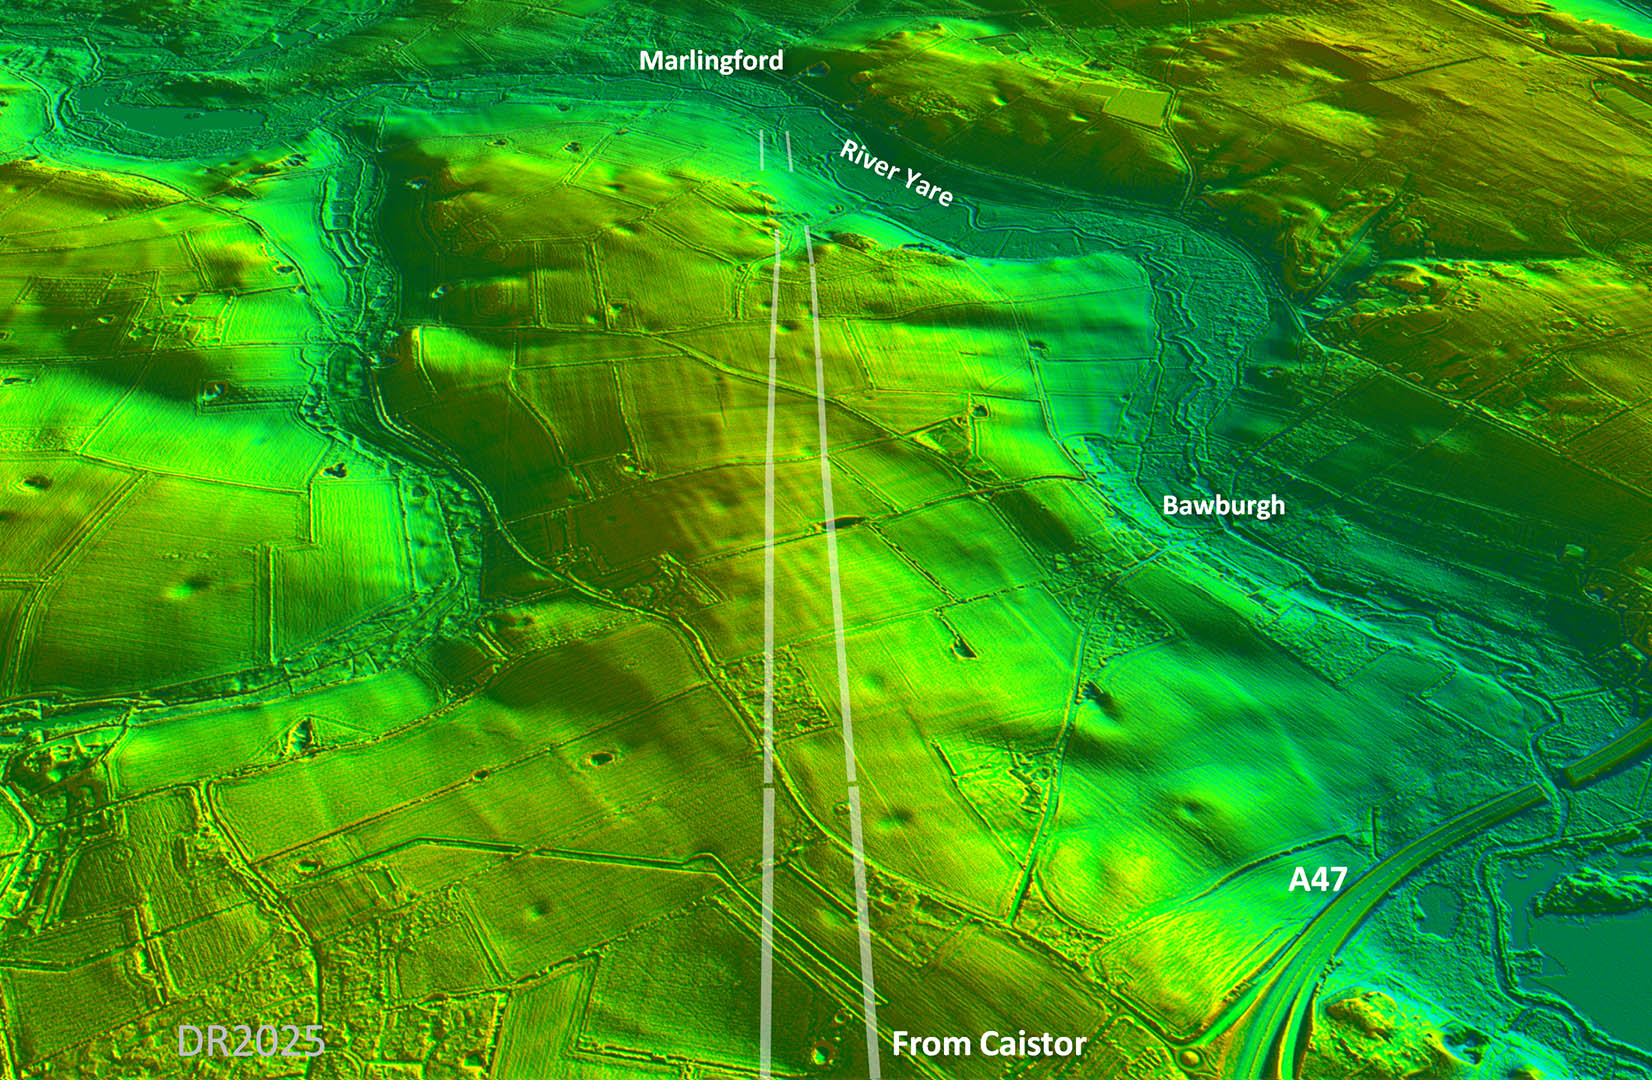
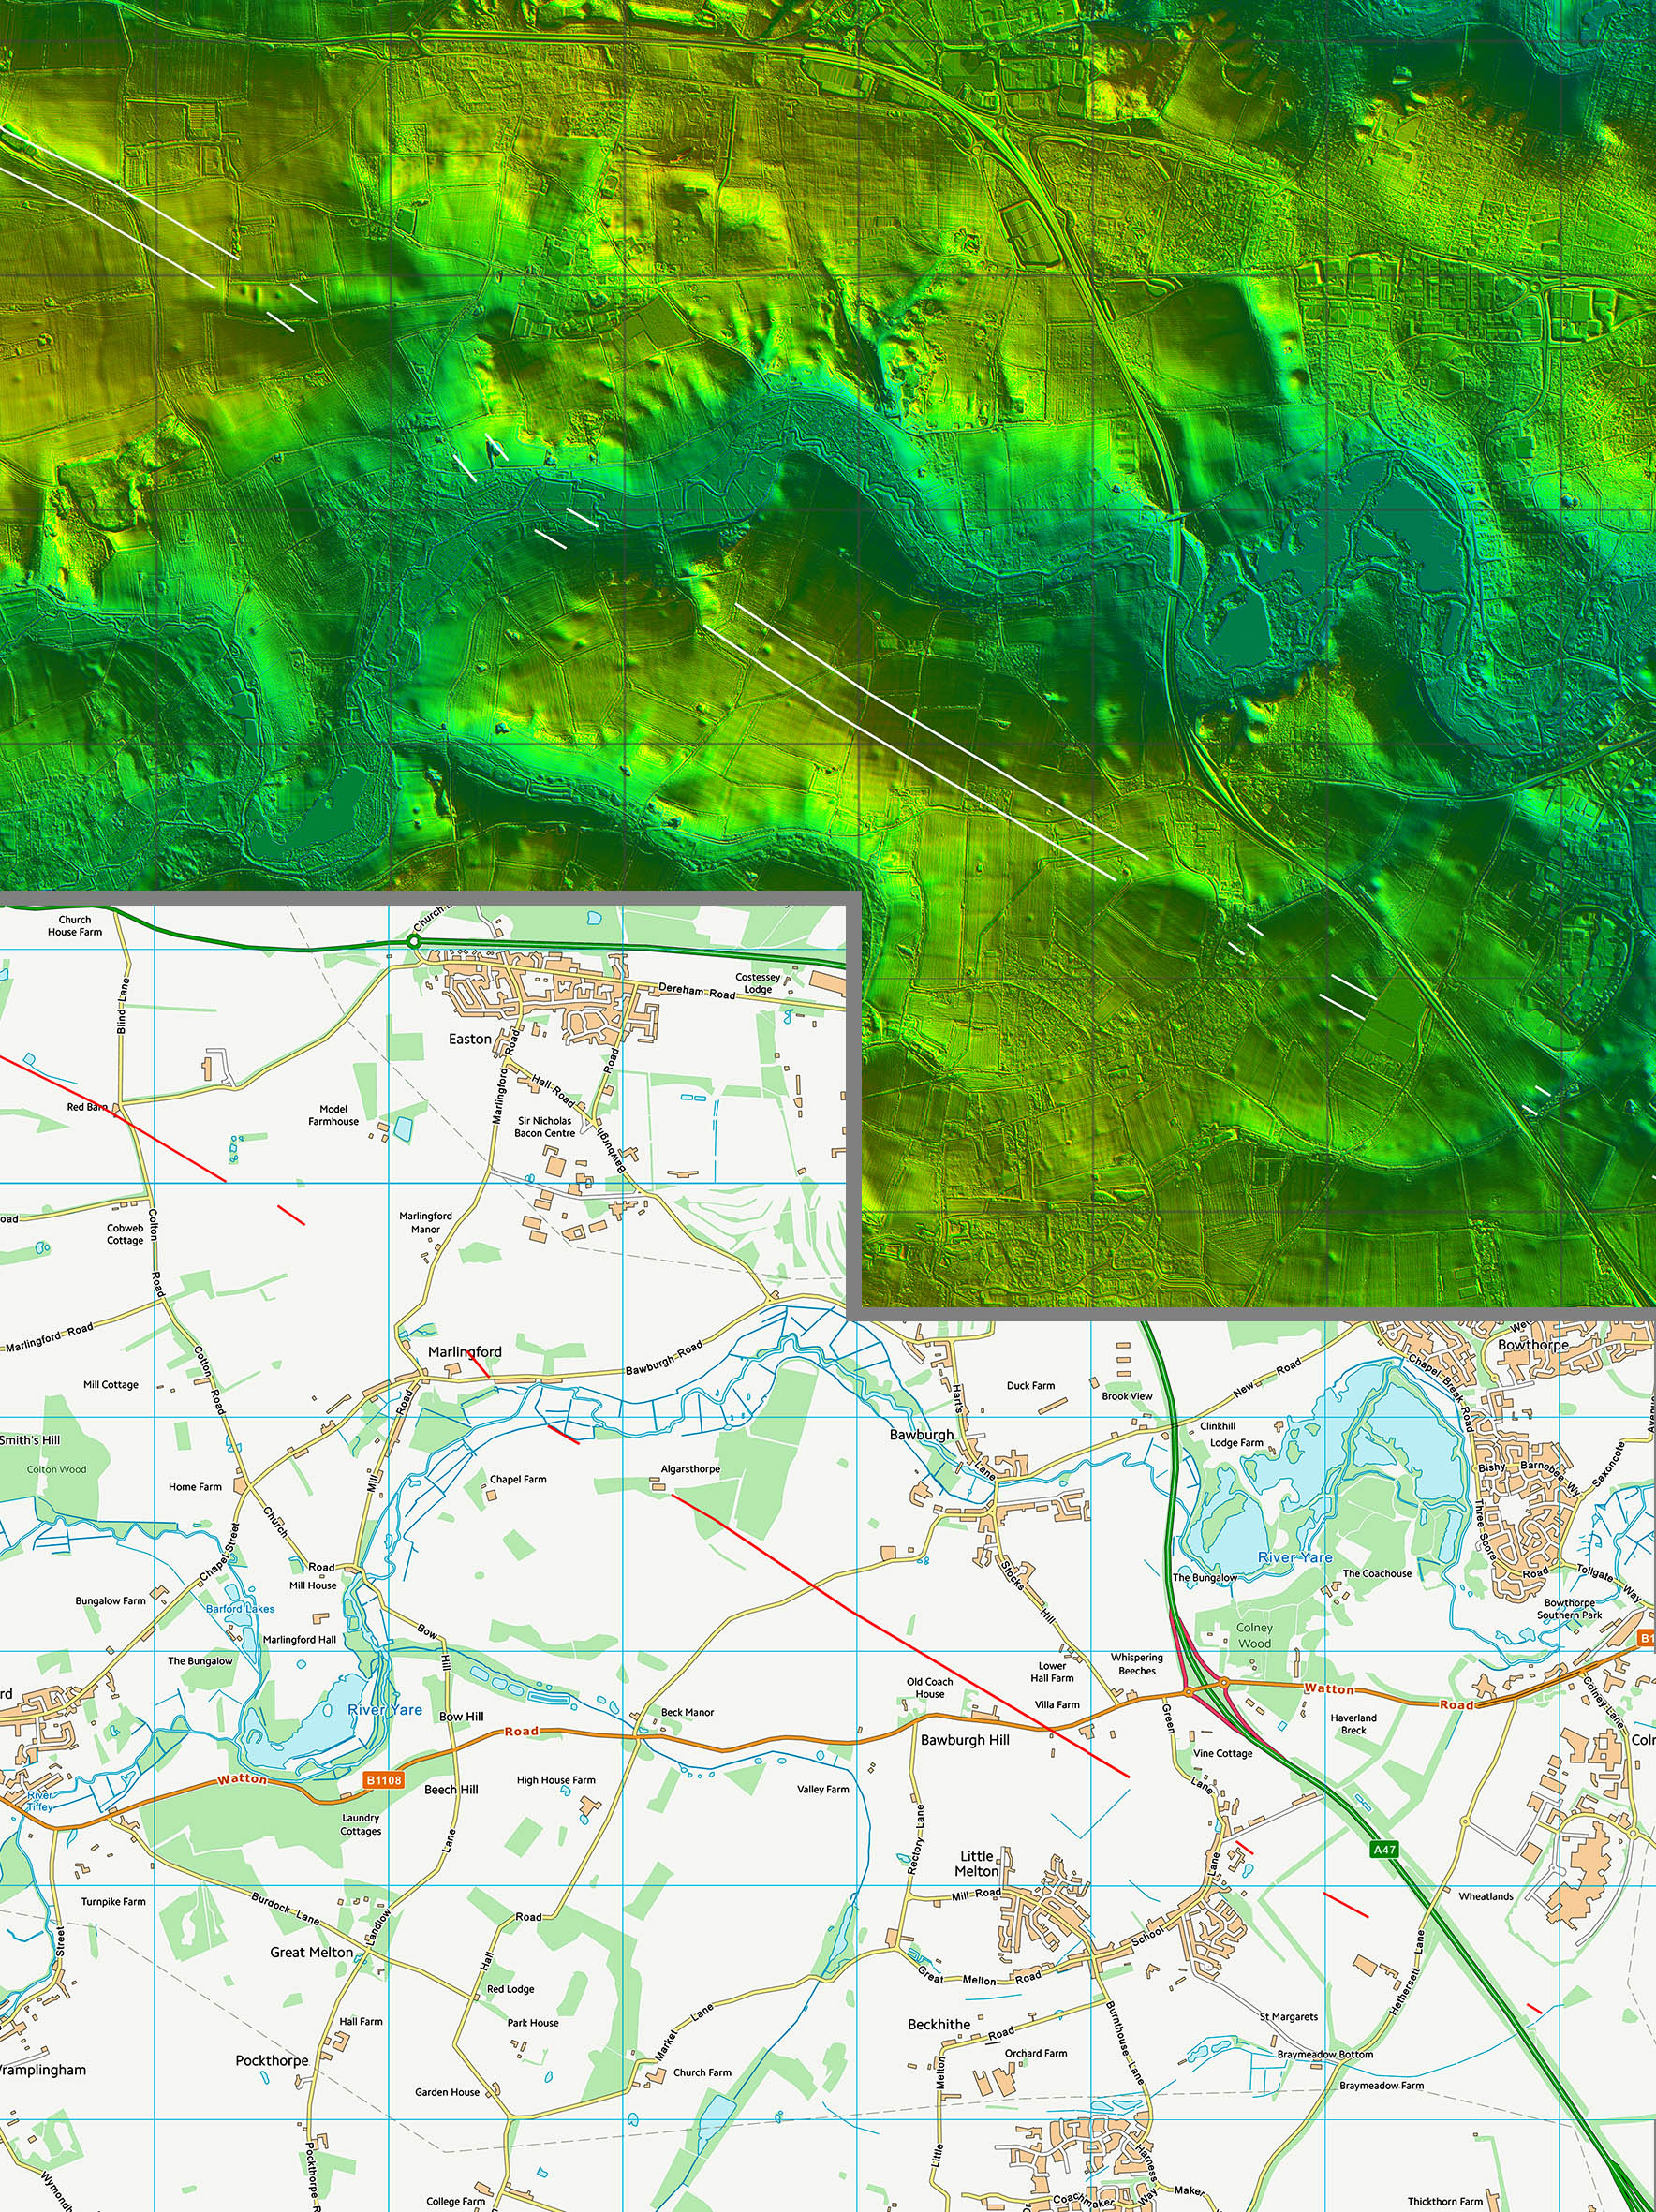
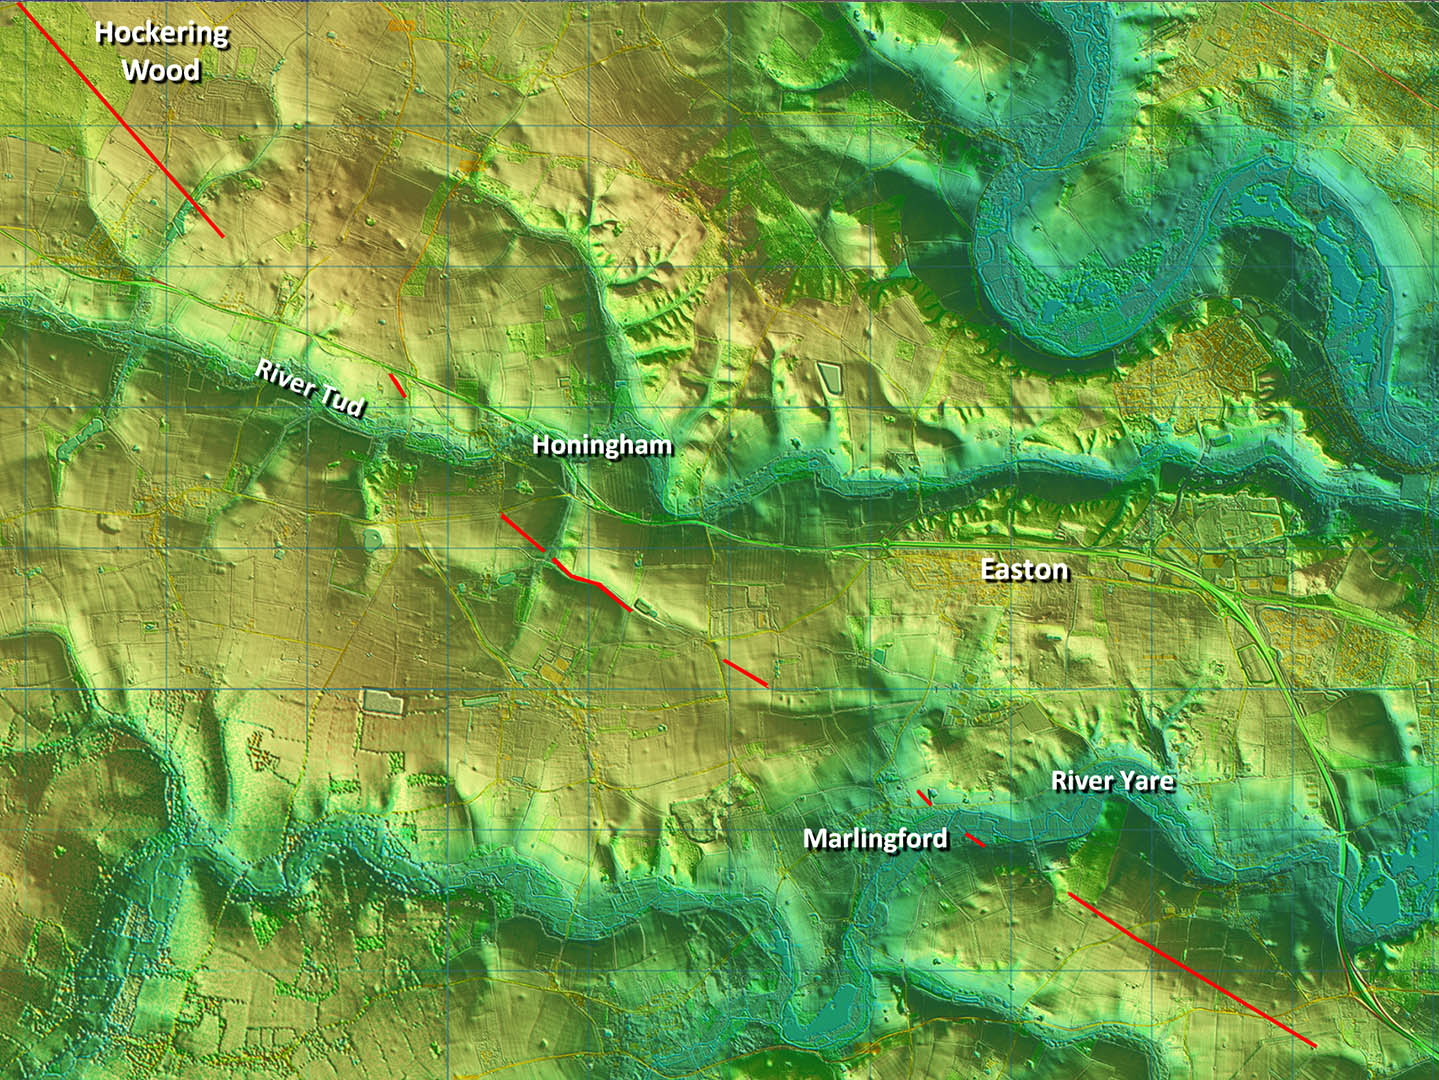
Oblique 3D Lidar Image - Approaching Marlingford
Yes it is faint and intermittent but in my opinion more than sufficient to confirm the alignment. Note how it heads for that little valley to drop down to the River Yare crossing. Typical Roman surveying.
Click for larger view
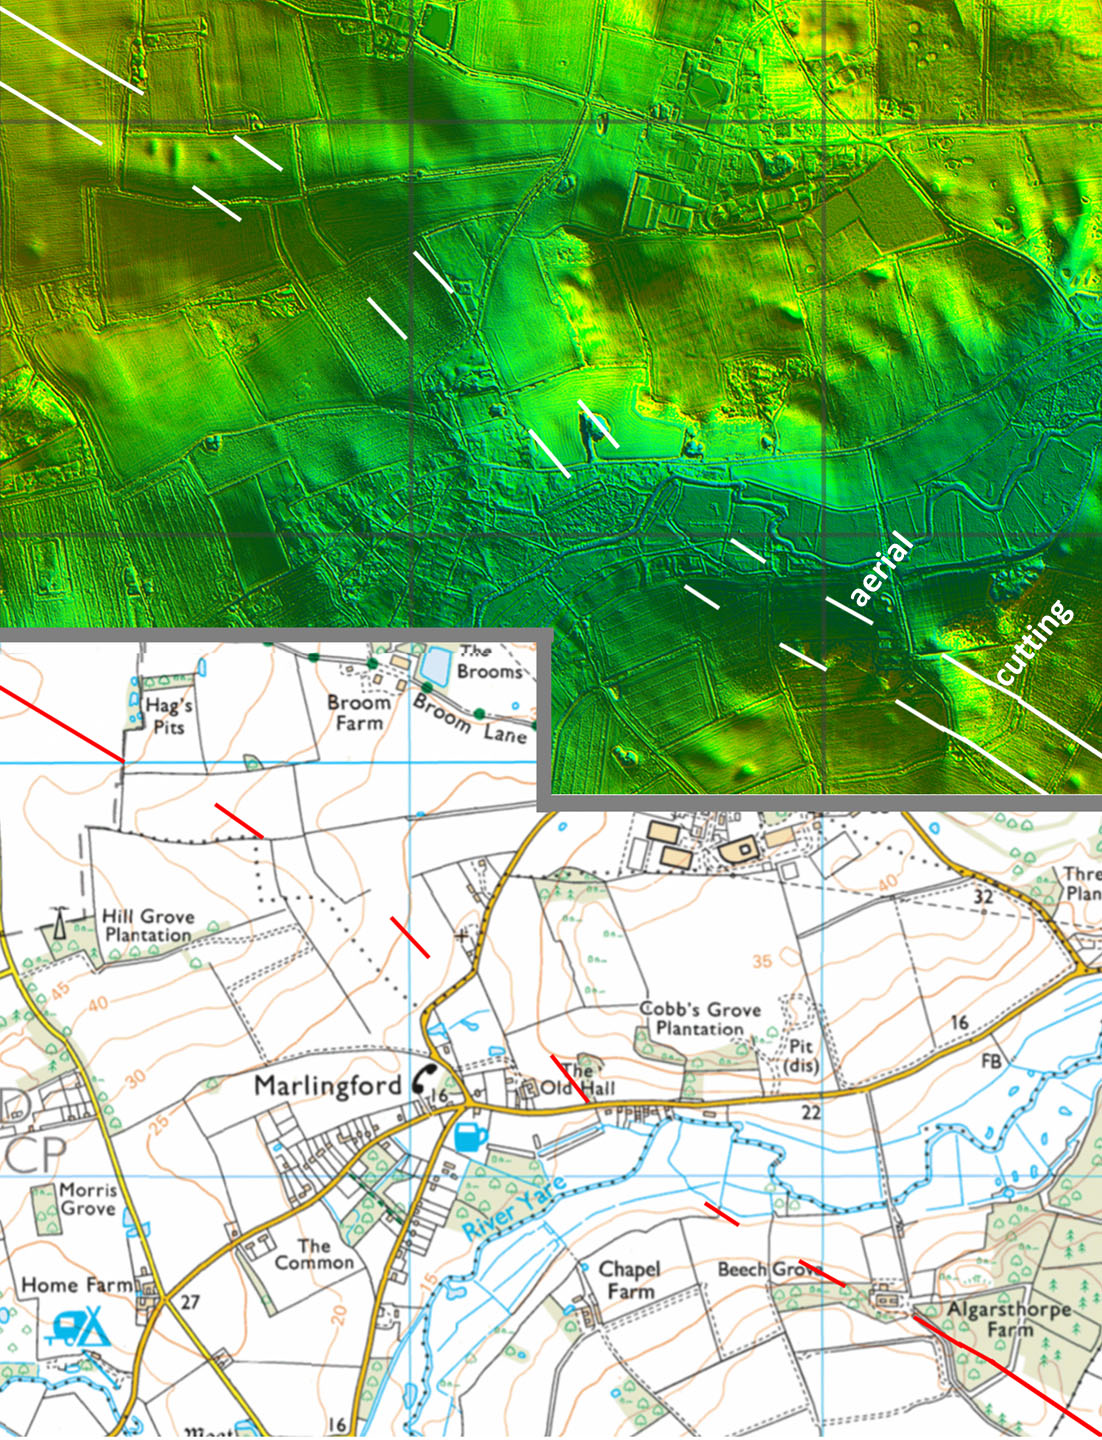
River Yare Crossing
Probably just enough clues to plt the route as it crossed the River Yare. The section marked "aerial" is visible as faint line only showing up on historic aerial photos. The rest of the features are visible in Lidar.
Click for larger view
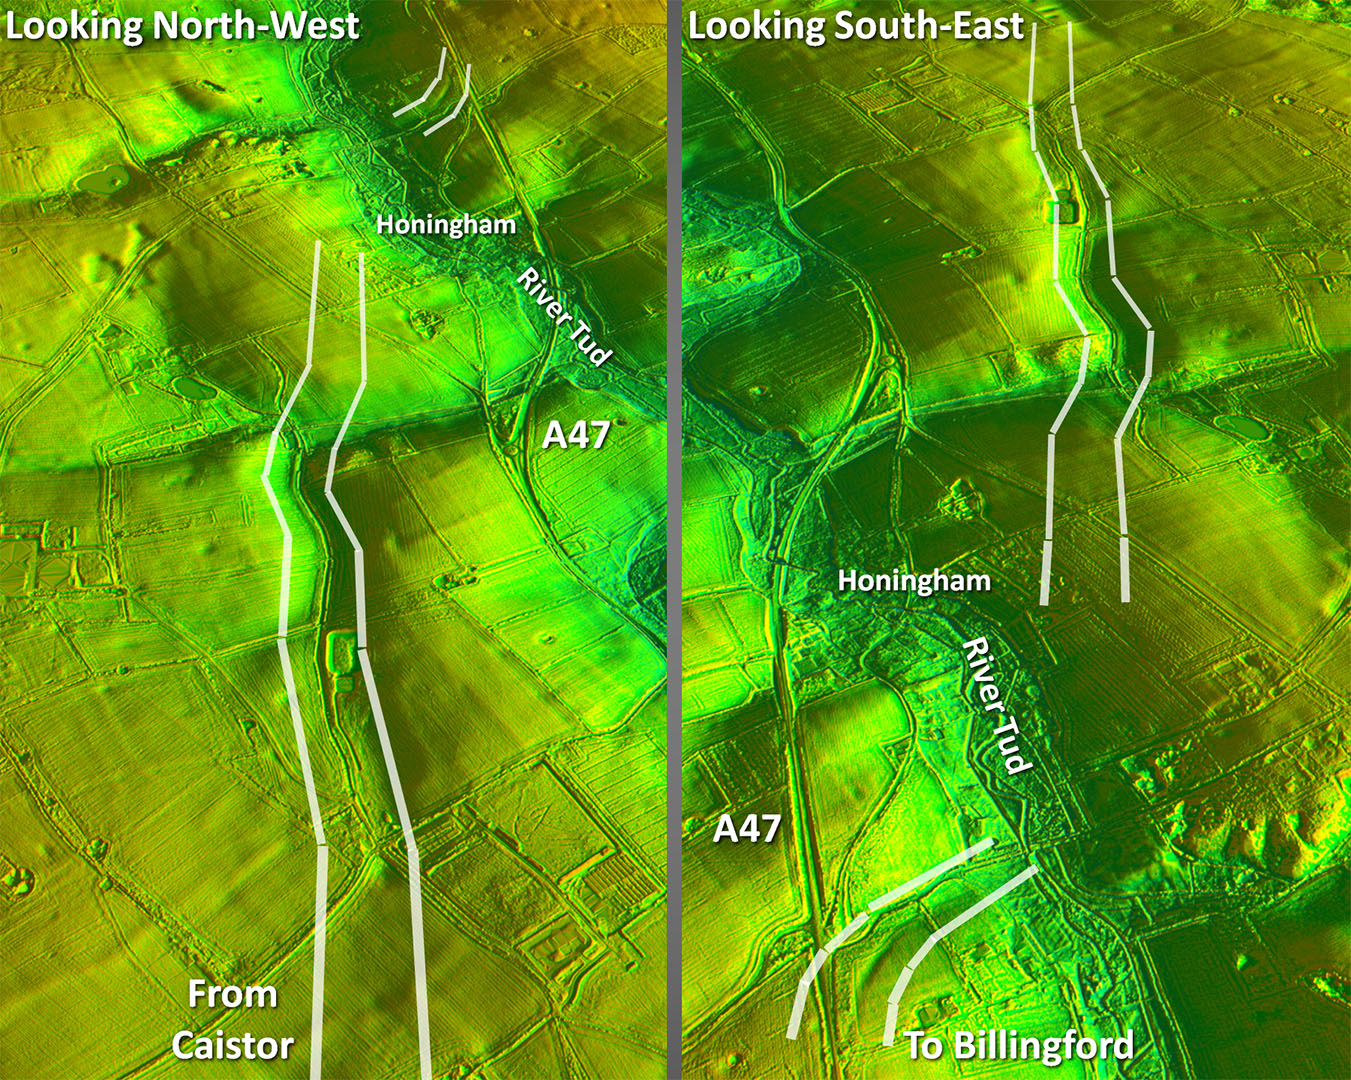
Oblique 3D Lidar Images - Honingham
This section is pretty faint but there is a secure agger as it crosses the little valley with a steam near Greenacres Farm (inset). This is very similar to the aggers across valleys for the Brampton to Great Walsingham road.
The crossing of the River Tud was at, or very near, Berry's Lane bridge and the road is obviously aiming for that.
Note the cutting where the road climbs up to the (old) A47 (top of this view).
Click for larger view
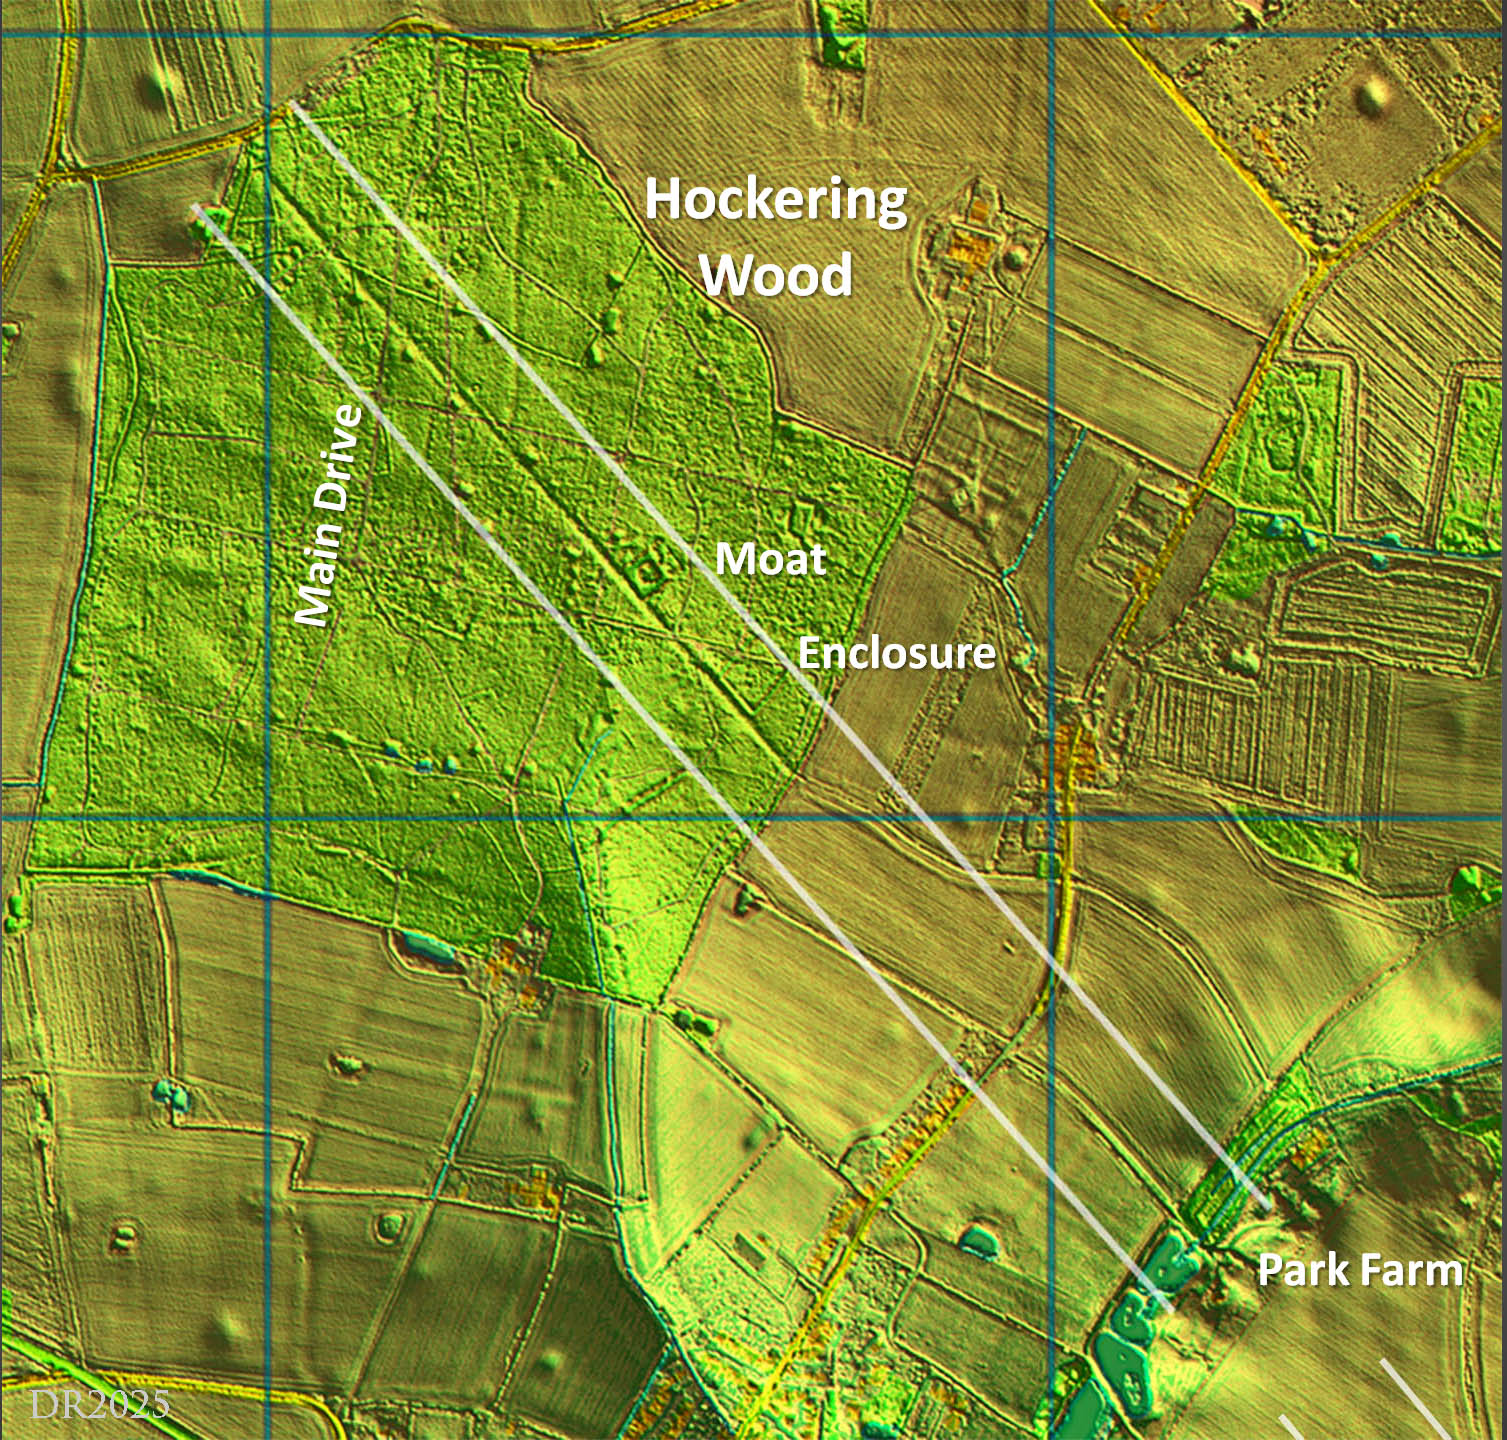
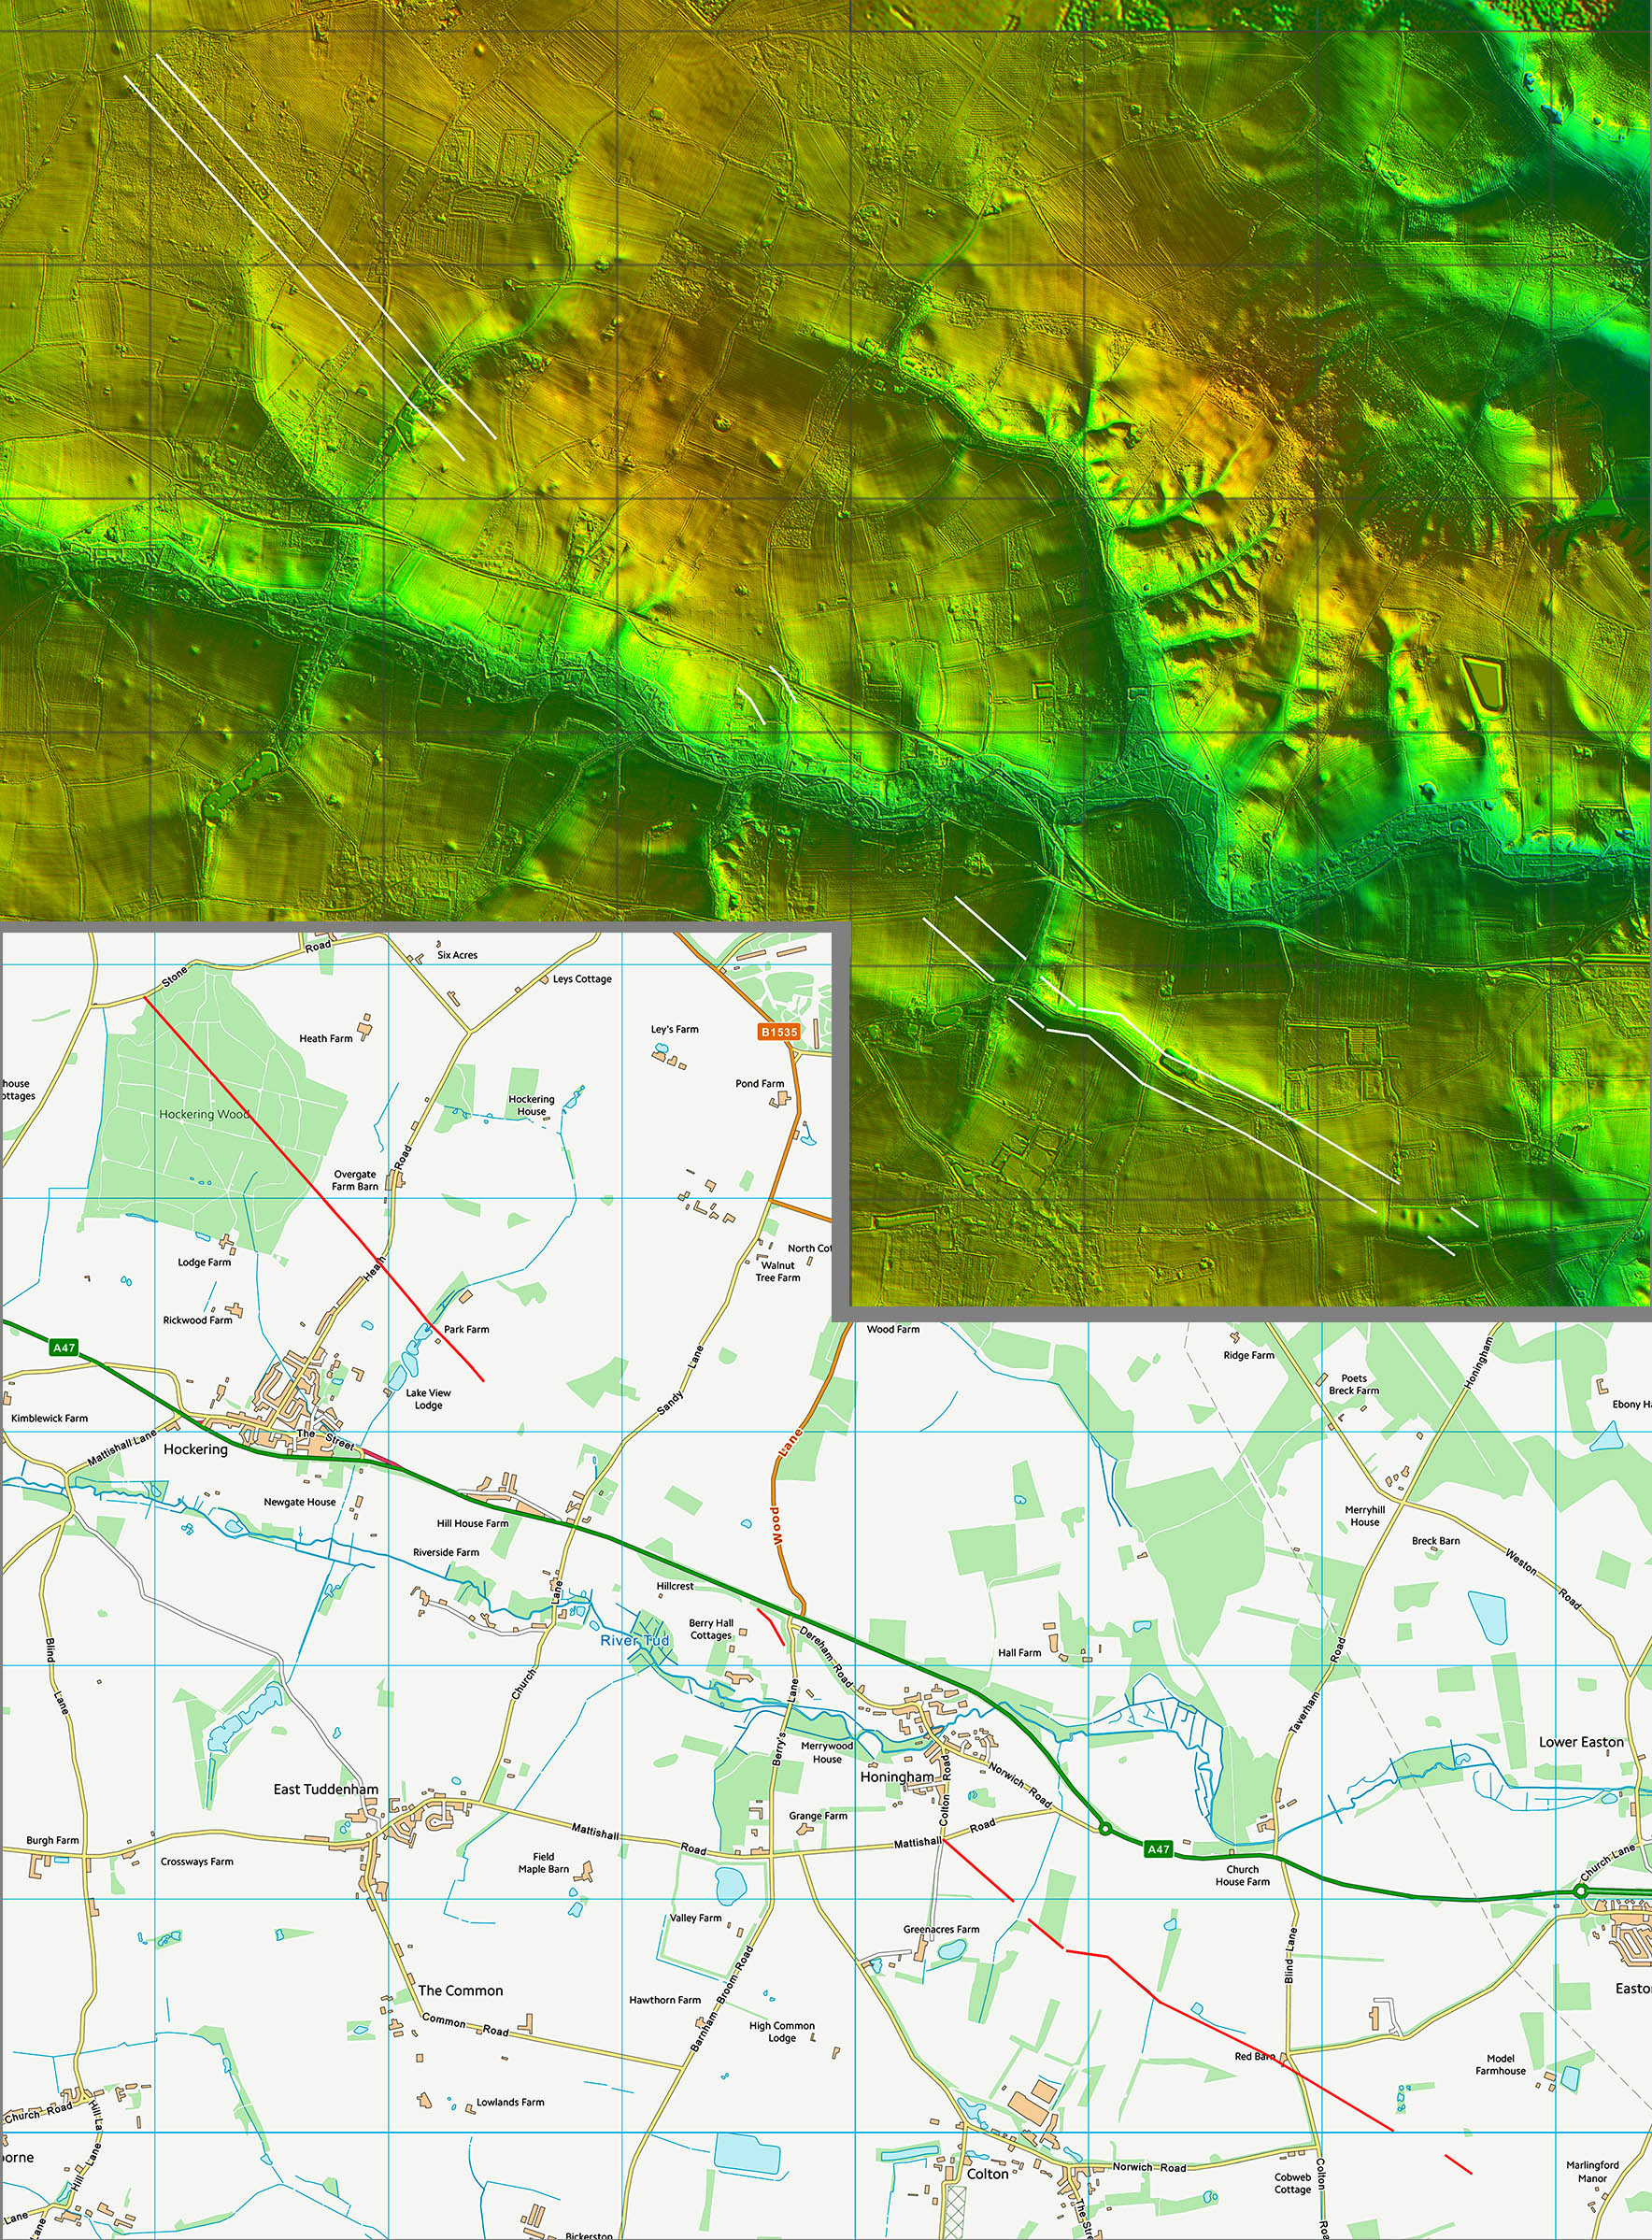
Lidar Image - Hockering Wood to Park Farm
Classic Roman agger in Hockering Woods. This is one of only three such ancient woodlands in Norfolk. As such it has probably never been ploughed so looks pristine. On the ground it is a lot more subtle though and it is difficult to make out in all the trees and undergrowth.
The extension of the evidence south-east of the wood to Park Farm is further confirmation of its Roman pedigree. Out of the wood it has the classic width of a ploughed Roman road - they get lower and wider.It is not just a feature in the woods.
It has now been added to Norfolk HER as NHER 69312.
Click for larger view
Hockering Wood - By the Moat looking SE
In the woods adjacent to the (medieval) moat. As usual an image doesn't really pick out the road so I have added approximate road edge lines.
Image: DR
Click for larger view
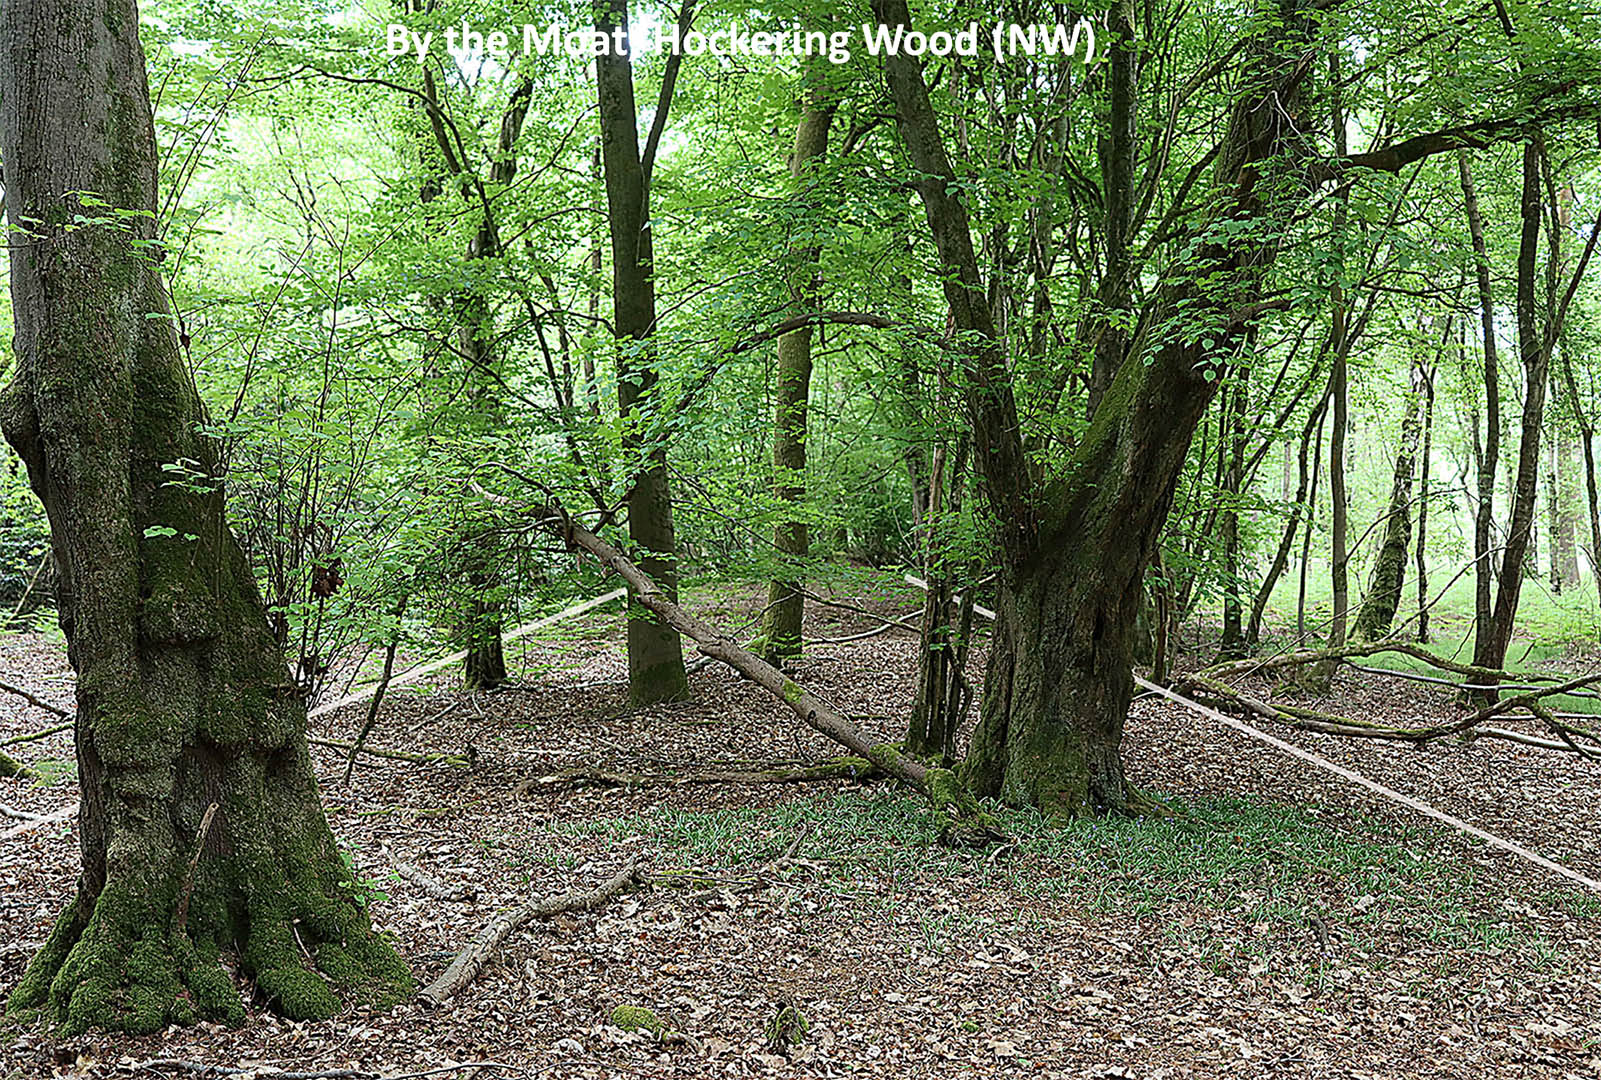
Hockering Wood - By the Moat looking NW
Same spot looking the other way. I attempted to follow the agger but it proved impossible.
Image: DR
Click for larger view
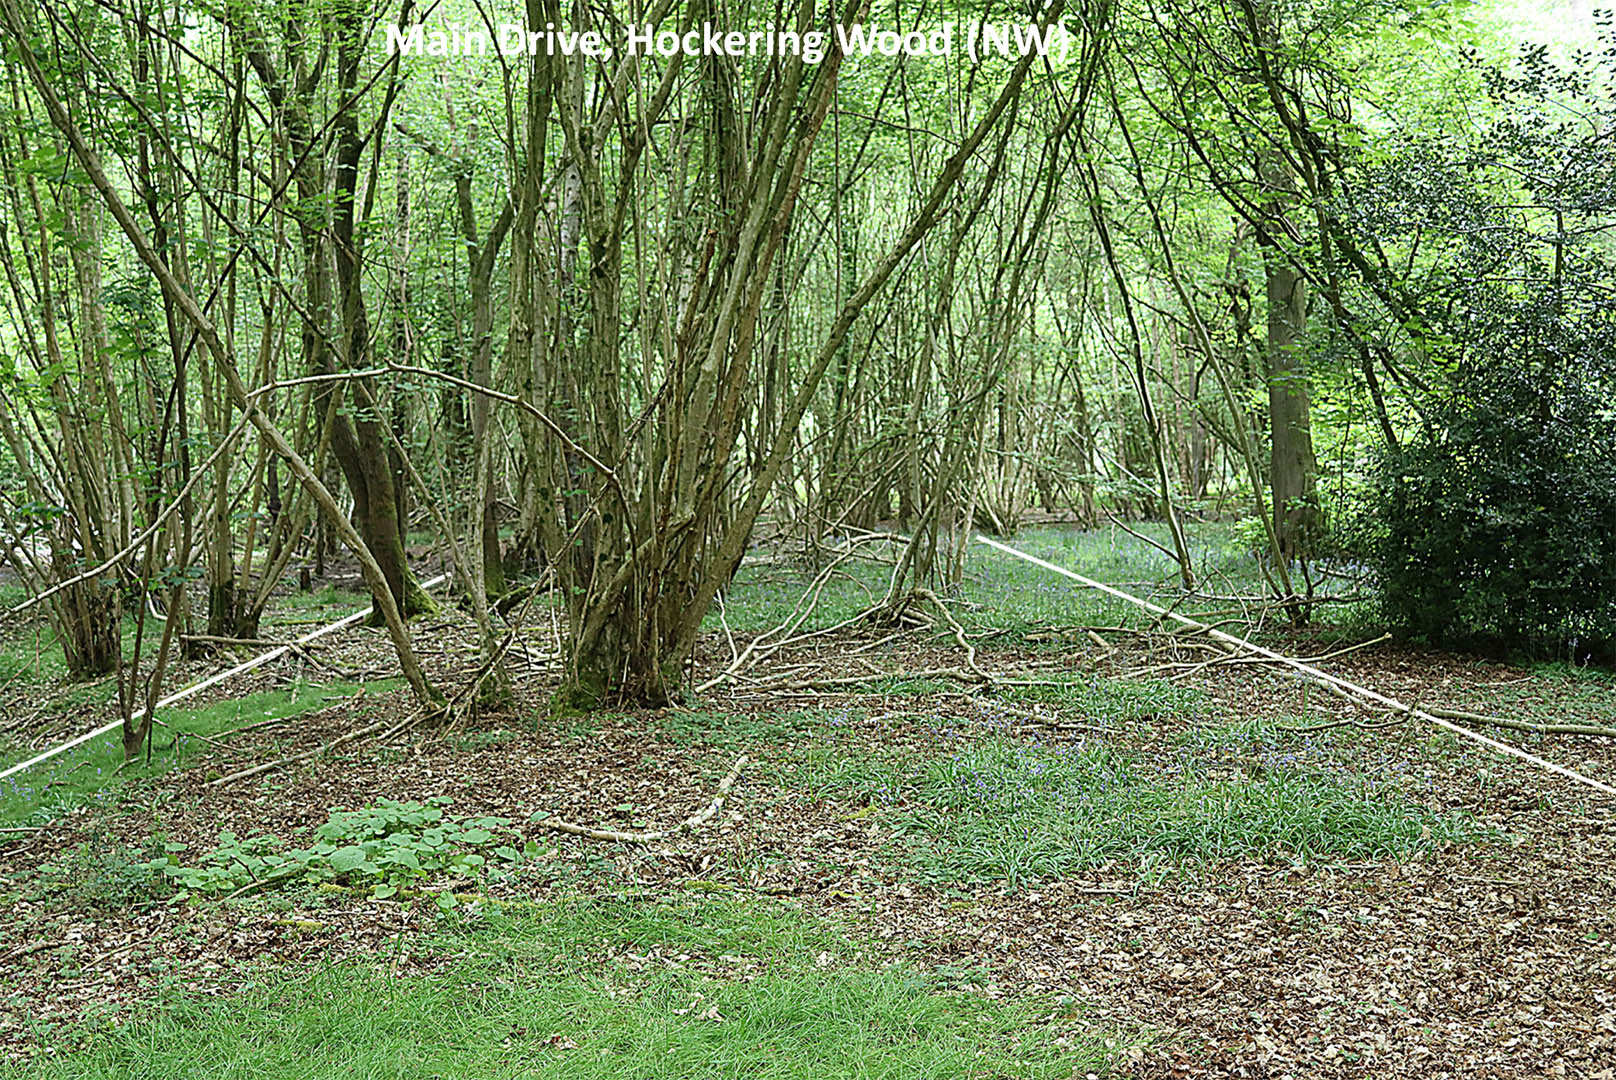
Hockering Wood - By the Main Drive looking NW
This is where the road has crossed the main drive (one of those concrete roads) heading to the wood's north-west corner.
Image: DR
Click for larger view
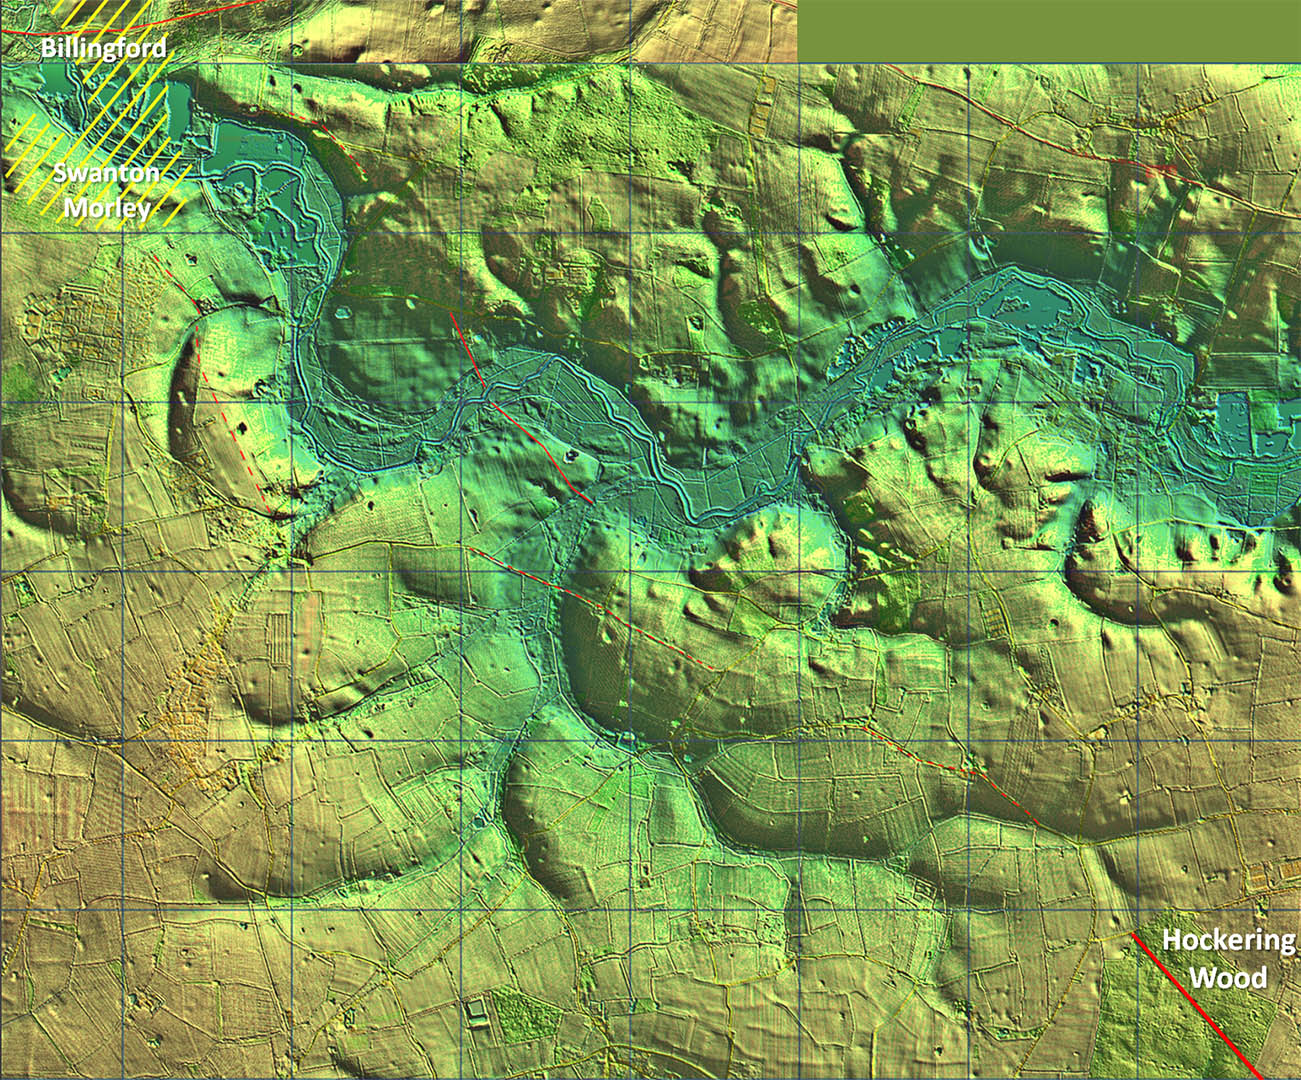
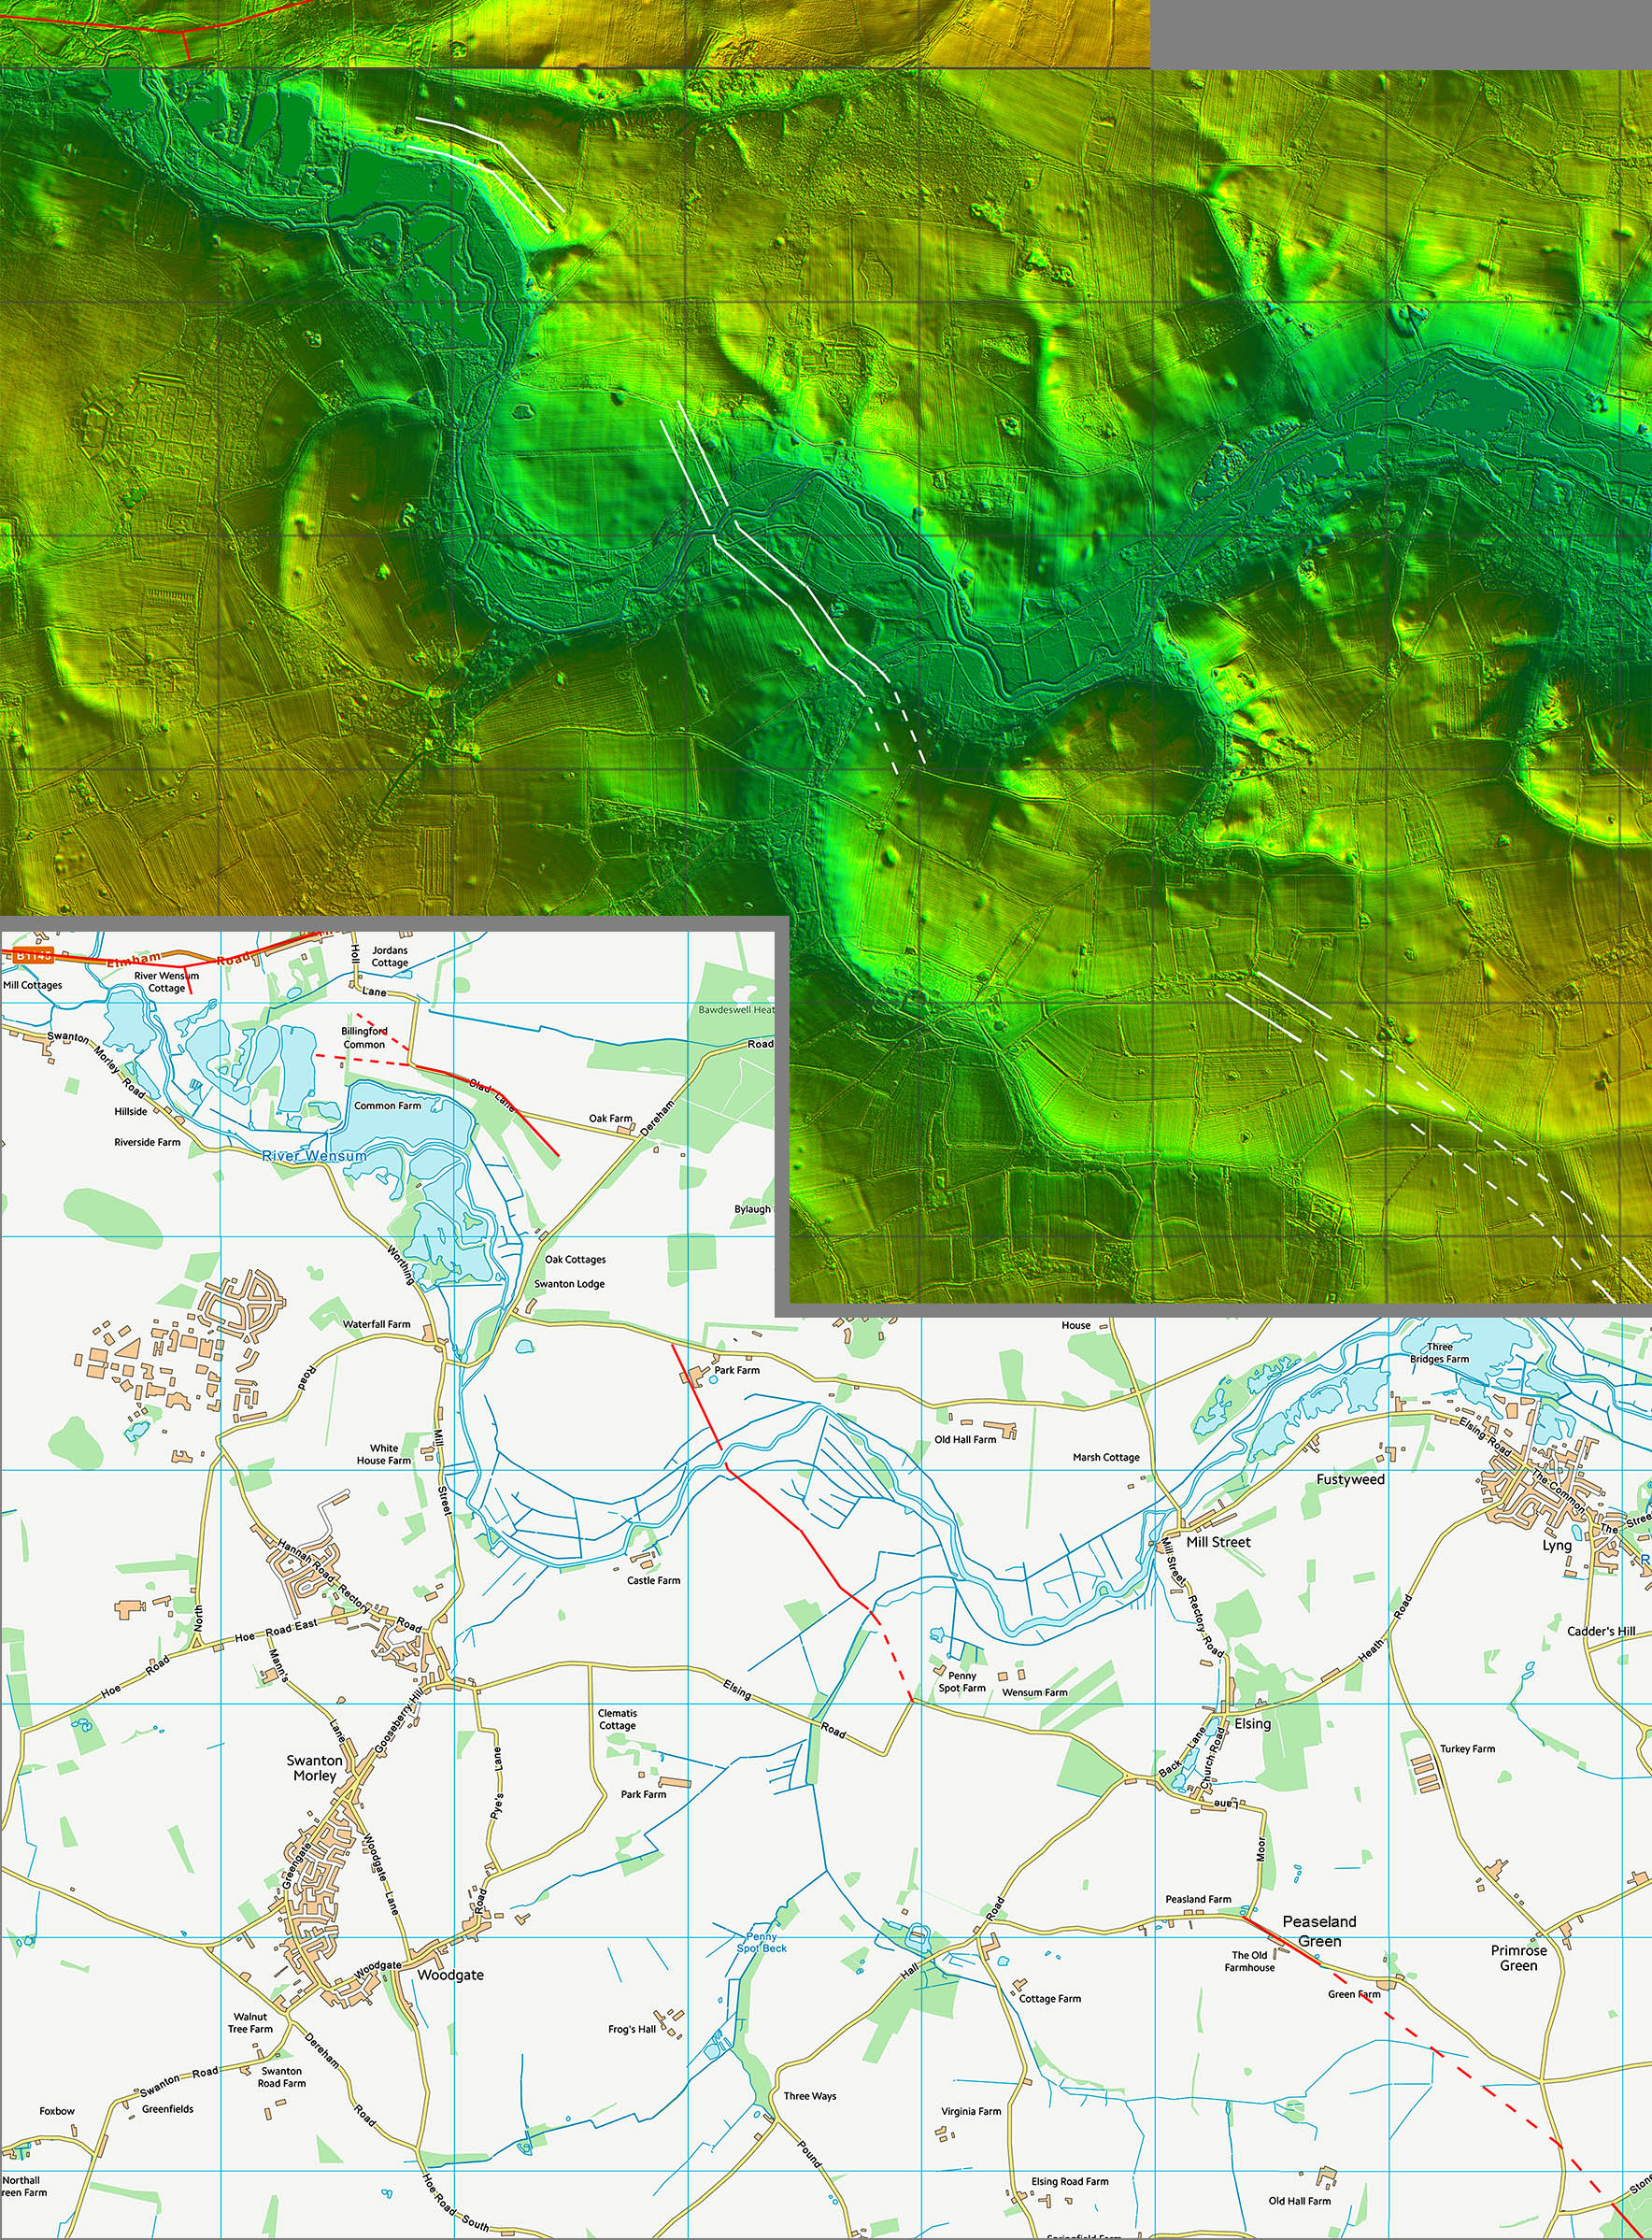
Lidar Image - Possible clues North-West from Hockering Wood
Great progress has been made on linking Hockering Wood to Billingford. The Wensum Way gives access to the section approaching the river and is a pleasant walk.
Click for larger view
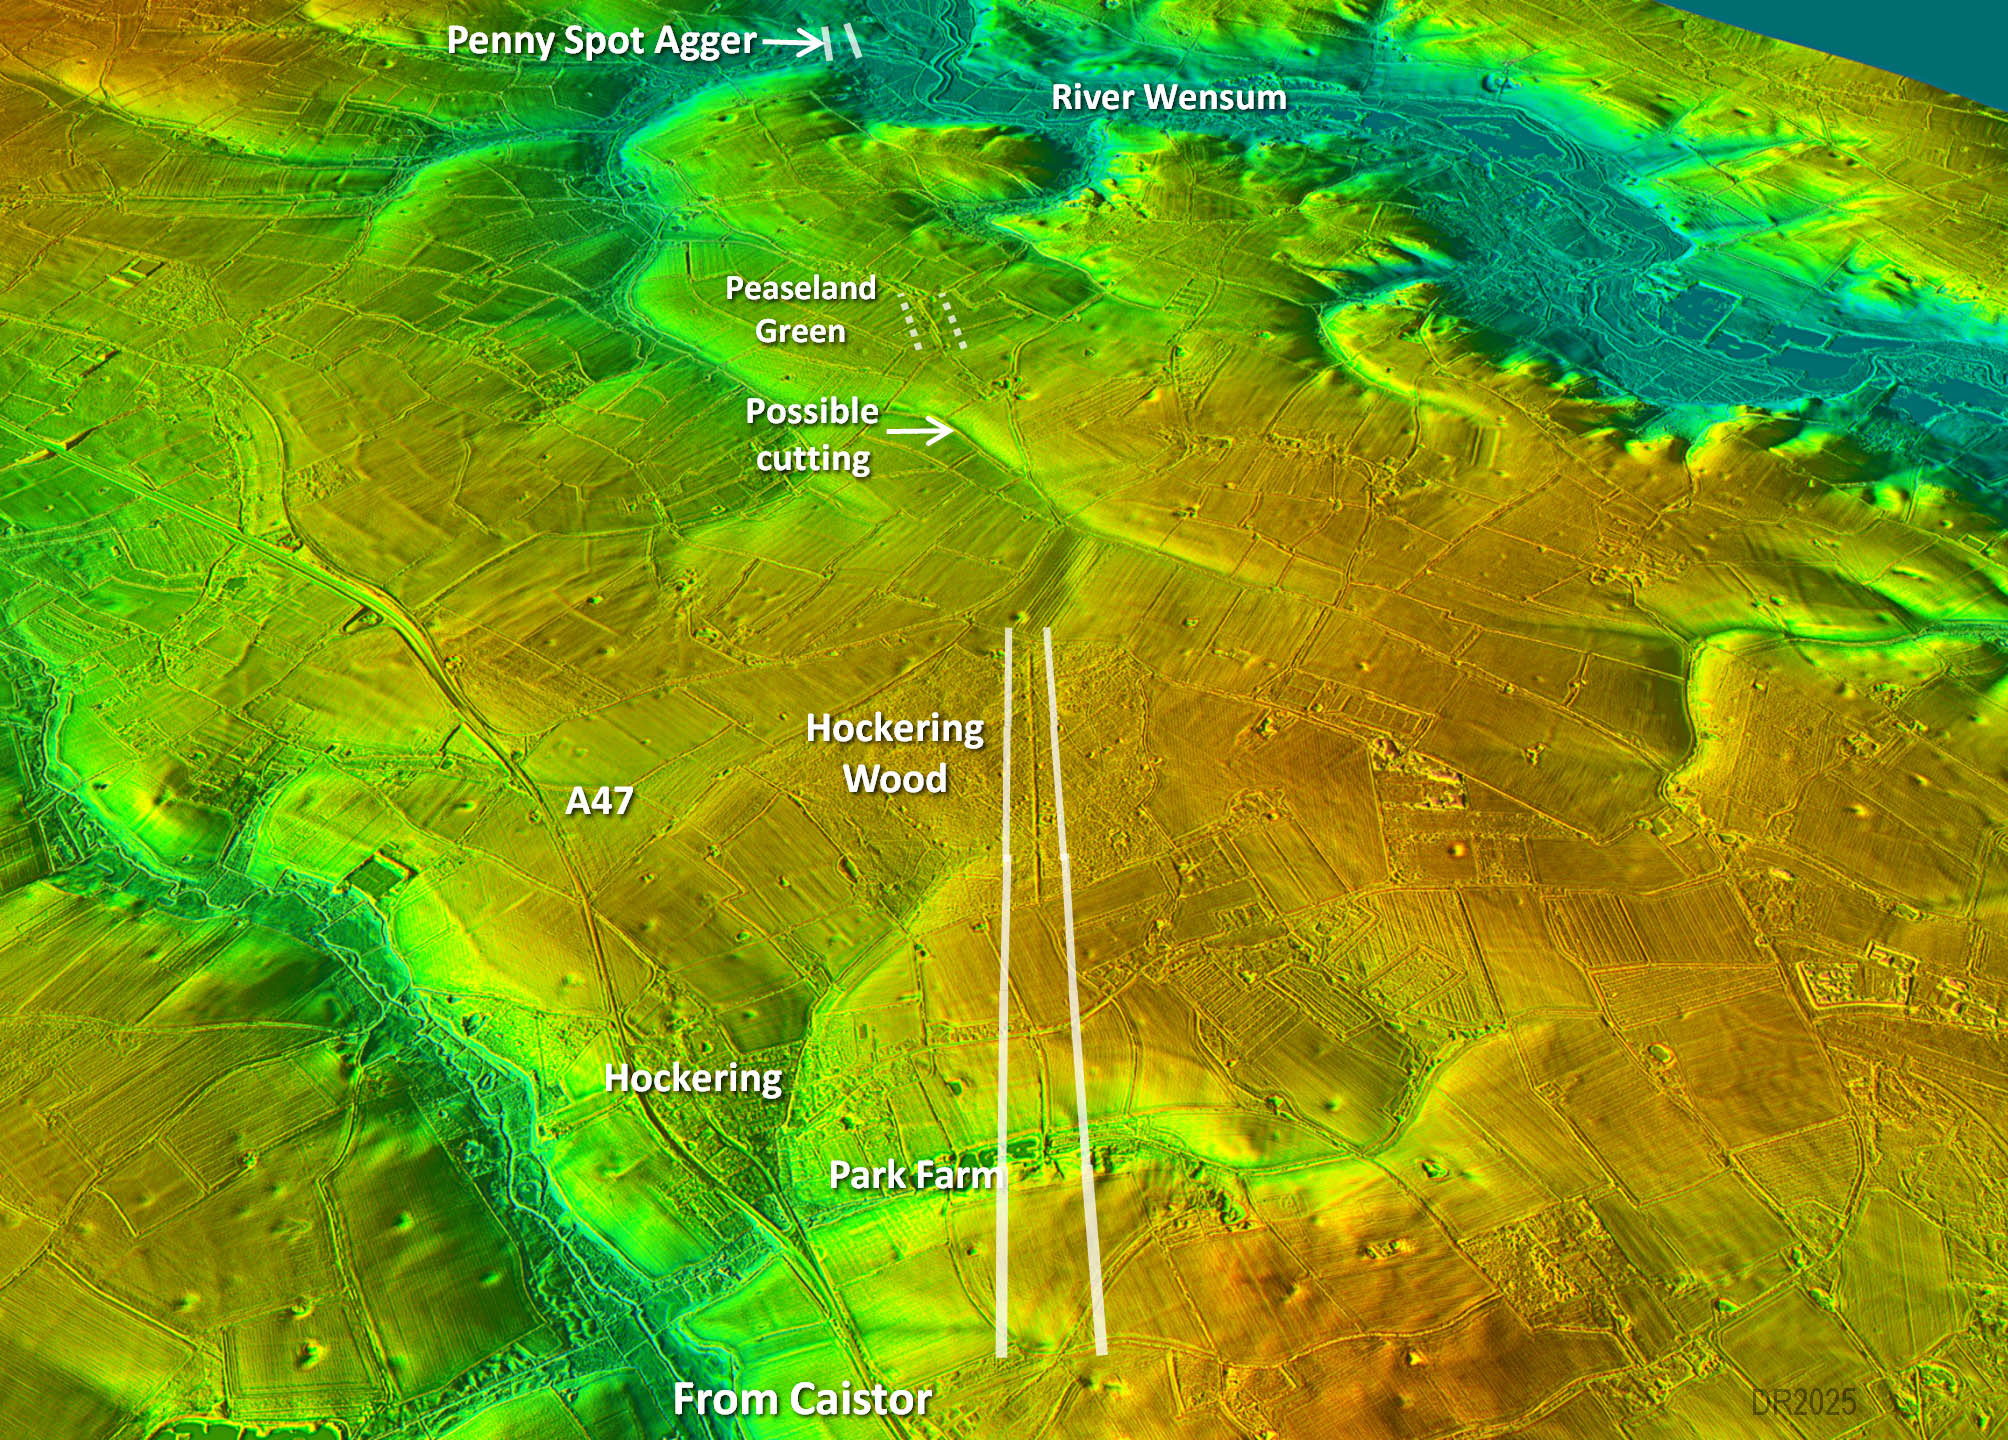
Oblique 3D Lidar Image - Hockering Wood to Peaseland Green
It is mighty subtle but I think we can just make out the surviving traces of the Roman agger to Peaseland Green. Possibly clearest on the far side of that little valley it crosses - the hint of a cutting. The Peaseland Green road (see below) fits perfectly with an alignment to Penny Spot.
Click for larger view
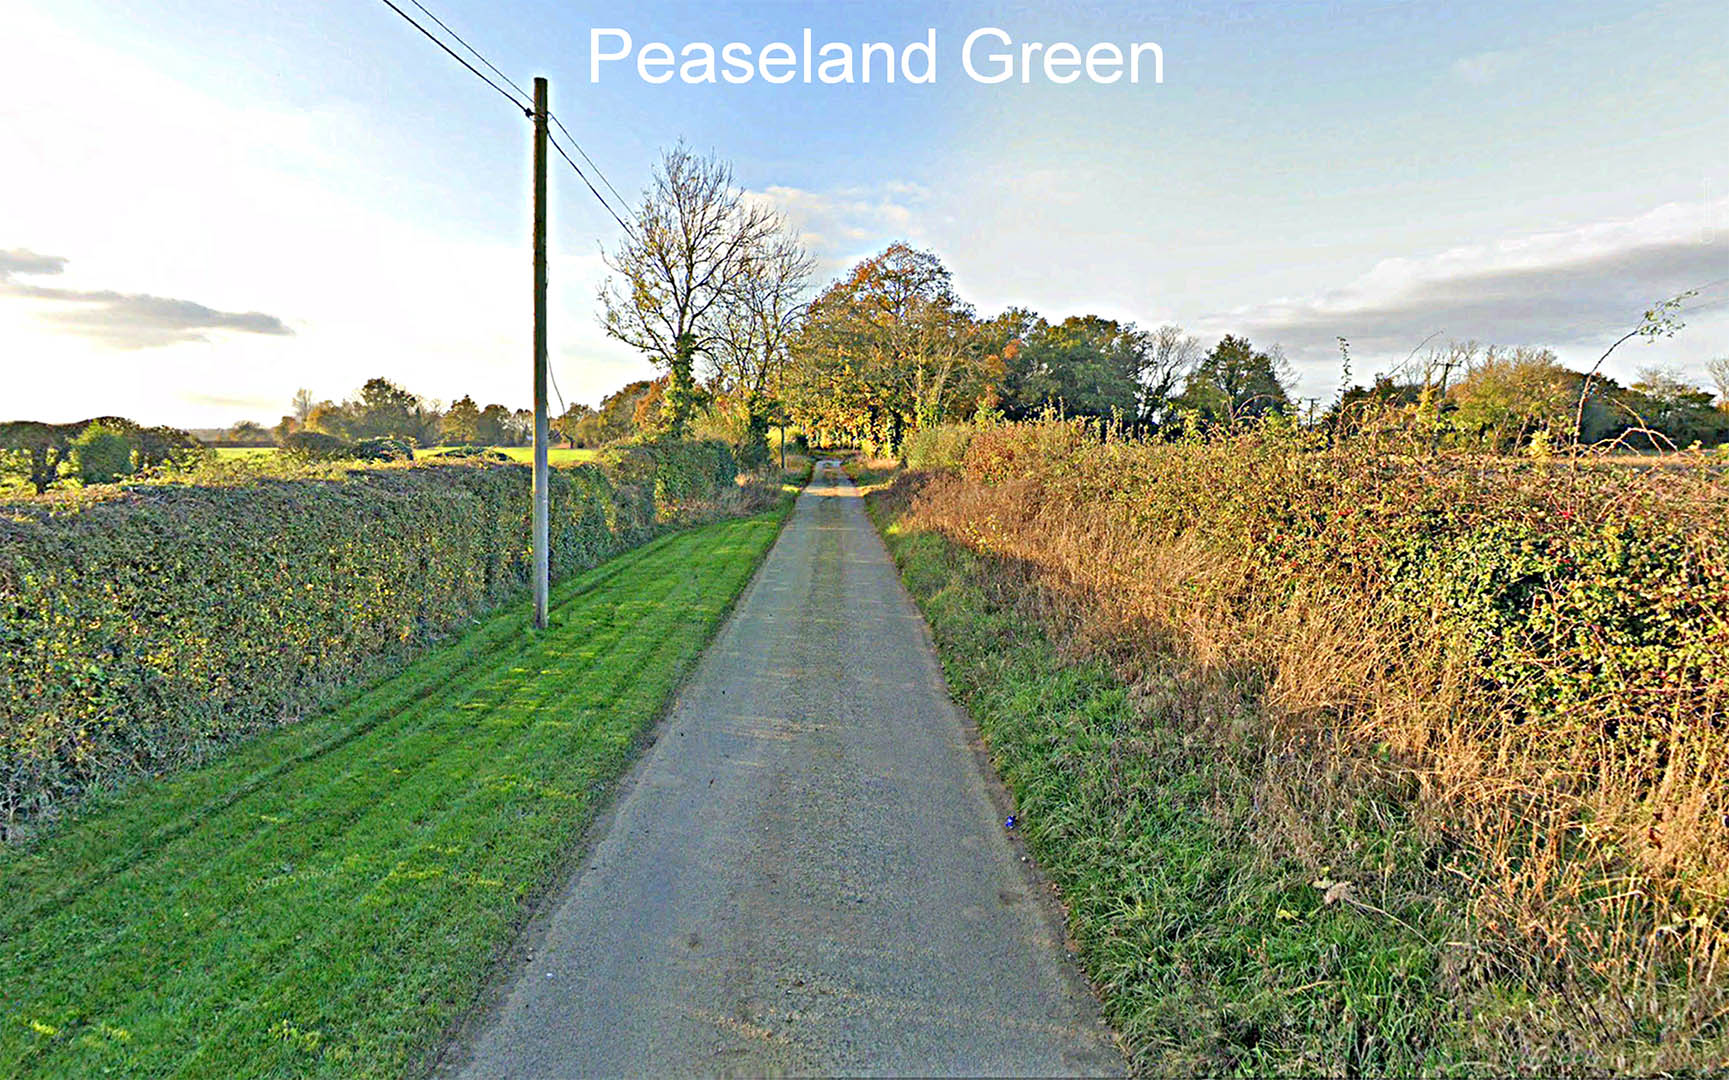
Peaseland Green
Nearly all roads in the area are tiny single track with the exception being this one passing Peaseland Green. It would fit well with a straight alignment from Hockering Wood and onward to the definite road at Penny Spot.
Click for larger view
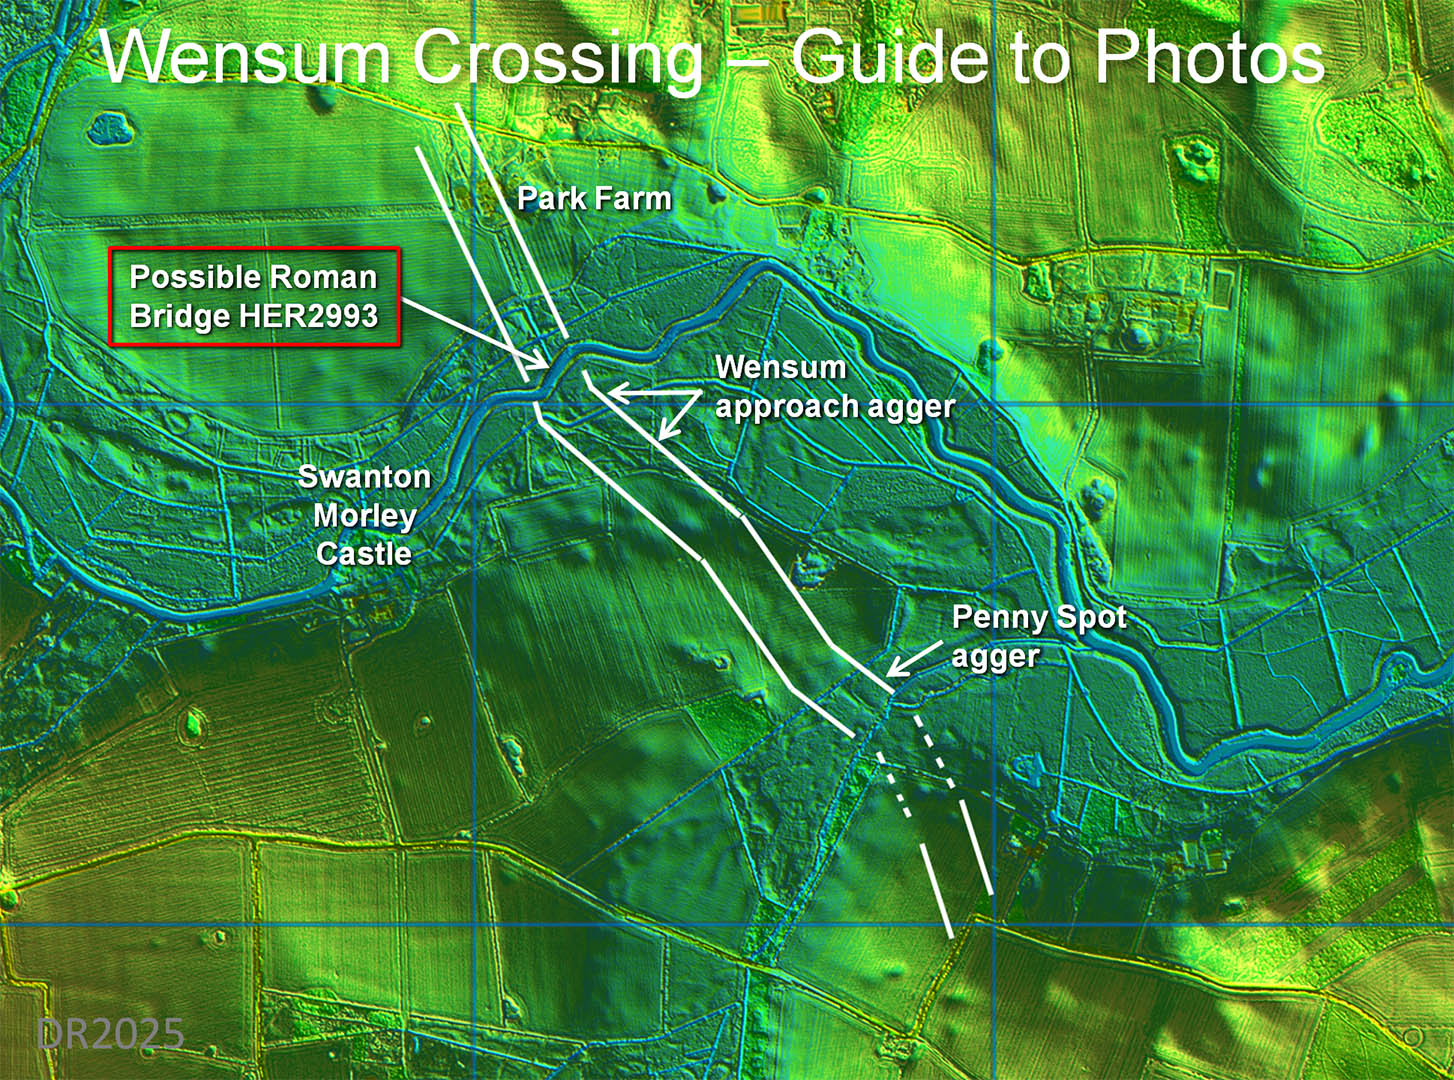
Lidar Image - Wensum Crossing(?)
This is the approach to the Wensum. Would the features visible in the Lidar show up when I visited the site? See below.
Click for larger view
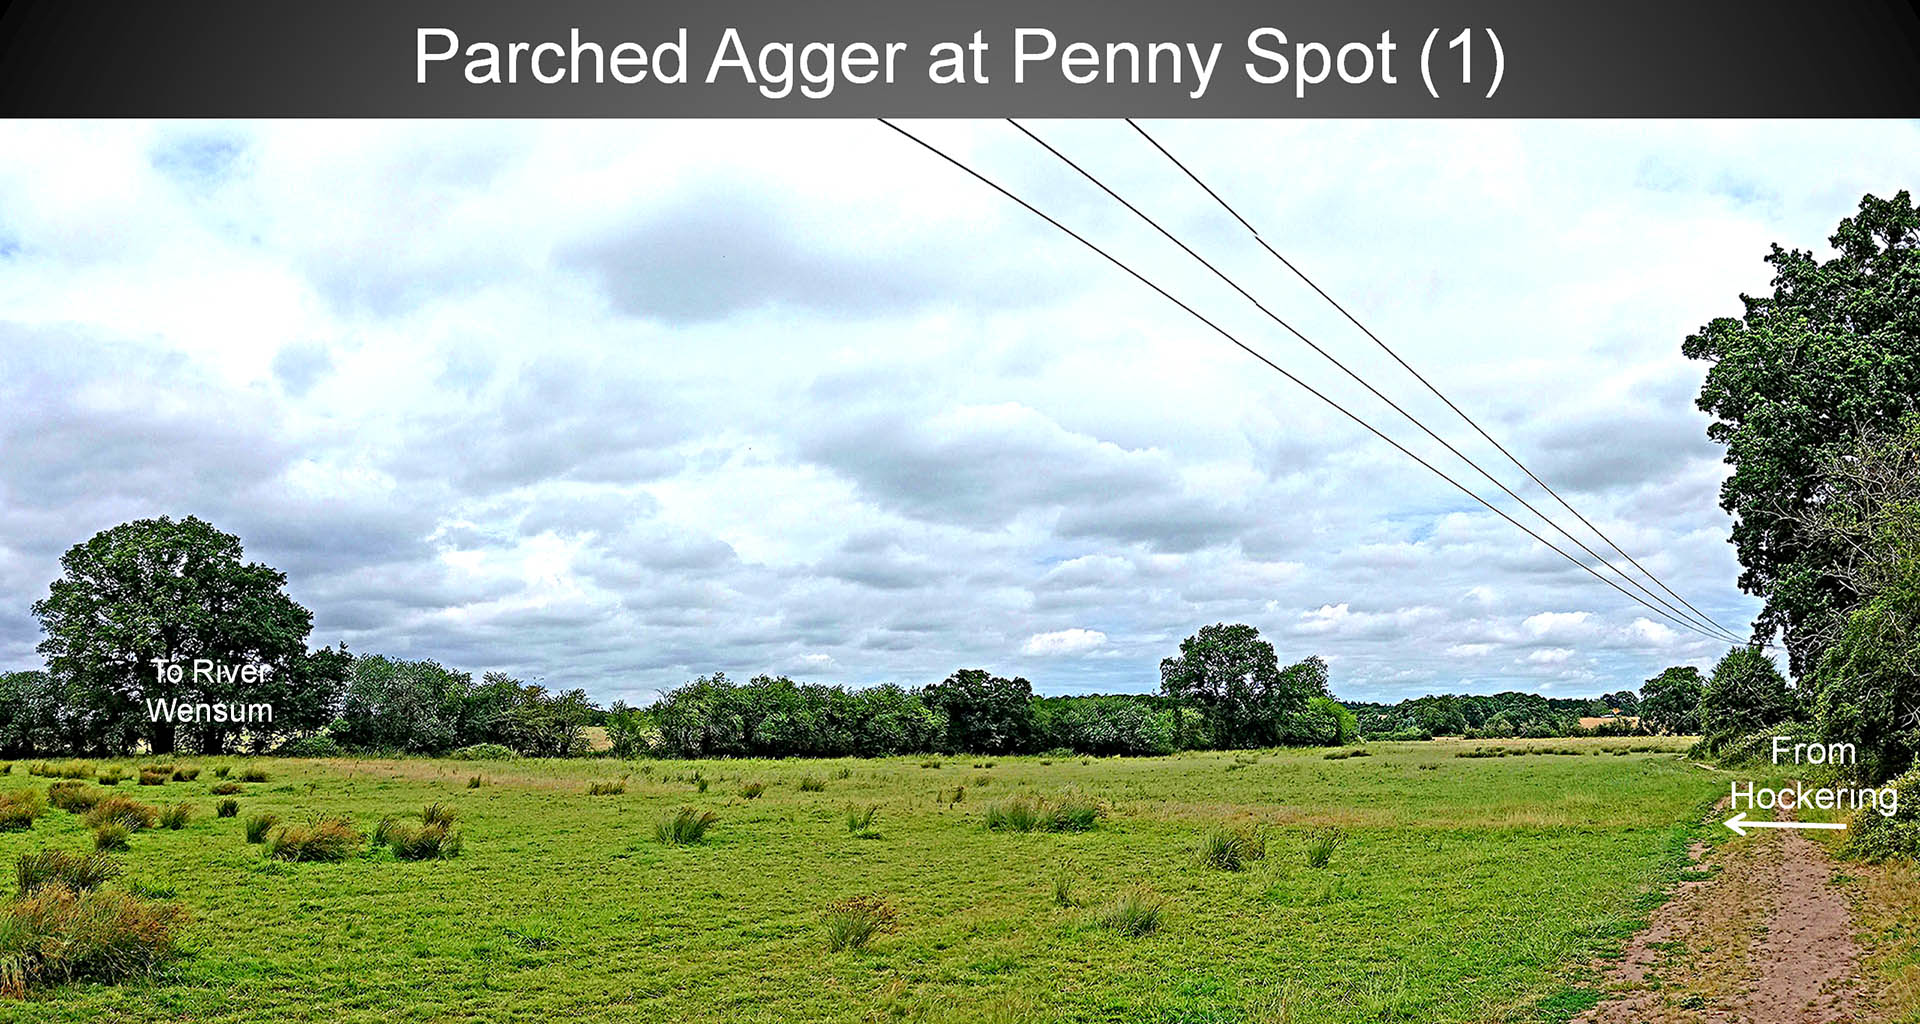
Agger at Penny Spot (1)
Wow - as I approached the Roman line I couldn't believe how obvious the road was. The parched ground on the agger made it stand out.
Image: DR
Click for larger view
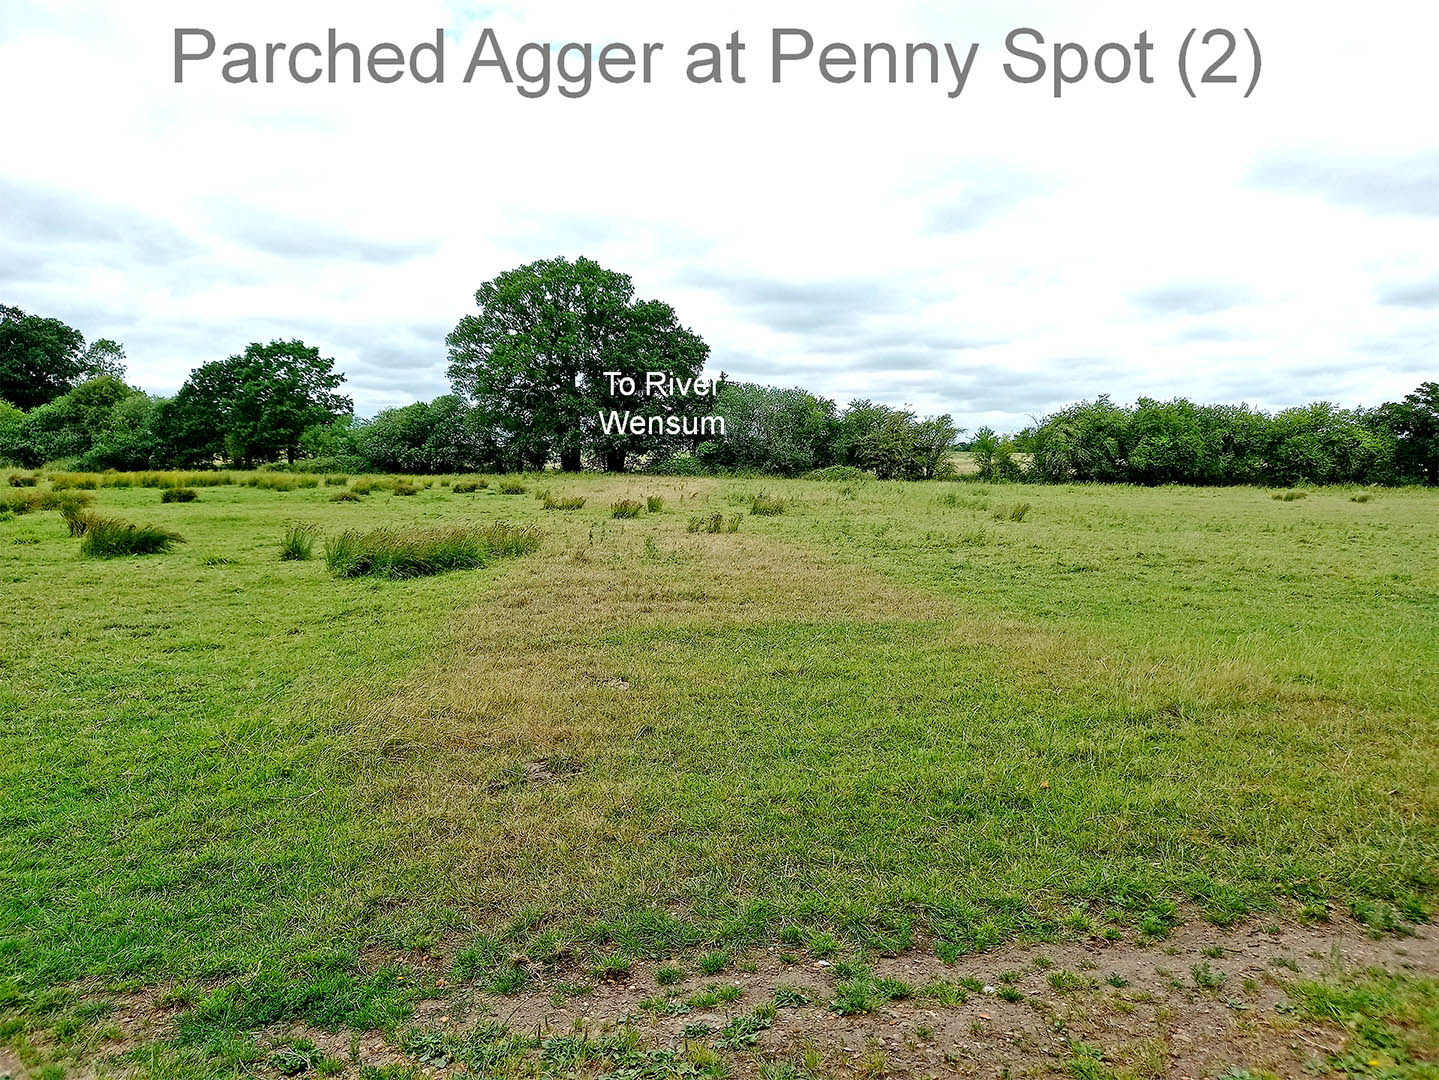
Agger at Penny Spot (2)
I am stood directly on the line and the road is still obvious. Normally with roads I have found with Lidar when you get on site they are all but invisible. Not this time!
Image: DR
Click for larger view
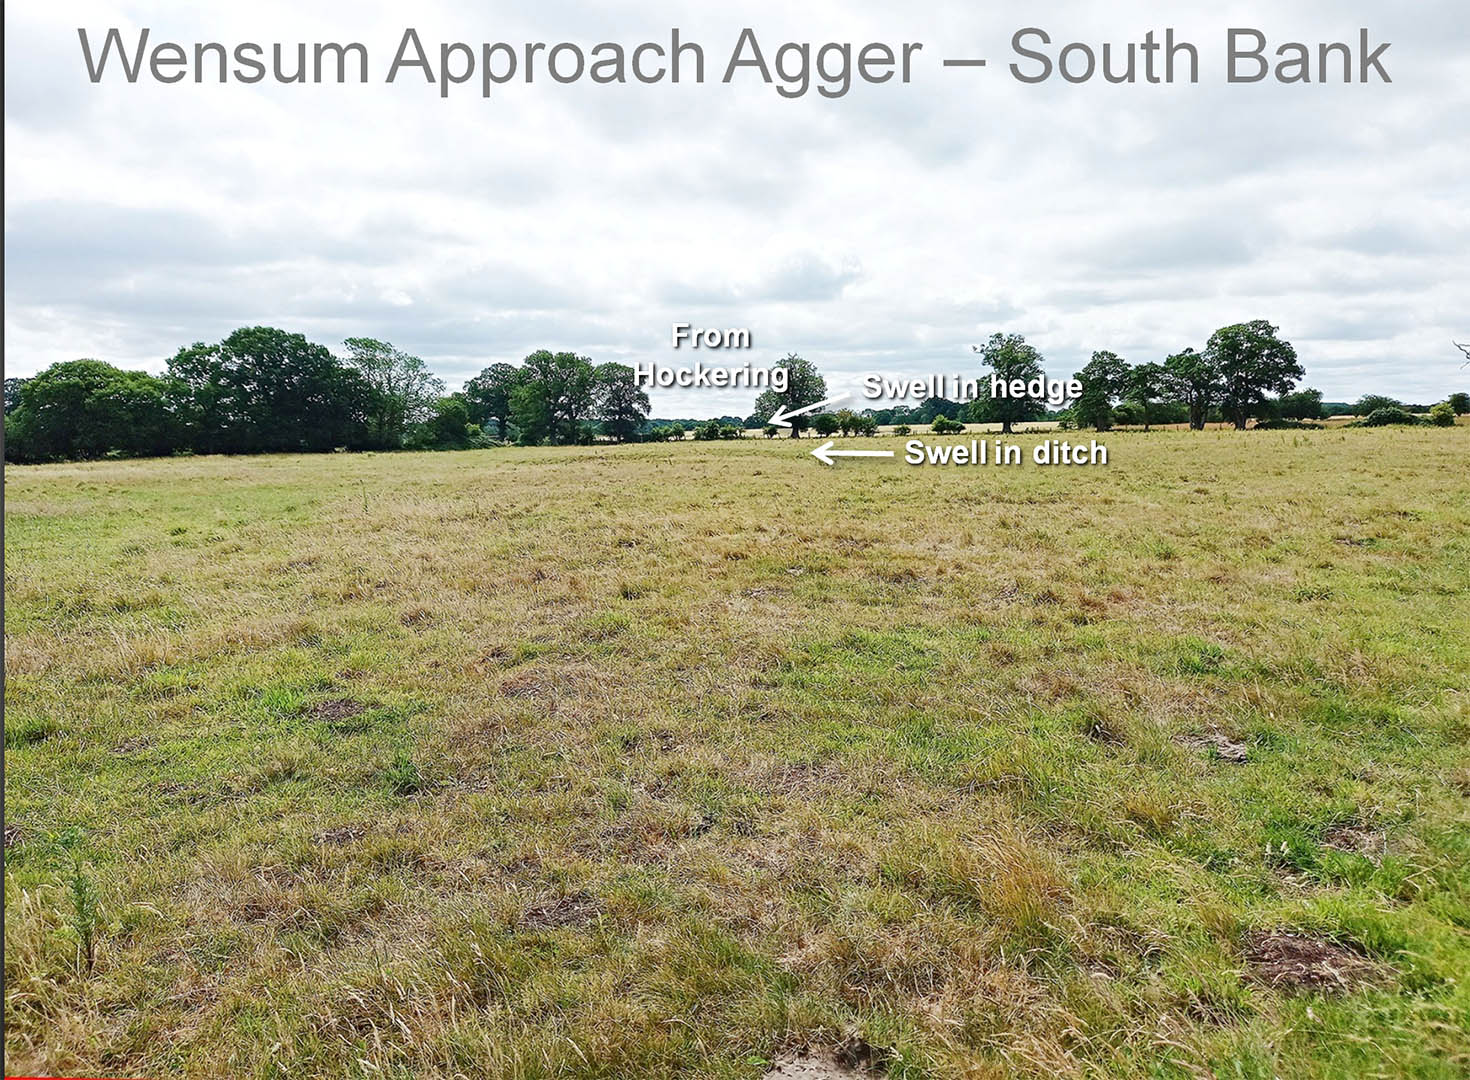
Approach to the Wensum - South Bank
Again I am stood directly on the line and whilst not as obvious at Penny Spot it is still clear. The swell clues help too.
I was unaware that Norfolk HER (NHER2993) had recorded a possible Roman bridge fitting the road perfectly and could hardly believe my luck when I read the details. The HER had no road here just a possible bridge. We now know it is not a "possible" - it is a certainty!
Image: DR
Click for larger view
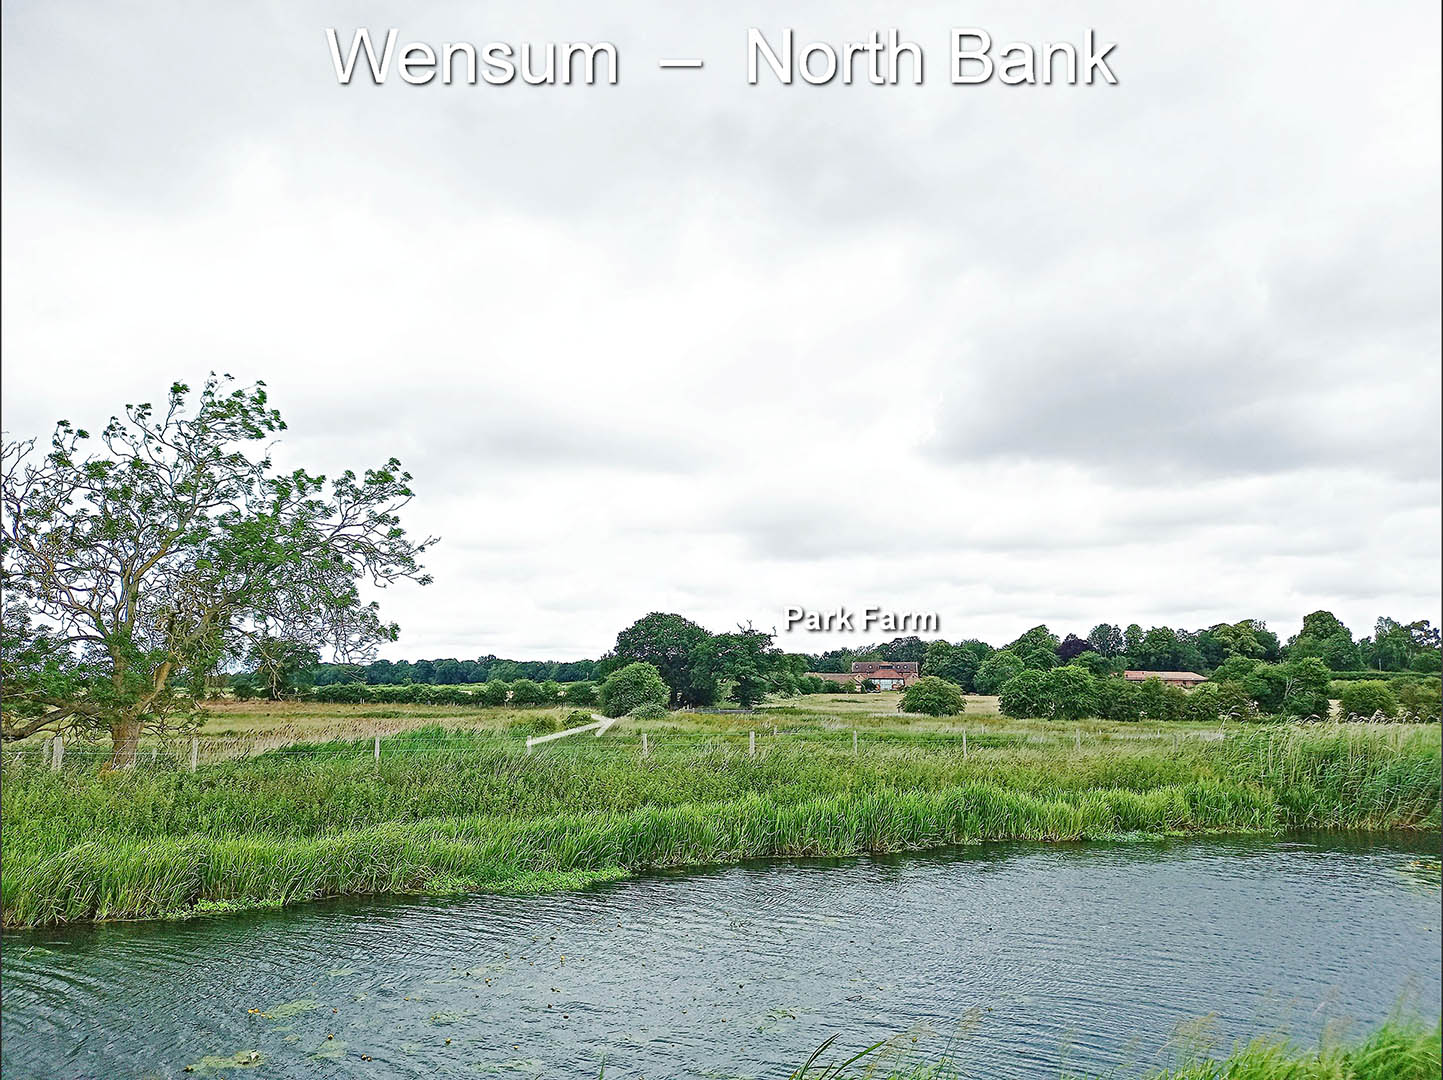
River Wensum - North Bank
This is the site of the "possible" Roman bridge. The road heads up the hedgeline to Park Farm (white arrow).
Image: DR
Click for larger view
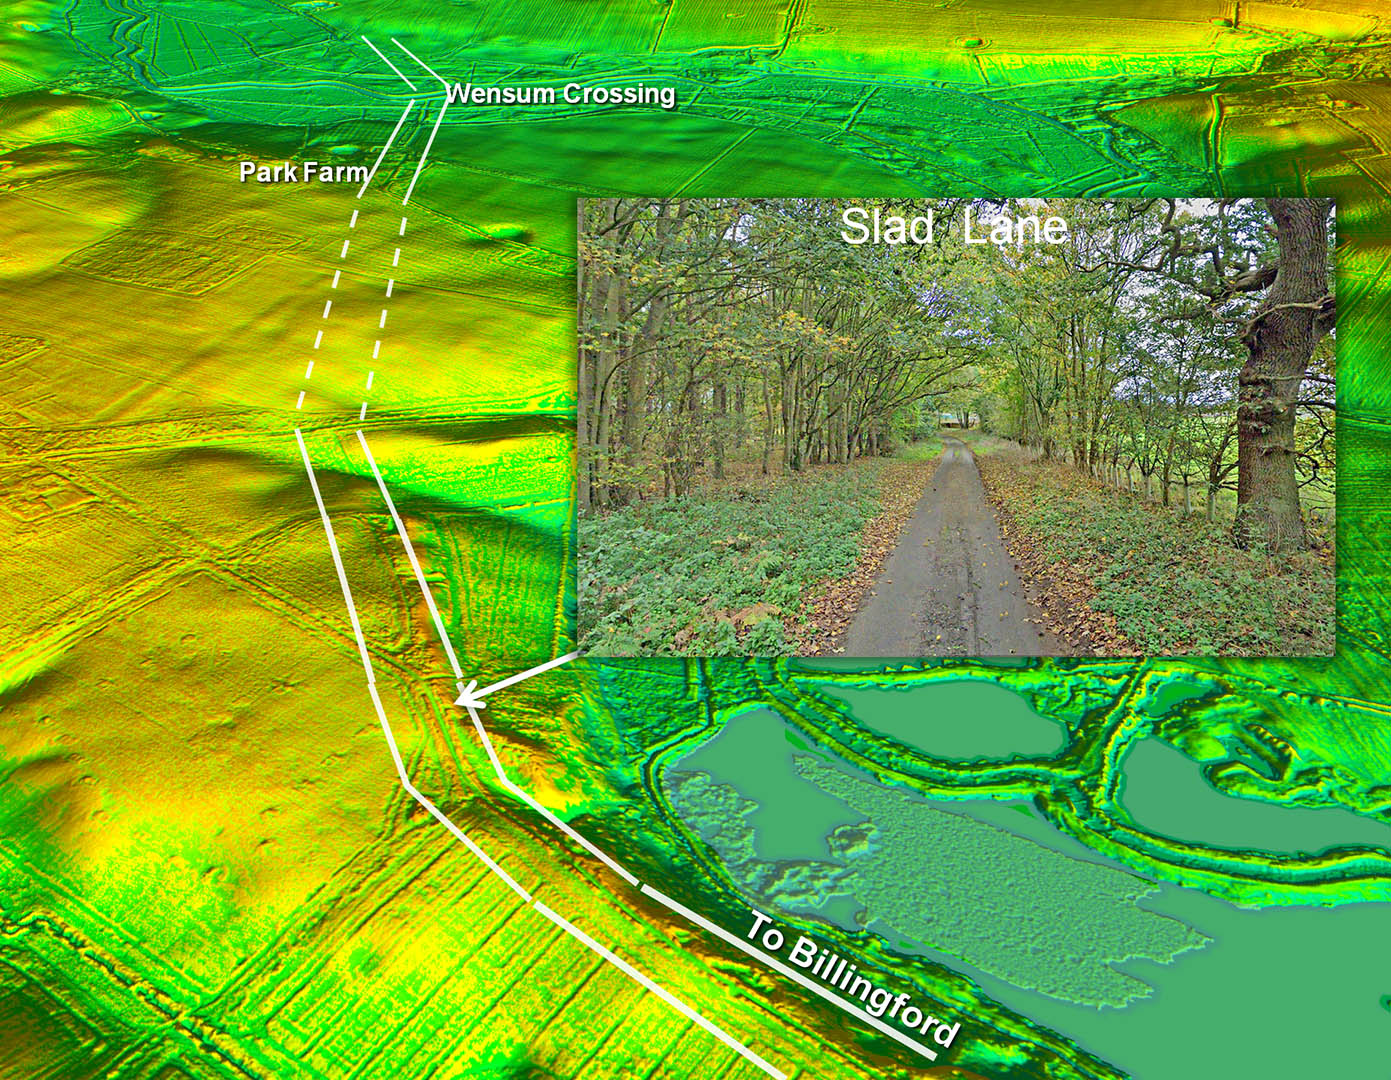
Oblique 3D Liadr Image - Slad Lane looking back to the Wensum Crossing
Between Park Farm and Dereham Road there is no trace but interpolation is probably correct.
Slad Lane is a classic case of a modern lane ontop of a much wider Roman formation. Slad Lane is where the Roman road skirts around the corner for the apprach to Billingford. Admittably around the corner in the distance (inset) then the road gets narrower but this is very likely the Roman route. It is the shortest practical route to Billingford (see routemap4).
Click for larger view
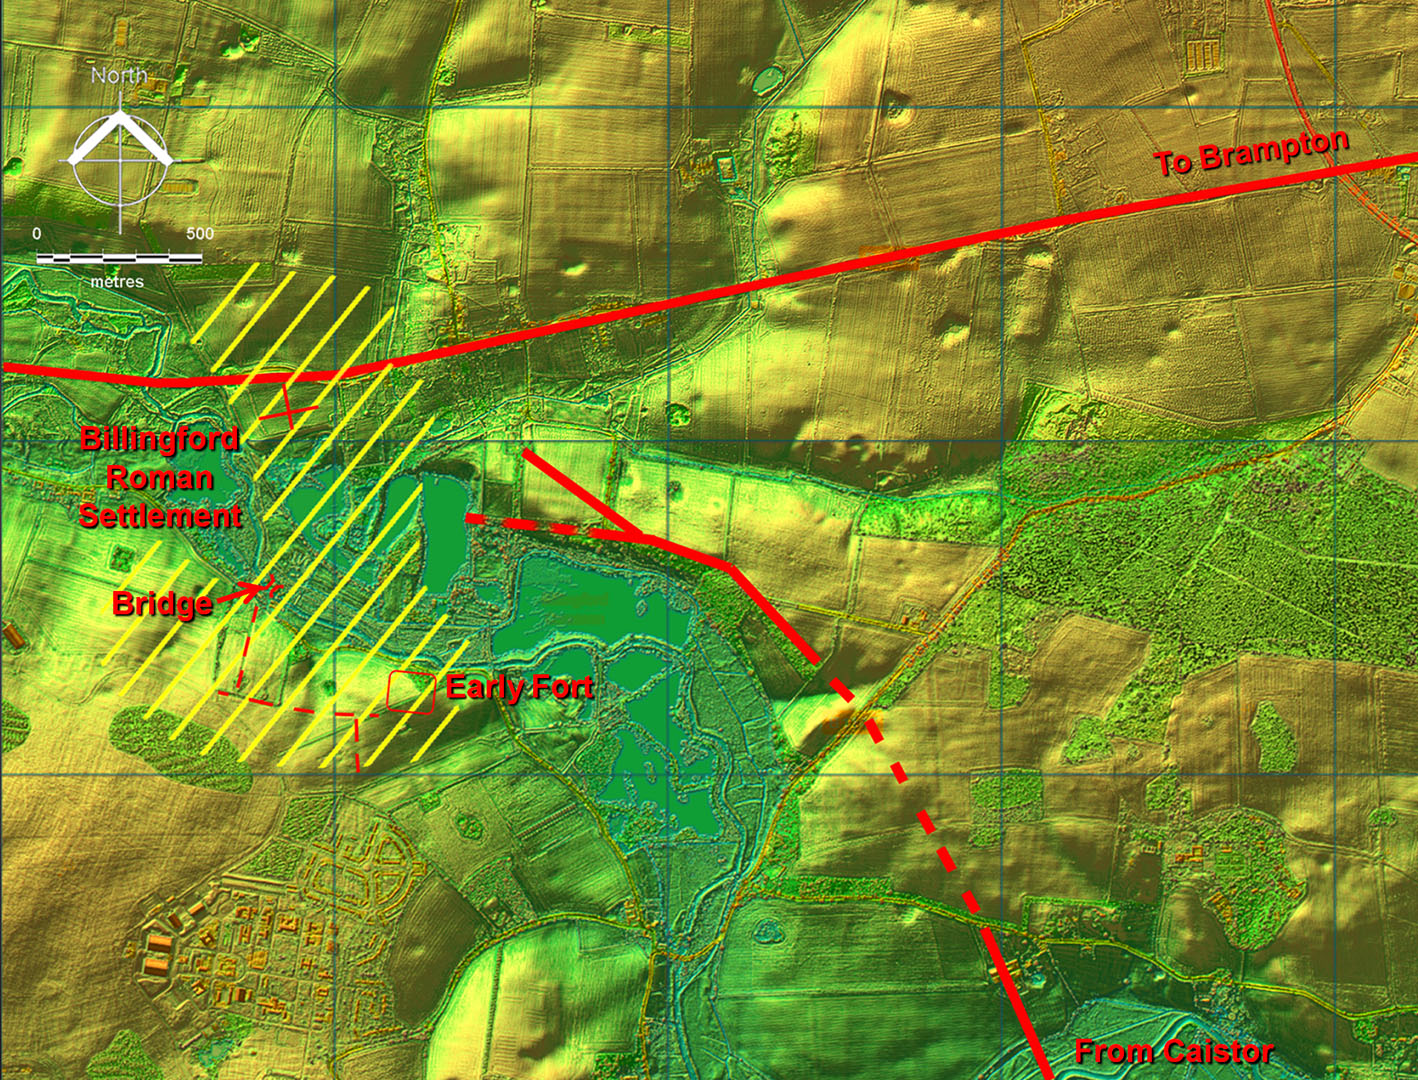
Billingford Roman Settlement
A large Roman settlement destroyed by gravel extraction. The settlement was on both sides of the river connected via a bridge.
Our road from Caistor spilts on its approach to the settlement. One appears to head directly into it whilst the other heads north-west to presumably join the road from Brampton.
Click for larger view
Route Map 1
The route would have left Caistor by its west gate and shared a bridge with the roads to Scole and Saham Toney. So far I have not been able to locate the orad where it emerges from Cringleford.
Click for larger view
Route Map 2
Heading to Marlingford we at last get some clues.
Click for larger view
Route Map 3
Again some annoying gaps but the section through Hockering Wood makes up for that.
Click for larger view
Route Map 4
From Hockering wood to the Wensum crossing the route is a bit vague but the actual river crossing point is confirmed.
Beyond the Wensum then Slad Lane is the section near Billingford (top left).
There appears to be two roads into Billingford. One aiming directly to the settlement and the other heading more north-westerly so perhap a bypass.


